| Author | Message | ||
Riviera |
Recently purchased this bike and am now giving it a good going over while waiting for spring. My Service Manual should arrive by UPS today. I imagine the bike (11k miles) still has the stock gear. I plan to change it out for the Hi-Perf bronze gear right away. Is the "special tool" that I've heard is necessary for the gear change available to purchase? Or, can I make my own tool to do the job? Also, I read here somewhere that the factory Service Manual mistakenly states 1 Qt. (32 oz.) lube in primary case, when it should actually be only 28 oz. Is that true? | ||
Oldog |
Riviera: Al sells the tool, its cheap ( holds the piniongear for tightening the oil level may be too be to high I have been putting the quart in the tranny, but I have been having slip issues I think I am going to try the 28oz option this time. | ||
Reepicheep |
At 11k miles, you should have enough visible wear to know if you need to change the gear or not. Just drop the oil pump and inspect it through the hole. It appears to be a tolerance stack issue. You cant afford to ignore it, because you don't want your first indication that you are one of the unlucky 5% to be a blown motor. But I bet 80% of the bikes have no problem at all, and 10% are in a grey area. | ||
Riviera |
Reepicheep, I agree. No matter what the current condition of my stock gear, I'm planning to replace it with the improved, brass gear. If for nothing more than peace of mind. I'll check American Sport Bike for the tool. Thanks to all! | ||
Riviera |
One more thing. On the American Sport Bike site for the replacement gear there's this Note: Note: you must remove one rocker box and put the other cylinder at TDC on the compression stroke to remove the cam cover. Why would I have to remove the cam cover to get this gear out? | ||
Oldog |
Why would I have to remove the cam cover to get this gear out? Its under it  | ||
Riviera |
Ha! You funny man. I thought the gear in question was accessible from below by just dropping the oil pump or it's cover. I guess not. That must be for inspection only. Thanks! | ||
Reepicheep |
Maybe if you got *really* creative with a dremel tool, you could get it out. Ohhhh, but you wanted to put a new one in?  I have all the parts sitting in the garage (except that plate) to do this job... as my 9sx is chewing on that gear slowly and I am now pushing 26k miles. I also have the updated oil pump. I did it on the M2 without the locking plate, but I'm sure it involved some absurd reaches and stretches and gyrations. Or (come to think of it) a 2x4 through the rear wheel. | ||
Hugie03flhr |
2x4 or a bungee on the brake always worked for me.  | ||
Riviera |
Right. I just found that the special tool isn't necessary unless the engine is out of the bike. In the bike, just put it in 5th with the rear tire on the ground and someone sitting on it and depressing the rear brake. What does the "updated" oil pump consist of? | ||
Texastechx1 |
increased volume, like 10% or more IIRC. | ||
Hugie03flhr |
Texas is right Riviera, or at least that's what I heard too. It's the pump used in the 2007-08 Buells. I hear it also has better scavaging and can handle high RPMs for a long rides better than the oil pump. | ||
Riviera |
I wonder if the pump's internal gerotors (I think they're called out separately in the Parts Manual ??) can be fitted into the stock pump's housing to raise the pressure? For the oil pump drive gear replacement, the Service Manual says to remove the cam sensor in the gearcase cover and then the rotor before removing gearcase cover. That seems unnecessary. Can't the sensor assembly be left in the cover, just setting the coveraside, still connected by the sensor harness? Can't rotor also remain attached to its cam? | ||
Oldog |
Riviera:  Go look at the parts on the bike. the short answer is yes/no, The sensor is attached to a plate that must be removed to remove the cup. you are leaving the wiring and plate on the gear case but removing the sensor plate from the bore, Then sliding the case and attached wiring off of the cam spindle after you remove the cup. From My experience, many times things that seem like they can be skipped are listed in the repair or inspection procedure for a reason. DAMHIK There are some exceptions, ( fork oil change) or Gear box removal come to mind the rest should be considered as must do. While we are at it consider this if the oil pump moves 10% more oil, the gerotor of the oil pump may be 10% larger How could it be that it would fit the housing? If you wish to upgrade I would replace the pump as a unit, The T-storm (sportster) engine is roller bearing construction using High volume and low pressure to oil itself. The pump is built in two sections feed and scavenge The primary inprovements in the oil pumps have been aimed at removing the oil from the engine sump areas, (Scavenge) | ||
Texastechx1 |
the gears inside the pump are taller, theres a pic somewhere on here. this is what gives you better volume. I do not know if the entire assembly is taller b/c of this... i would think so but I'm not sure... i've seen the old gears and the new gears side by side but not the entire pumps. I remember that the diameter of the gears were about the same too maybe when i finally get the cash to do the swap i'll rip em apart and take pics | ||
Riviera |
Ok, got the new drive gear in this past Saturday. Couldn't find a reasonable way to secure the gears to remove the nut. Thought i'd have to wait while I ordered the special tool. Called local HD parts Dept. on the long shot of them having it, which they didn't . Parts guy said he used a piece of wood jammed between gears to lock them in place. Sounded reasonable. I used a piece of thick plastic from a bondo spreader. Worked well. Photo attached. My original steel gear was in good condition. Teeth are still full width on top and the wear pattern is uniform and centered across majority of each tooth face. Photos attached. I still have to get rocker boxes back on. They appear to have a sorta brushed finish to them. They're somewhat dull and spotty from age. Anyone got a tip on cleaning them up without making a bright, polished finish? How about some heavy steel wool action for a brushed look? As long as I was this far I replaced all oil lines with oil cooler specific (400psi) hose. Removed oil tank to clean it and that area of bike. It's a pain to remove. 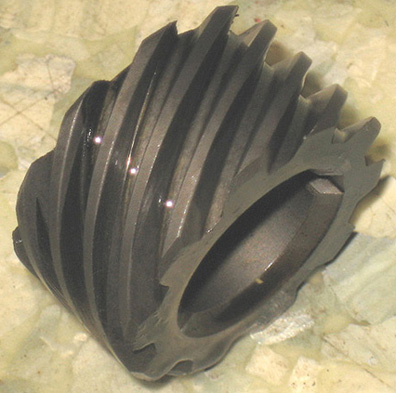 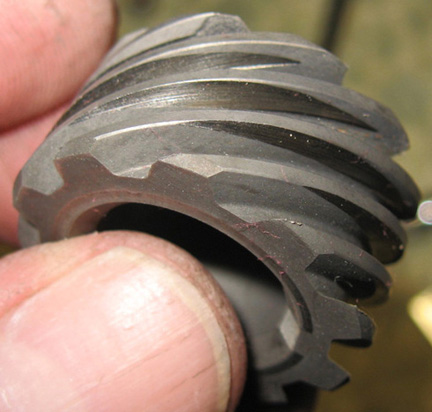  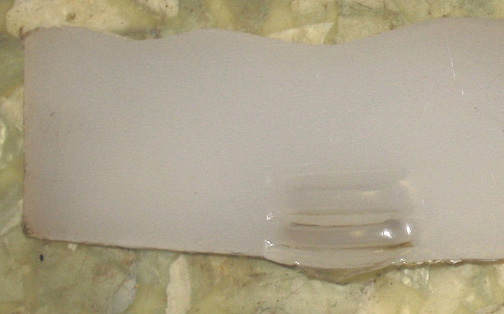 | ||
Oldog |
Rivi: that gear exibits the grenade wear pattern good catch. I hope that wedging the plastic between the gears will not cause problems.. Oh BTW I notice that the wear pattern is un even side to side. | ||
Kalali |
"...that gear exhibits the grenade wear pattern..." What do you see on there that tells you that? Just Trying to learn. Thanks. | ||
Akbuell |
FWIW, when I did my oil pump drive gear, I got the special tool. I have used the rags/wood/rear brake system back in the day with iron head Sportsters, but the tool was worth every penny when it came time to torque the nut back on at reassembly. Just for my own peace of mind. | ||
Riviera |
"I hope that wedging the plastic between the gears will not cause problems." I imagine no more problem than wedging the gear against the steel special tool would. | ||
Oldog |
The steel gizmo for holding the gear is bolted to the case the rotational force applied to the crank is a twisting force only ( unless you stand on the wrench ) =) By putting a wedge in the gears you applied a bending moment to the shaft, in theory you ran the risk of bending it slightly, which could cause problems. In that the shaft is several inches long and quite slender not a good idea. Also the plastic mashing between the teeth could alter the torque readings that you got and the nut may not be tightened correctly, ( plastic is absorbing the twisting force ) Kali look at the second pic of the gear, the wear is just burnishing ( polishing ) little wear. look at the 3rd pic, see the marked shoulder on the teeth - toward one end of the contact mark look at the pics closely, Rivi just put in a big golden chunk of piece of mind =) now while your at it get the "grenade plate" outa the clutch and your golden  (Message edited by oldog on February 16, 2009) | ||
Riviera |
I see your point on the gear wedging to lock the shaft issue. But, I feel it'll be Ok. The nut didn't take much force to break loose or torque down. Please tell me about this clutch "grenade plate" issue  Also, I've read some about the American Sport Bike kit to convert the rocker boxes to the one-piece XB versions ($225). But, I can't understand why it'd puke less with PCV valves as opposed to original design routing hose to below the bike with a vent filter. Are the internal umbrella valves somehow the culprit? | ||
Gowindward |
"Also the plastic mashing between the teeth could alter the torque readings that you got and the nut may not be tightened correctly, ( plastic is absorbing the twisting force )" Sorry that one doesn't fly. If you get X force reading on the torque wrench then the nut & shaft it's being applied to gets that much torque applied. Think about a torsion spring. It "absorbs" energy when a torque is applied to it and it you tied it to a shaft and started twisting the shaft with a torque measuring device (torque wrench). Just because the spring is "absorbing" the energy doesn't mean the shaft doesn't see the same load. The shaft is seeing the load right along with the spring. You are spot on about loading the gear shafts up with a side load. Have no idea if it's high enough to hurt though. | ||
Jramsey |
The grenade( spring plate in the middle of the clutch pack) plate is there for smoother clutch engagement. Many toss it before it causes trouble by replacing it with two steel and one fiber plate. IIRC it hasn't been used since '02. (Message edited by Jramsey on February 16, 2009) (Message edited by Jramsey on February 16, 2009) | ||
Oldog |
Rivi: In the clutch pack is a gizmo officialy called the spring plate its purpose is to make the clutch easier to engage (softer bite), at aroung 40K miles it breaks the rivits that hold it together and they wind up in the basket usualy destroying things or ant least making a mess. to fix it. Remove the derby Remove the clutch throw out mech Slack the primary chain. remove the primary cover get the clutch compressor tool. -> install it, per the instructions compress the spring remove the lock ring remove the pressure plate assy remove the plate pack with the spring plate remove the "grenade plate" from the pack INSTAL 1 friction 2 Steel plates in the stack where the spring plate was. assembley is the reverse ( I would use a fresh primary gasket ) you can run a lighter spring if desired ( XB spring ) YMMV On the breather setup you got that right as far as I know, the XB boxes are the hot setup ( that or a catch can ) I have a billet can 50$ or less on E-bay remove the Primary cover NOTE those plates go in steel fiber steel sorry for any corn fusion (Message edited by oldog on February 16, 2009) | ||
Oldog |
Sorry that one doesn't fly. If you get X force reading on the torque wrench then the nut & shaft it's being applied to gets that much torque applied. And if the plastic is deforming as you twist the wrench how much force is actualy making the nut tight? and how much is squashing the bondo spreader? Gotcha  Hey Rivi: I presume that you bathed the crank in RED loctite prior to install? You are spot on about loading the gear shafts up with a side load. Have no idea if it's high enough to hurt though Thanks, Loren I take that as a compliment.. I would bet at the threads its no more than 5/8" diameter and its every bit of 4" long there, from the bearing in the case, long and slender with side loads = not good. (Message edited by oldog on February 16, 2009) | ||
Gowindward |
If it's no longer rotating then the full load is applied to the nut.  | ||
Jramsey |
Jim is correct on the 2 steel 1 fiber plates. Its been a year and a half since I've done it, my............brainfart  I'll correct my earlier post. | ||
Oldog |
 Ok I got it now NOTE TO SELF MAKE SURE THAT THE DEFICATION IS IN SEQUENCE BEFORE CORRECTING THE ENGINEER | ||
Riviera |
Yes, it got red loctite on the threads. Forgot to mention, I pulled the third of a hardened steel pushnut out of the oil tank when I fished around the drain hole with a magnet for kicks. Thank the fates it never made its way to the outlet. I just got the bike and so have no idea how that got in there.  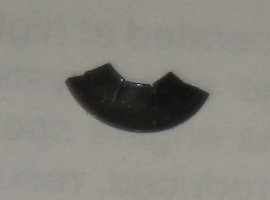 |