| Author | Message | ||
Buellisticx1 |
Hey guys, Anyone know if is there a good place to order a Crankshaft oil seal installation tool? Or anyone can to tell me how built a good homemade tool? I have been to try to buy the "official" seal installer tool HD-45206, but I have not been able to get it, not all dealers will sell you one, They are not able to sell it as a retail tool. It seems that certain tools are not intended for retail sale. I need to know where I can get it. I have been to try to buy it to Chris from Lyberty and they are a sponsor of this site, but they are not able to sell it as a retail tool, and looking into an alternative for me as the equivalent tool from other vendors is around $80.00 (i.e.other one from Jims), but is much more expensive than the OEM HD tool, and I'm going to using it the one time only, then I think the price is not worth it! I'm sure there are plenty on here with very good knowledge of this repair who would be willing to help me. I read many many posts about and know It�s a involved process.Just want to make sure I get all the right info. I'm interested in any experiences someone made,changing the seal. Any hints or tips would be gratefully appreciated!. Regards. (Message edited by buellisticx1 on October 15, 2008) | ||
Preybird1 |
I know how to get it. You need to stop a mac tool truck guy. They actually supply hd techs with there tools. I found a parts guy here in Utah, That can get me HD tools. me and a couple of buddies were toying with the idea of getting a HD scanalizer, Or equivalent scanner and we got to talking about how he sells tools to the HD mechanics. And he said he could get what i need | ||
Fasted |
hd-b of bloomington indiana 812 3338003 (sponsor) ask for mike in parts ask for badweb discount they ship i like the mac tool guy idea, too....thanks for the info!! | ||
Jos51700 |
The Mac Tools guy cannot get the *HD* Kent-Moore tools, even if he carries Kent-Moore tools. They're proprietary-i.e. no dealer license, no buy to resell. However the ONLY thing stopping your dealer from selling Kent Moore tools is....the dealer. There's nothing in the Kent-Moore (AKA Spent Moore) catalog that say NO RESALE. It's simply finding a dealer that's not paranoid about you competing with them. Talk to the parts manager, his profit numbers go up if he can sell it to you. The service guy doesn't give a damn. What I'm wondering about is... Why spend that much money on a tool you're only going to use once? I've been a dealer tech for a decade, and I've only used it 3 or 4 times. Get everything ready for the seal, and pay the dealer the 1/4 hour they'll charge to install the seal in 2 minutes. They rape you on labor, and, even at $100 bucks per hour, you're still megabucks ahead of buying the tool. Plus, if it leaks, you can make them do it over! Worse come to worse, PM Jramsey. He's a machinist, and with a few simple measurements, he can MAKE you a seal driver. With a lathe, it wouldn't take more than an hour. | ||
Easy_rider |
It's amazing to me that I only did this two months ago and I already forget what I used. It seems like it was a deep-well socket. Maybe a 36mm? The knowledge vault has a couple of posts. One option is a 1.5" copper pipe that's cut longways in order to allow the diameter to increase slightly. FWIW, watch your fingers when trying to get the clutch pack/drive gear back on! | ||
Jos51700 |
Also, the seal installation is a piece of cake. I've done it without the tool at all. Just measure the depth of your old seal, and you can use a blunt punch to GENTLY and EVENLY install the new seal to the old depth. Just don't deform anything, and you're golden. I don't remember well enough, but I think there might even be a locating lip in the crankcase. THE THING TO REMEMBER!!!!!!!!! DON'T gouge the bore the seal lives in trying to take it out! This is NOT the place for ham-fisted mechanics. Make sure seal puller, screwdriver, fingernail, or whatever you're using to pull the seal is NOT touching the soft, delicate, fragile, aluminum bore. It's not the end of the world if you gouge it, but let's not go there in the first place, 'kay? | ||
Preybird1 |
Hmm i will look into the kent moore tools. I will give him the part number and see if he can really get it or not! | ||
Buellistic |
Jos51700 is "RIGHT" as "i" have replaced mine twice and am up to 105K now ... | ||
Ebutch |
Yes S2T, 120,000 miles 2 seals.S3 62,000 miles 1 seal as John,LaFayett said!!!!New seals are better, double seals.(install with new spacer at same time 40240-89) | ||
Buellisticx1 |
Thanks guys! I really appreciate the info. Hey Preybird1, I'll wait your answer, I need to get the installer tool,I would prefer to do it right the 1st time with the correct tool, if can to be I have never done this job, it's the first time. Any ideas how removing the sprocket spacer and the old crankseal?.... I don't know how to remove the spacer and seal correctly to avoid trashing any machined surfaces.I have no idea how difficult it is to replace or how much time is involved. I prefer to do stuff myself. I do almost all my own work. And I'm not opposed to buying the needed tools. I don't trust in Dealers I do love my bike. Any ideas will be greatly appreciated. Regards. (Message edited by buellisticx1 on October 16, 2008) | ||
Fasted |
http://www.badweatherbikers.com/buell/messages/384 2/370024.html | ||
Fullauto |
I had a friend machine one up. Very simple. The dimensions are on here somewhere. 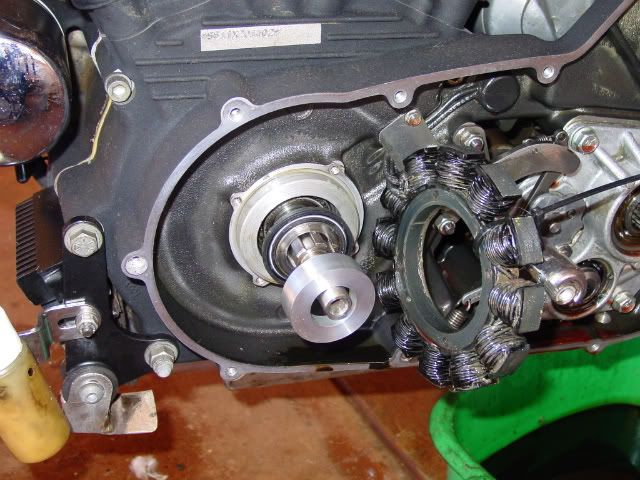 | ||
Fullauto |
Oh, I went to the hardware store and bought a PVC reticulation fitting to use as a spacer. The metal spacer ensures that the seal is seated to the correct depth. | ||
Jos51700 |
"The metal spacer ensures that the seal is seated to the correct depth." IF you're referring to the steel spacer behind the seal, this is not accurate. Were you referring to the aluminum spacer/tool in the above photo? | ||
Ebutch |
Spacer(40240-89) inside seal,wouldn,t work without it!!!! | ||
Buellistic |
Before warned, the that plate covers and holds the stator wires is a source of trouble ... Not good to let stator hang by these wires(or you will be called a HARLEY-DAVIDSON technician !!!)because it not only breaks the insulation, it tends to put too much of a bend in the wires(let us not forget stress) ... | ||
Buellisticx1 |
Thank you one and all for the input, I really appreciate it. Also, thanks to Fullauto by post the pic, It's very helpful to me. After read on the link put by Fasted, I think could be able to know take out the old seal, it's really interesting. All ideas and tips are greatly appreciated. Regards. | ||
Fasted |
the stator does not need to be removed...... only the rotor | ||
Bluzm2 |
No it doesn't but it gives you more room to pull the seal without gouging the seal seat. Plus if it's not been done, it gives you a chance to put a bit of silicon RTV under the stator wire hold down tab. | ||
Buellistic |
VERY, VERY good Bluzum2 !!! | ||
Ebutch |
http://www.badweatherbikers.com/buell/messages/384 2/174248.html | ||
Buellisticx1 |
I read many pots about the Old crankseal removal procedure on here. A guy used a small sharp hook to pull the old part and he tried to grab the old seal on the shaft side so he did not scratch the aluminum case, as the shaft is much harder, (as said Jos51700 on the past post: or whatever you're using to pull the seal is NOT touching the soft, delicate, fragile, aluminum bore.) Just a question more: I know to need to remove the plate assembly as a whole. I would like to know if for remove the clutch nut,will I have to Pull out the very center snap ring?, then I'll can to remove the adjuster assembly, right? (Message edited by buellisticx1 on October 17, 2008) | ||
Jos51700 |
Correct! | ||
Reepicheep |
The real danger is if you go too deep and the ball bearings are rubbing on the seal. They will cut through it in about 4000 miles. (DAMHIK) You can install it fine without the special tool if you measure carefully and make something to gauge depth out of a hardwood dowel. I used a green tinker toy, and just notched half the top of it so half of the tip would push in the seal, and the other half the tip would come to rest on the raised surface. Then I just worked my way around a circle slowly seating it until the tinker toy showed appropriate depth. Having the real tool makes it easier and more reliable. | ||
Buellistic |
Nothing like doing a good job under a little hardship ??? | ||
Buellisticx1 |
Agreed!, but sometimes you have a difficult time. Greetings. | ||
Fullauto |
Jos, you're right of course. It's been a while since I did it (about 20,000 miles) and it is of course the depth of the lip on my alloy tool that sets the correct depth. I must have done it right. It's lasted this long. What I forgot to mention is that my only concern with doing it this way is that the aluminium (Australian spelling) tool turns within the seal as it is seated, possibly damaging it. This is why the HD factory system uses a handle with a Nice bearing in it so that this doesn't turn on the seal. I took the stator off as a matter of course, realising afterwards that I hadn't needed to. I was aware of the possible problem with the plate that holds the wires and took care to make sure that this didn't happen. I ground a slot in a screwdriver blade to hook the old seal out, but this wouldn't work with the double lipped replacement seal. Came out easily. I'll think of something else if I have to do it again. I love this forum. It has contributed so much to my knowledge. | ||
Easy_rider |
I thought about doing a humor write-up about how imperfect the replacement goes for "the rest of us". Decided I might not be that funny... Not to worry, it's very doable. There was a moment when I couldn't get the rotor off and I was trying to figure out what was wrong. Turns out magnets are amazing things... | ||
Buellisticx1 |
Always learn something on this Forum, It's a wonderful resource!. |