| Author |
Message |
    
Henrik
| | Posted on Saturday, August 26, 2006 - 10:38 am: | 


|
Ptown; thanks for the vote of confidence 
It's a very good idea that I'm sure someone like Aaomy can whip out in a flash. I however am simply a hack and a shade tree mechanic. So unless I can "make" something with a hacksaw and a pair of vise-grips I usually have to find other ways.
Thanks for the thought though.
Henrik |
Ptown
| | Posted on Saturday, August 26, 2006 - 01:22 pm: |
|
Hendrik / Bluzm2
Previous post to Hendrik refers, this topic is quite lengthy and covers a couple queries by different people and I might have }got mixed up but in any case maybe you can also take a look into my suggestion.
It is a very small job. You only need the adjustable fitting of a bicycle brake lever adjuster bolt and same thread tap. remove the bracket , tap it measure the correct length needed for proper setting, cut to length and bob's your uncle.
(Message edited by ptown on August 26, 2006) |
Ptown
| | Posted on Saturday, August 26, 2006 - 01:34 pm: |
|
oldog
I also have the X1 and fitted my Jagg oil cooler on the small tubes that point down further forward? I just had small mounting bracket machined out of aluminum and mounted it onto that. The brackets look the same as the frame mounting brackets which is used to mount the steering dampers onto the fame.
As said the OIL Cooler is not really needed, but it looks very good on the bike, and the advantage having it mounted there, its out of harms way for stones and dirt from the road thrown up by the front tyre. The advantage of the side mount is that there is also a lot of air passing there for cooling. |
Ceejay
| | Posted on Saturday, August 26, 2006 - 10:21 pm: |
|
if you do get the double rotors lined up and need some angled valve stems try plotonline.com, you'll have to read Japanese but an air cooled mag I picked up from there had a nice writeup of some giving that address. I know a lot of if's but if your stuck in gas station with a big honking airchuck they could help out considerably.... |
Henrik
| | Posted on Saturday, August 26, 2006 - 10:33 pm: |
|
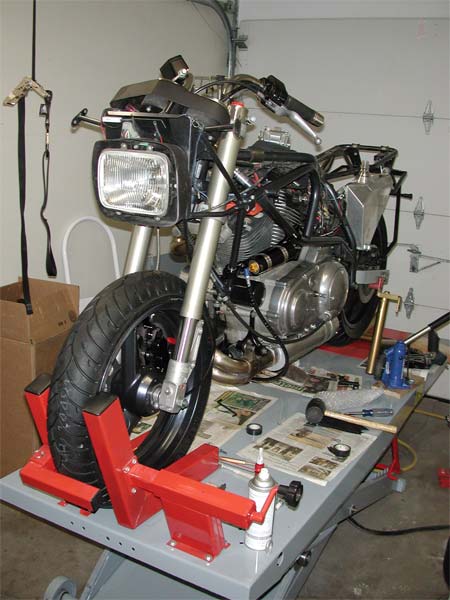
Some progress today.
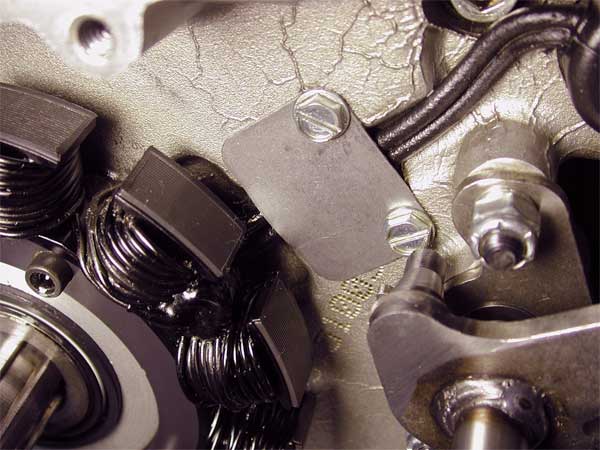
I mounted up the wheel with both disks again. As I mentioned before there is a disk alignment issue. The left side could be fixed by shimming the caliper, but the right side shimming is not an option - it would have to be "Shimmed out", i.e. not possible.
Here you see the left side caliper from the front and can just glimpse the 2mm space left over between disk and caliper since the disk is not centered
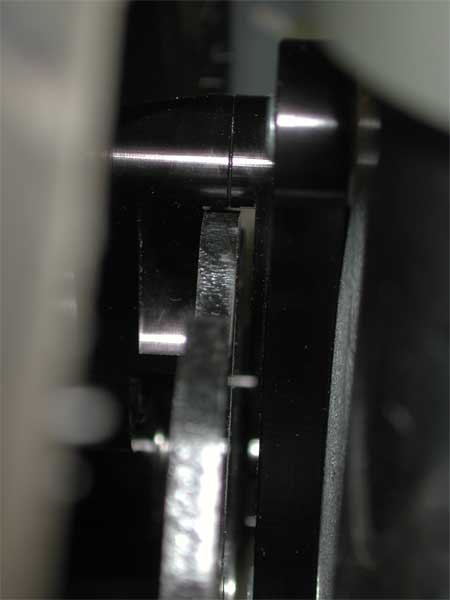
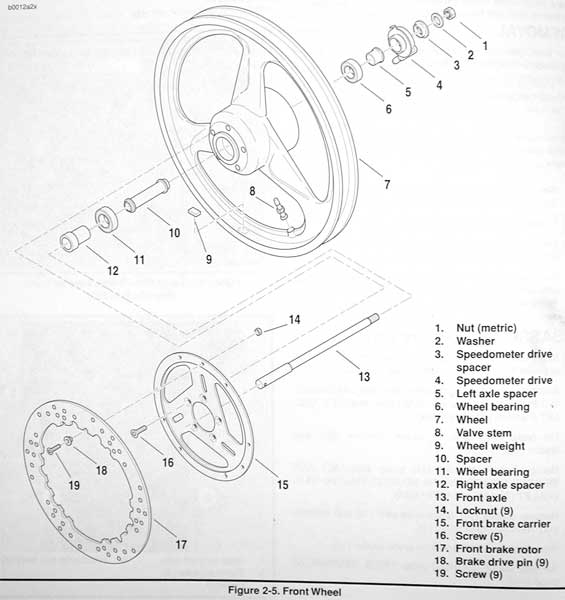
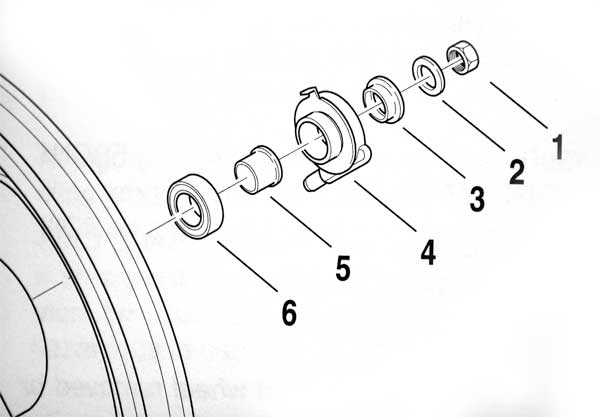
If you take a quick look at the front wheel assembly you'll see that by machining #3 - the speedo drive spacer - down 1mm I can get both disk centered without much shimming.
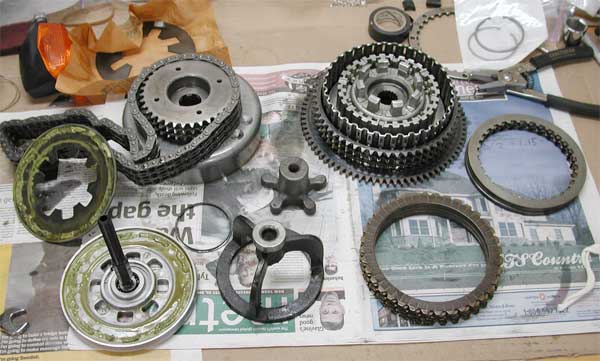
I also took the primary apart today. I needed to trim the end of the shifter arm so it would work better with the Baker "Easy Shift" kit. I also wanted to get rid of the clutch spring plate and replace the stock diaphragm spring with a Uly spring for lighter clutch pull.
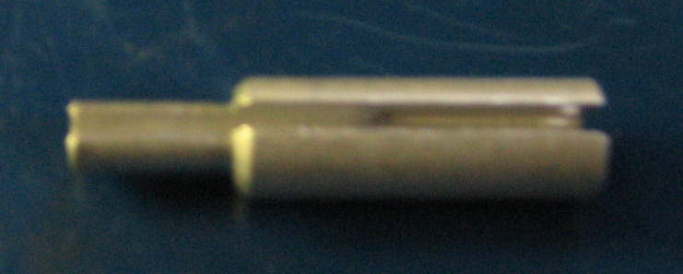
I used a locking bar to lock the engine sprocket and the clutch hub. 4 1/8" with the ends rounded was a perfect fit - thanks Jack.
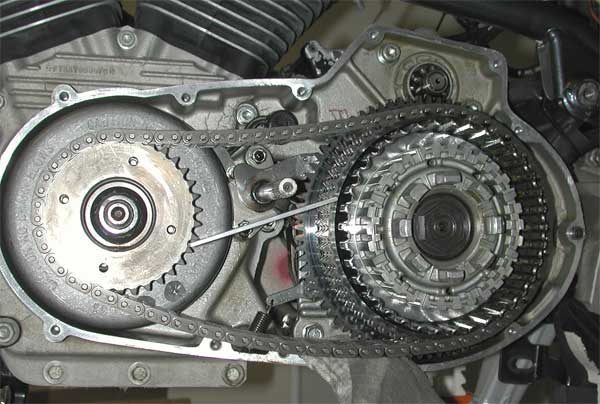
I got the engine sprocket nut off with an 18" wrench with a 5' pipe slipped over the end - the rotor says no sharp blows ya' know. Took quite a bit of force to get that nut to budge too.
The clutch nut came out easy enough - once I remembered that you shouldn't remove the clutch spring assembly and clutch plates before trying to remove the nut ...
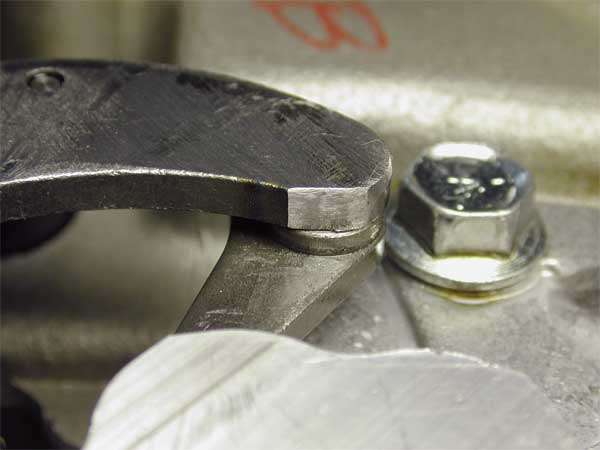
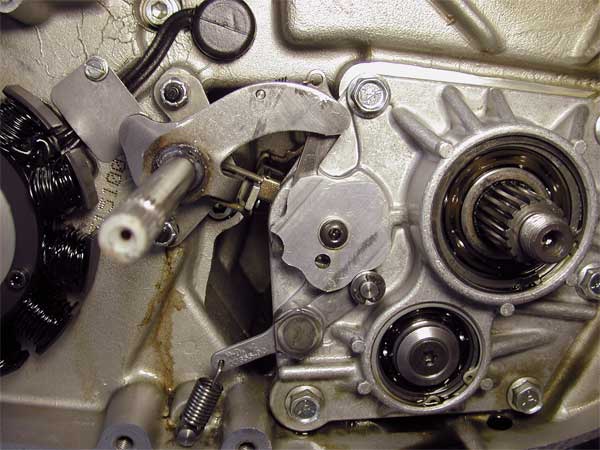
With all that out of the way I did some testing and found the spot on the tip of the shift arm that would hit the detent arm when shifting, particularly between 3rd and 4th. I covered everything up with rags and trimmed the shift arm using a dremel tool with a small cutting disk.
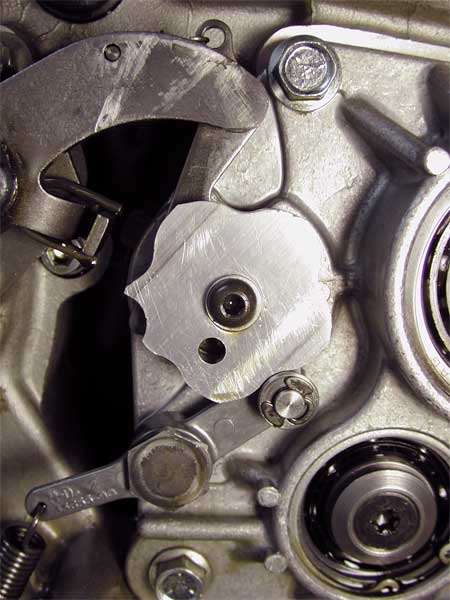
While I was in there I took out the small clamp holding the stator wires and rolled up the edge to minimize the risk of cutting the wires. They looked fine though.
I used a brass punch to just tap the center of the edge out some.
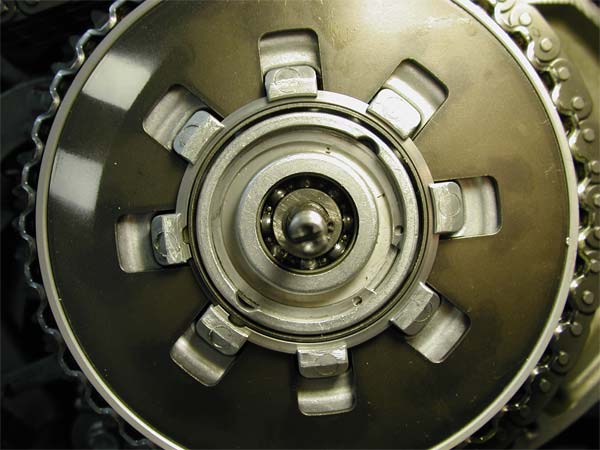
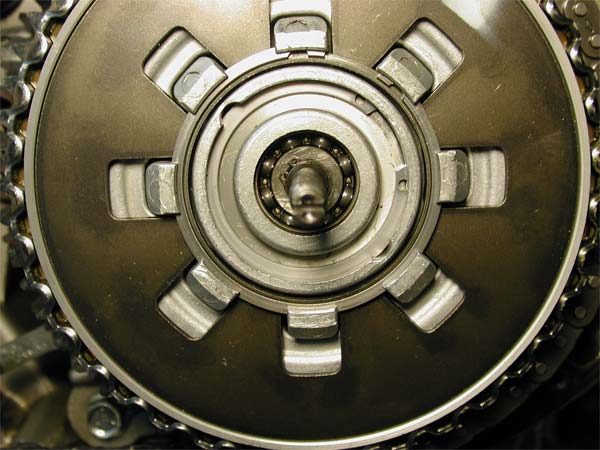
When I got the clutch pack apart (again ...) I found a lot of wax-like gunk under the diaphragm spring:
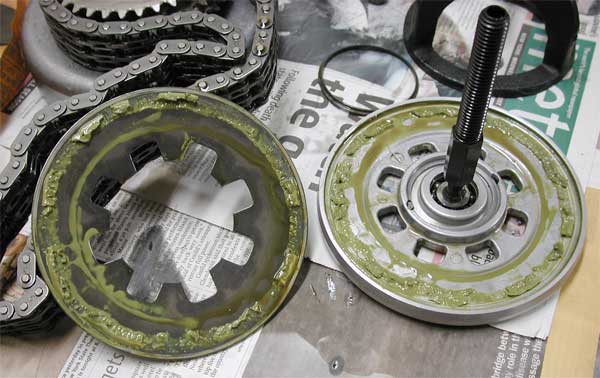
I used to run Redline Heavy Shockproof in the primary for awhile, but when I took the primary apart some years ago I found the same kind of semi-solid gunk throughout the entire primary. I didn't take the clutch pack apart back then. I obviously haven't run Redline since.
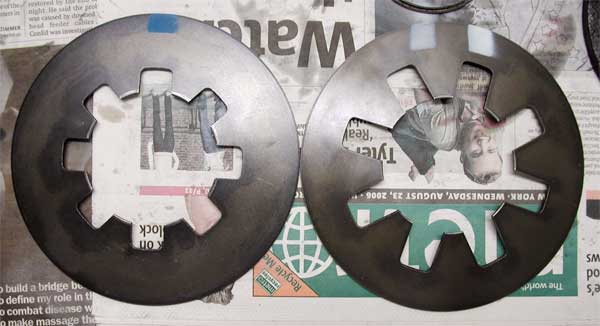
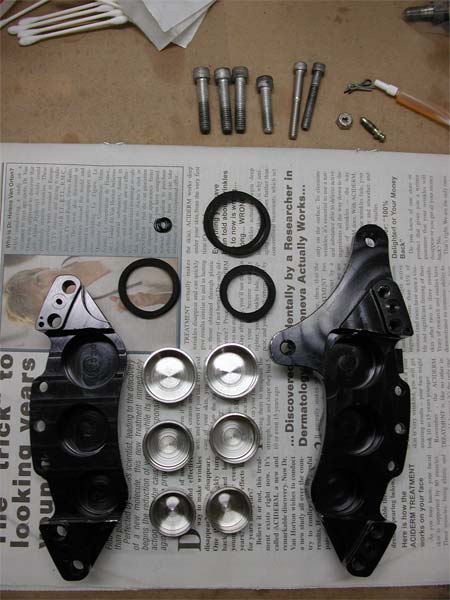
Here are the 2 diaphragm springs. The stock spring to the left, the new Uly spring to the right.
And here is the Uly clutch spring and holder after the clean-up.

Here is the clutch with the clutch plates in and the spring plate out (thanks Jack and Brian)
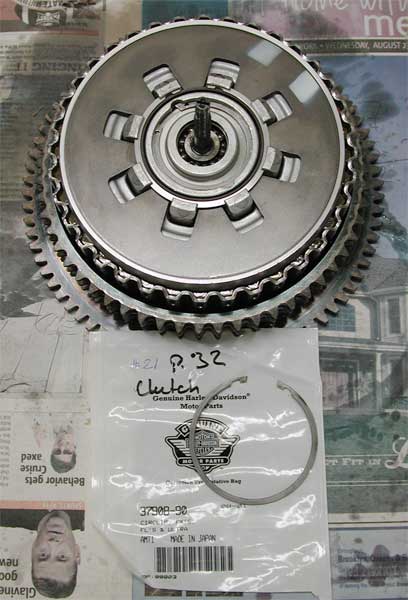
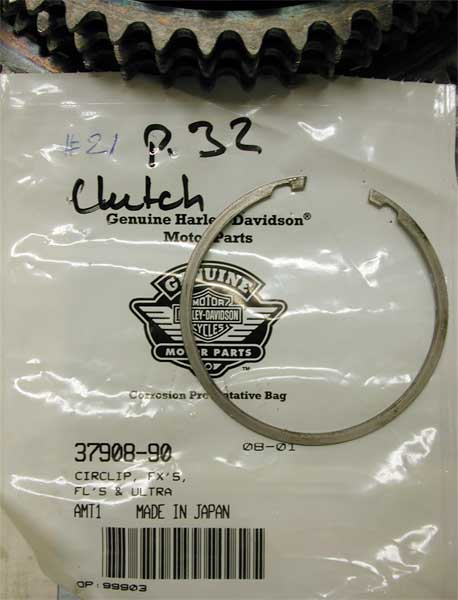
I put the clutch pack back together using a new snap ring to hold the diaphragm spring in place. You can also see one of my tricks for staying organized when I take on new projects. As I go through the parts book I make a list of parts, part numbers and on what page the parts are listed. Then when I get the parts I write that information on the packing. That makes it harder to loose track when I start the work - not that it doesn't happen, only less so
As I went to put everything back together I realize that my Red Loctite has a cracked lid and is useless - dang it. Always something.
Henrik |
Henrik
| | Posted on Saturday, August 26, 2006 - 11:02 pm: |
|
Thanks for the link Corey; I looked through the site, but didn't find any angled valve stems. The language barrier might well be a reason
There are a few options for angled valve stems available here i the US, however the threaded part on those is only 12mm long, and the meat of the Marchesini wheels is 10.6mm, not leaving enough thread to safely secure the valve stem. This is no doubt due to these being older rims.
The other option is a shorter straight valve stem, but the company selling them here in the US has been less than forthcoming with sizing information - odd if they're interested in selling stuff ...?
Henrik |
Ceejay
| | Posted on Saturday, August 26, 2006 - 11:42 pm: |
|
Henrik,
I don't know Japanese either-but I know some who do, I'll get them to translate the page for me, and I'll get you the info ifnyer really interested... |
Henrik
| | Posted on Sunday, August 27, 2006 - 10:41 am: |
|
Corey; I'm interested, but it's not urgent. I had to get the tires mounted back up to start putting the bike back together, so realistically I won't get to it until winter.
Thanks though.
Henrik |
Oldog
| | Posted on Sunday, August 27, 2006 - 02:23 pm: |
|
Ptown:
got pix of the mount?
I would like mine in that orientation. |
Ptown
| | Posted on Sunday, August 27, 2006 - 04:12 pm: |
|
Oldog.
Sri not on hand my bike is in South Africa and my profile only shows the right side, But will ask my brother back home to Email me and I will post it for you during the week and give you more details what I did for vibration elimination on the mount.
It really looks good on that mounting angle. Just make sure that when you mount it, that the outlet from the motor will be connected to the top inlet of the oil cooler en return flow to the motor from the bottom outlet of the cooler. |
Firemanjim
| | Posted on Sunday, August 27, 2006 - 04:47 pm: |
|
Henrik,my Triumph has right angle stem,I'll look closer when I get home tues morn. |
Henrik
| | Posted on Sunday, August 27, 2006 - 10:15 pm: |
|
Thanks Jim
More progress today, but it's too late. Time for sleep.
Henrik |
Road_thing
| | Posted on Sunday, August 27, 2006 - 11:09 pm: |
|
Great stuff, Henrik--thanks for walking us through this!
rt |
Ptown
| | Posted on Tuesday, August 29, 2006 - 04:36 am: |
|
Oldog
Here a Pic. of the side mounted Oil cooler


Any other questions just give me a shout
ptown |
Firemanjim
| | Posted on Tuesday, August 29, 2006 - 10:21 am: |
|
Hey Ptown,what brand damper do you have?I really need a frame mount like that,cannot seem to find one. |
Ptown
| | Posted on Tuesday, August 29, 2006 - 11:18 am: |
|
Jim
I am not sure for what bike it is I bought it of e-bay but its looks the same as a LSL damper. It seems to be from a ZX750 Kawasaki 1992.
I then just bought the mounting kit from LSL for the X1 and had the frame one made as the one you get with the kit mounts on the thinner frame tube where my oil cooler is mounted.
You will notice its a bit to short to mount on the side of the fork tube, thats why I shift the fork mount to more of the back of the fork leg. Not totally behind but just a fraction forward.
I can have it measured for you if you want .? |
Bomber
| | Posted on Tuesday, August 29, 2006 - 11:50 am: |
|
Jim -- Damper Frame mount? is that the Bomber sign you're shining on the clouds above Gotham? |
Road_thing
| | Posted on Tuesday, August 29, 2006 - 12:57 pm: |
|
Bomber sign?
I think Jim would send smoke signals!
rt |
Henrik
| | Posted on Tuesday, August 29, 2006 - 12:58 pm: |
|
Anyone know the thread size and pitch for the master cylinder banjo bolt
1) for HD master
2) Buell master - tuber and XB
Thanks
Henrik |
Firemanjim
| | Posted on Wednesday, August 30, 2006 - 01:56 am: |
|
I know they are american as I had to steal one from my metric bikes to put the Nissin M/C on.Had a bitch finding the darn one for the dual lines.
Henrik,RE your throttle cables,Terry told me unless you buy the Screaming Eagle kit the cables will be wrong. But he had an interesting part for his Blast cable he got from Edelbrock,looked like just what you need.
not a great pic but you see what I mean. Part # available if you need it.I will be at Vallejo tomorrow. |
Henrik
| | Posted on Wednesday, August 30, 2006 - 09:27 am: |
|
Thanks for the info Jim; I rummaged through the "parts depot" last night, and found a banjo bolt that fits the ISR master. Came off a GSXR front end I bought recently.
ISR stuff is *seriously* nice btw.
As for the carb - if the bracket I hope to receive from Mikuni soon doesn't fix the problem I'm bolting the stock CV back on. It's been doing the job ok and I have it apart for cleaning already. The gadget in the picture looks like it might do the trick though.
As far as I understand Ptown, that is pretty much what he suggested, only his idea was using bicycle parts and to thread the cable bracket.
Gasp ...
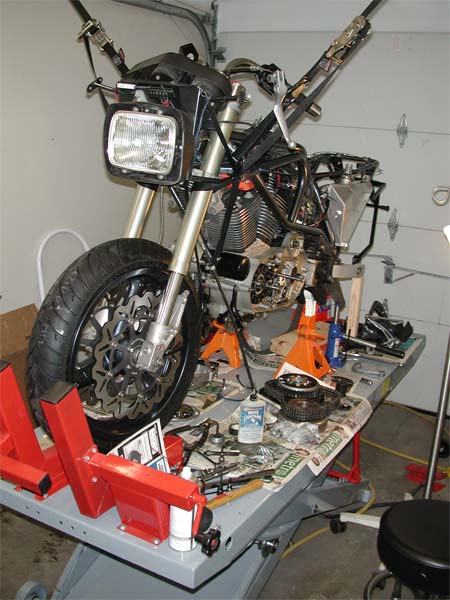
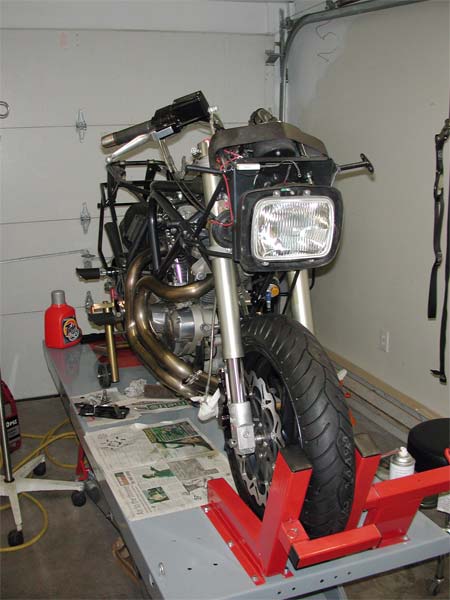
The bike as it looked when I started working on it last night. 92 hours and counting.
ok, with that out of the way, here are a few updates:
Primary:
I got the primary mostly back together last night. Not that big a deal, and things go much more smoothly if you have the necessary parts available (I didn�t) and you remember in what order to do what ...
Here�s why you need a new retaining ring after you remove the clutch adjuster plate:
Notice how the snap ring is not completely seated in the groove - fresh ring is needed.
I realized why FMJ said not to remove the brass bushing when replacing the shift shaft seal. See when I looked at my old seal - probably original from the factory it looked like this:
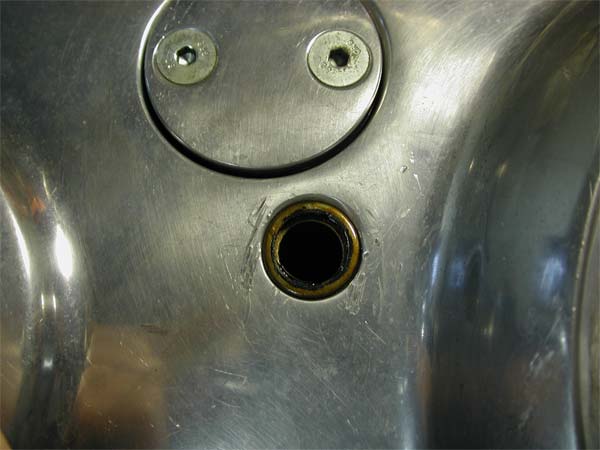
But now that I went and finally pulled the old one I see that they no longer have a brass collar:
\image[shift shaft seal new}
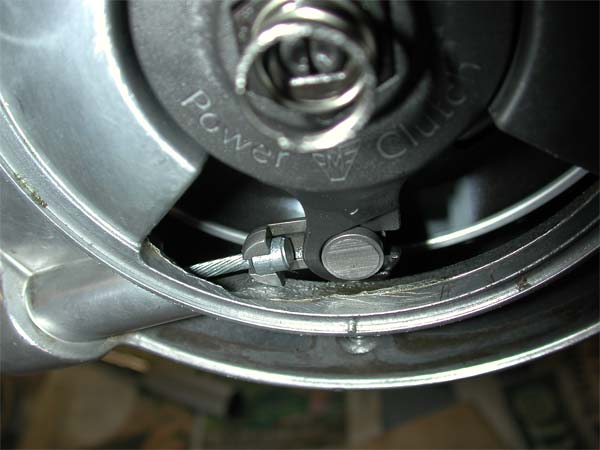
While I was at it I installed a Muller Power Clutch. Between the Uly spring and the Power Clutch, clutch feel is now downright feathery - well almost
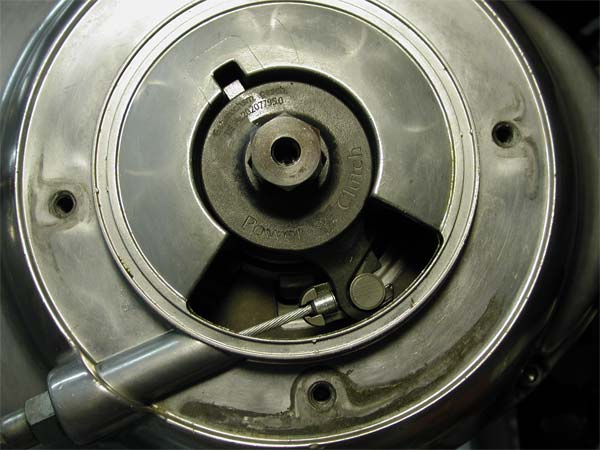
The Power Clutch fit well except for the cable bracket rubbing on the primary at "full pull". It's not enough though, that I think it'll be an issue:
Now here's something more serious. Since I had the left side plate off, I had a chance to take a good look at the rear brake line and look what I found:
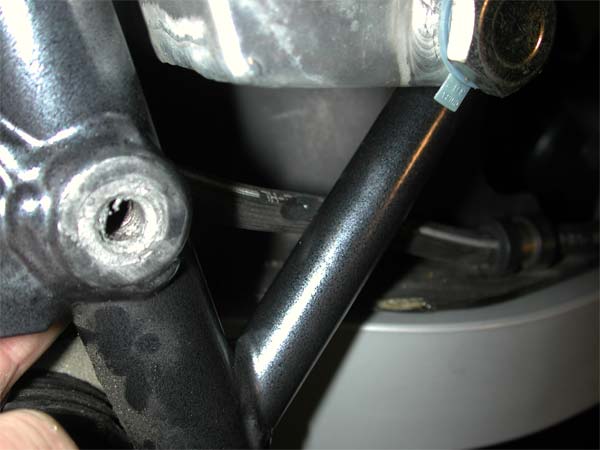
and even worse:
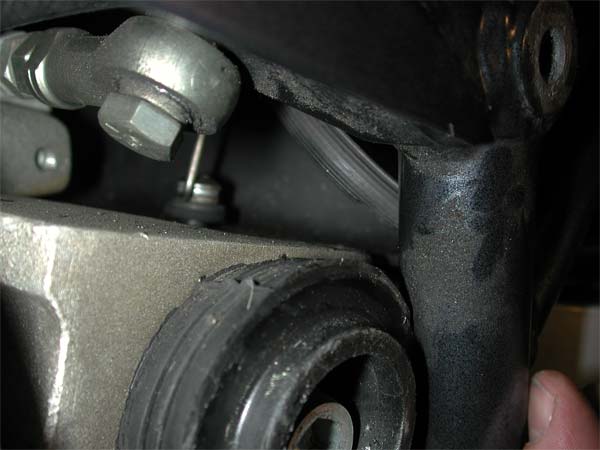
As you can see in the following picture, the brake hose has been routed so that it crosses over a sharp edge on the swingarm mounting block and after that presses and rubs against a frame tube. Not good:
Now, I don't want to start any hype, but I seem to recall that the rear brake hose had to be replaced when the swingarm recall was performed - can anyone confirm?
Either way, I tried to re-route the hose, but it's too long for to lift up and off the rubbing parts. I have never touched that line, so this might be a good incentive for you S2 owners to take a close look at your rear brake line.
For now I'll have to secure and protect the line with spiral wrap and replace it when I get home.
Well all this was going on Monday night. More on Tuesday night later.
Henrik |
Henrik
| | Posted on Wednesday, August 30, 2006 - 10:47 am: |
|
Well, last night was long but productive, but first a question:
I'm installing a relay in the wiring for aux power. Here's a picture of the relay:
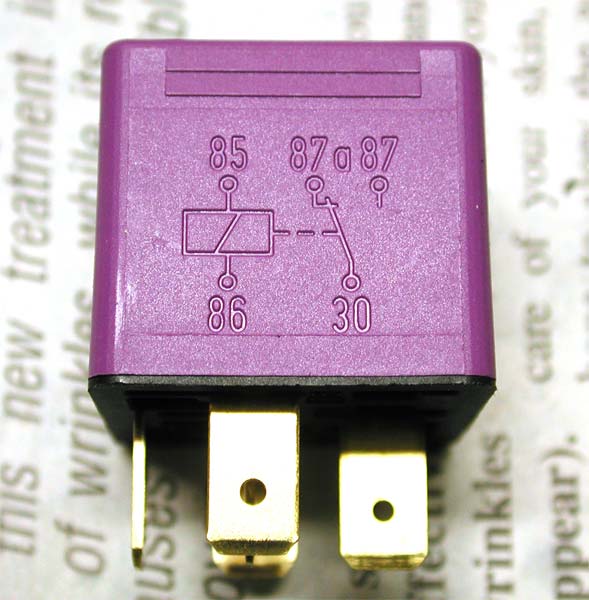
As far as I can figure the "85" and "86" connectors are for the main power = the feed that is being switched on and off by the relay. "30" and "87a" and "87" would then be the power that switches the relay. Is that correct? If so, can I choose either of the "87" or do I have to do something special? ... or have I got it backwards?
Now, the bike's looking more like a bike after last nights Marathon event:
In the process I rebuilt and mounted the right side front brake caliper:
Yes, I finally got the pistons from PM - they had indeed sent the package out for Saturday delivery ... but not changed the address to my home addy, so the package was waiting for me at work Monday morning. All in all not an impressive display of coherent service.
I got wheels and rear shock, exhaust and primary installed and buttoned up as well.
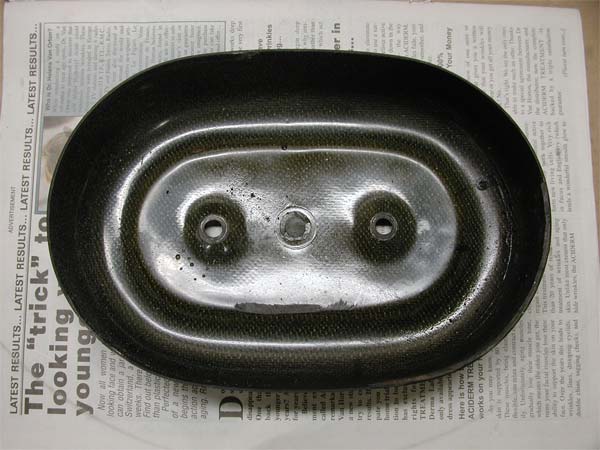
I also prepared the stock S2 aircleaner for the new backing plate I got from NHRS:
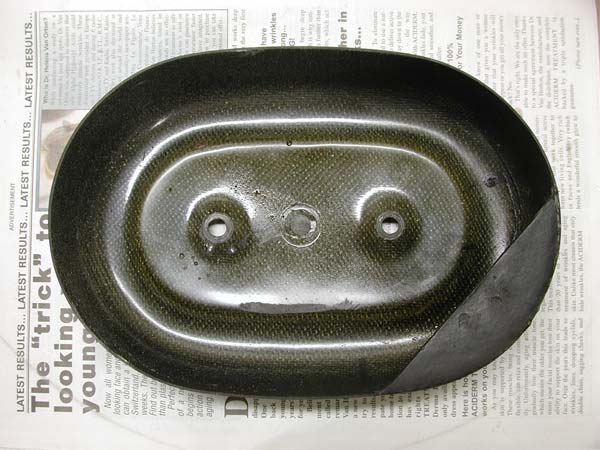
That set-up uses a bigger K&N filter, so there is no longer room for the "drool lip" on the old CF cover, but the dremel tool with a cutting disc took care of that:
Next up is new bars, brake and clutch hand controls, heated grips, aux power wiring, new battery, check/clean/dielectric grease electric connections, rear brake line salvage, brake bleeding ... and I guess I ought to put some bodywork on as well
Henrik |
S2pengy
| | Posted on Wednesday, August 30, 2006 - 11:47 am: |
|
Henrik
Yes the rear brake line was to be changed with the swingarm... It was part of the recall kit... |
Henrik
| | Posted on Wednesday, August 30, 2006 - 12:04 pm: |
|
Thanks Todd - I thought so.
In that case that line was installed like that by a factory trained technician - a good one at that.
Looking at how the hose was routed, I couldn't see a better way of running it - nothing obvious. Looks to me like the flexible hose part of the brake line is too long to fit properly.
Anyway - please check your brake line everyone. I have no doubt my brake line would have worn through in in short order. The notch where the line was resting on the edge of the swingarm mounting block is particularly disturbing.
Henrik |
Oldog
| | Posted on Wednesday, August 30, 2006 - 02:03 pm: |
|
Henrik
you got it back wards,
85 or 86 goes to ground the other is turned on by the control switch,
30 is + battery,
87 is on when the relay [ 85-86 ] is off
a87 is on when the relay is ON [ 85-86 ] On
85-86 coil of the relay there may be a diode in the relay so, one will be the ground
if no diode then 85/86 ground / battery - no care
30 common
87 is NC ( normaly closed )
a87 is NO ( normaly opened )
the socket it fits in should be marked. so should the bottom of the relay,
IHTH
you got mail
(Message edited by ol-dog on August 30, 2006)
(Message edited by ol-dog on August 30, 2006) |
Henrik
| | Posted on Wednesday, August 30, 2006 - 04:06 pm: |
|
Hi Jim; got your mail. Thanks.
Henrik |
Seth
| | Posted on Saturday, September 09, 2006 - 05:13 am: |
|
*bump* |
Natexlh1000
| | Posted on Saturday, September 09, 2006 - 08:19 am: |
|
It looks like your rear isolators are about to go.
Mine looked just like that when they failed.
See how they are drooping down a bit?
The new sexy updated ones have ears that you might have to grind to make them fit.
(I had to cut my X1's beltguard a bit) |
Bake
| | Posted on Saturday, September 09, 2006 - 10:14 am: |
|
Oldog, nice work on the relay, I agree 100% |
Oldog
| | Posted on Saturday, September 09, 2006 - 08:27 pm: |
|
I saw Henrik last week the Aux relay was not installed at the time. but he was riding the S2
I wish I had the solution for the intermitting turn signal that came up on the ride, when you use lubricants be careful of what you use some are conductive
Reepicheep figured it out. |
Henrik
| | Posted on Sunday, September 10, 2006 - 06:47 pm: |
|
Nate; the isolators were replaced some years ago along with the swingarm. The left one I got to take a look at was looking ok though. No wear or rips visible.
Aux not installed yet - ran out of time. It'll go in next along with the PIAA lights. I'll post pictures and descriptions.
Those of you who have followed this thread will appreciate that only 3 bike issues popped up on the trip:
1) the right turn signal started acting up; would turn on without me touching it. Of course wiring was a likely culprit since I'd had to solder wires for the front brake light switch. Extensive pulling, prodding and rearranging failed to reveal the culprit. Then Bill suggested that maybe a metal filing from when I drilled the switch housing might be the cause. It could indeed, as could my excessive cable lubing. So on Bill's suggestion we blew the switch out with compressed air and voila.
2) part of the difficulty with the electrical trouble shooting was that the rear brake light didn't work either. It'd be logical to think the two were related - but no. Took awhile to figure that one out.
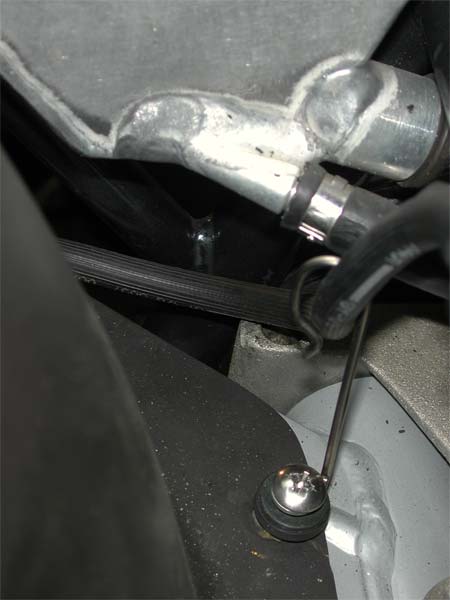
3) the choke lever slipped off the bracket - easily fixed.
All in all not bad considering the extent of the projects I took on
The last couple of days before leaving on the trip got a bit hectic, but I have a few more pictures and bits to tell. Stay tuned.
Henrik |
Court
| | Posted on Sunday, September 10, 2006 - 10:08 pm: |
|
Welcome home! |
|