| Author | Message | ||
Hodakaguy |
I'm wanting to install a Temp gauge on my 97 S1. Any pics of temp gauges that you installed? Where did you mount it and what type gauge did you use? Digital or analog? I'd like to keep track of the oil temp since it gets well over 100 deg here in the summer. I'm running a stock plastic oil tank at the moment and I'm planning to install either a Spurgin or Jagg oil cooler. Thanks in advance. Hodakaguy | ||
Oldog |
Hodakaguy: I have Pressure and Temp by HD, most of the stuff other than the gauges is not much use. I mounted my gauges pressure and temp on a piece of 1/8" aluminum. The oil temp gauge is not too spendy. The back side cup will hurt your feelings though, you need it to retain the instrument I did not like the kit hardware it did not fit too well so. I had to buy numerous brass fittings to make the gauge up and place the probe in line, You might have better luck than I did I made mine up with brass parts sized to allow good oil flow the sender on my bike in the oil pump out let line about 2" from the pump this should reflect the highest readings for oil temp in operation dogging My 2001 x1 across I10 in florida 80+ mph oil temps between 170//230 it takes quite a while for the oil to reach OT around town I will take a snap of the sender install tomorrow would you be intrested in it and the oilpress set up? I will send both if so  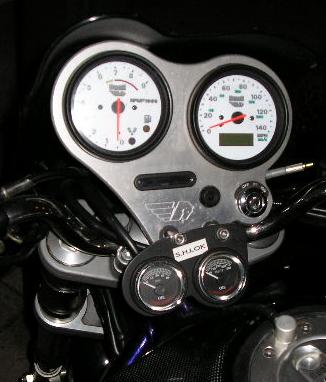 | ||
Hodakaguy |
Hi Oldog. Pics of the sening units would be great. I like where you mounted them so you can see them while riding. Thats pretty much what I had in mind. Thanks for the pics. Hodakaguy | ||
Oldog |
H-guy here you are 1. pressure switch and sender I used the yellow oatey teflon tape for gasoline on the threads, If and when you try this go slow make it all as short as possible use the heaviest nipple or street ell into the filter mount if you back it off it may leak the brass to brass will take resonable tightning be careful of the filter mount (brass to alum) 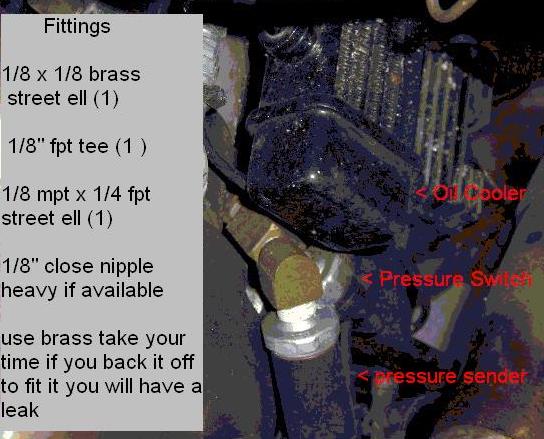 2. the insert tee for the temp sender is 1/8" fpt you will need to nipple it out to get the insert depth ok If I remember right 1/4" fpt tee, nipple coupling & bushing sender tip just in the oil stream on the bottom side, 2 hose barbs brass 1/4" mpt x ~3/8" barb, and clamps I think  the gauge kits come with wire harnesses, don't screw around with routing the power connections below the stearing head. just the sender lines and grounds. depending on how you do it you may be able to make an aluminum strap to hold the gauge, I bought the HD chromed items $$$$$$$ The pressure gauge about 100$, The Temp about ~ $80 the "retainers" about $60 each if you attempt it I hope that this helps | ||
Outrider |
Thanks Oldog...I learned something new today! | ||
Oldog |
All: SOME ol dogs know the tricks BUT this one is just slow, when you assemble the pressure sender if you use a setup like mine, sorry I Just remembered this Heres the order, install the street ell in the filter mount stop short of the final position, by about 1/8 turn or so ( straight out in my case ) nipple, then tee. while holding the street ell in the filter mount tighten the nip and t, branch should be straight down install the outer 1/8 x 1/4" street ell for the gauge sender tighten and stop short by about 1/8 turn, install the OP switch it should be pointing down install sender, and tighten outermost and innermost ells, I tucked the sender in next to the filter mount as far from the header as possible I took the time to post this because of the amount of time I spent dry fitting the setup on the kitchen floor, I hope every one who does this has an easier time of it than I did if I had the coin I would contact one of the boards "billet smiths" for a new dash plate I think if it were spaced up about an inch and re arranged (a little) the cluge that I made would not be needed, a final note because of the location of the indicators I must from time to time remove the caps from the bottom of the indicators and dump the rain water from them I used longer dash mount bolts and metal tubes from the local home store, [ LOWES ] even spaced up and radiused I still managed to nick the tank cover.  if you are intrested i have the cut out dimms and a cadd sketch for an X1 | ||
Oldog |
All: SOME ol dogs know the tricks BUT this one is just slow, when you assemble the pressure sender if you use a setup like mine, sorry I Just remembered this Heres the order, install the street ell in the filter mount stop short of the final position, by about 1/8 turn or so ( straight out in my case ) nipple, then tee. while holding the street ell in the filter mount tighten the nip and t, branch should be straight down install the outer 1/8 x 1/4" street ell for the gauge sender tighten and stop short by about 1/8 turn, install the OP switch it should be pointing down install sender, and tighten outermost and innermost ells, I tucked the sender in next to the filter mount as far from the header as possible I took the time to post this because of the amount of time I spent dry fitting the setup on the kitchen floor, I hope every one who does this has an easier time of it than I did if I had the coin I would contact one of the boards "billet smiths" for a new dash plate I think if it were spaced up about an inch and re arranged (a little) the cluge that I made would not be needed, a final note because of the location of the indicators I must from time to time remove the caps from the bottom of the indicators and dump the rain water from them I used longer dash mount bolts and metal tubes from the local home store, [ LOWES ] even spaced up and radiused I still managed to nick the tank cover. if you are intrested i have the cut out dimms and a cadd sketch for an X1 |