| Author | Message | ||
Pwnzor |
That mucky pink oil still looks weird to me... | ||
Ourdee |
Looking into that void where everything was reminded me of a night in a bar. EMTs got called for someone that er/uh slipped and fell. A very drunk guy took one of the EMT's hats. He finally gave it back. Then pointed at the letters on the hat and spelled out E...M...T, EMPTY! | ||
Tpehak |
That looks like water mixed with iron oxide | ||
Tootal |
I have noticed that the oil does look a little different when I use the flash on my camera. It makes it look a little brighter giving it that milky look. So for the last time, there is nothing wrong with the lubrication. Glitch put the link to the fluid, did you not see it? Matthew gets a pass, I know you're just giving me shinola!  | ||
Greg_e |
What tools are needed for that output shaft seal and bearing, I need to do that this winter. | ||
Tpehak |
So in order to replace the belt on Harley Davidson you need to disassemble the motor and remove the primary case? | ||
Tootal |
Greg e, the big seal seals on a ring. That ring has a chamfer on the ID that presses on a quad seal. It's easiest to remove the output shaft from the ball bearing first by removing the ring, then the quad seal, then the large seal. A puller could be made with some washers big enough to press against the edge of the output shaft and a piece of allthread long enough to go through a plate on the other side of the case. Making sure everything is in alignment is important so you,re pulling even. The casting of the case is thin where the outer race of the bearing sits. Make sure there's no rust or dirt on the output shaft where it comes out of the bearing. There are companies like JIMS that make a real nice puller that uses the screw holes to align the plate. There's even a hex in it to hold the bolt that they use so you don't need to hold the back side. There's a YouTube video showing it's use, very nice. If I was doing this for a living I'd make one like that. If you go to JIMS website and look at the catalog it's on page 196. You'll also need that huge deep well socket you see in the picture above. The Service Manual is really good too. Tpehak, there's no need to touch the engine, just the inner and outer primary which includes the front sprocket and clutch. (Message edited by tootal on September 02, 2020) | ||
Tpehak |
Still a lot of work. | ||
Shoggin |
I don't know... but I believe there is any replacement schedule for a drive belt on a Road Glide? Exactly like a Buell. So, why engineer a fast swap for something that rarely gets replaced? | ||
Whisperstealth |
I loved being able to swap out the Uly belt without having to mess with the primary. I know it's a bit of apples to oranges comparison, but the belt on the big twins was one of the reasons I resisted getting one for so long. | ||
Pwnzor |
I know you're just giving me shinola! Somebody's got to do it. | ||
Crusty |
Belt changes are one of the reasons I prefer a Sportster to a Big Twin. I replaced a broken belt on my 05 Roadster in a parking lot. | ||
Zac4mac |
I carry a spare belt for the Uly and Loretta the 1125R and tools to do it roadside. After being stuck a couple of times with a snapped belt, it�s easy peace of mind. Z | ||
Tootal |
Hey Matthew,  | ||
Tootal |
I believe HD requires a belt change at 80,000 miles. Mine has been changed once already. The chrome on the aluminum rear pulley is chipped pretty bad and the front pulley is worn too. Harley does make an emergency belt that uses pins through the lugs so you can change a belt but it should only be used to get you to a dealer or home to fix it right. With all the new engines over the years you'd think they could have incorporated the Sportster design on the transmission and moved the belt to the other side. Next time I see an Indian I need to see how their belt system is designed. | ||
Pwnzor |
Awesome, I'm #1! | ||
Tootal |
I remember when I gave Vern so much shinola he honored me with the single digit emoji! I just love to pass on the love! | ||
Tootal |
Well I said I wouldn't bore you with the cleaning, however, I did think some might like to know about cleaning threads. Getting rid of old loctite or crud in aluminum should not be done with a tap. In other threads I have talked about it but I thought a picture might be worth a thousand words. So here is a thread cleaning kit: 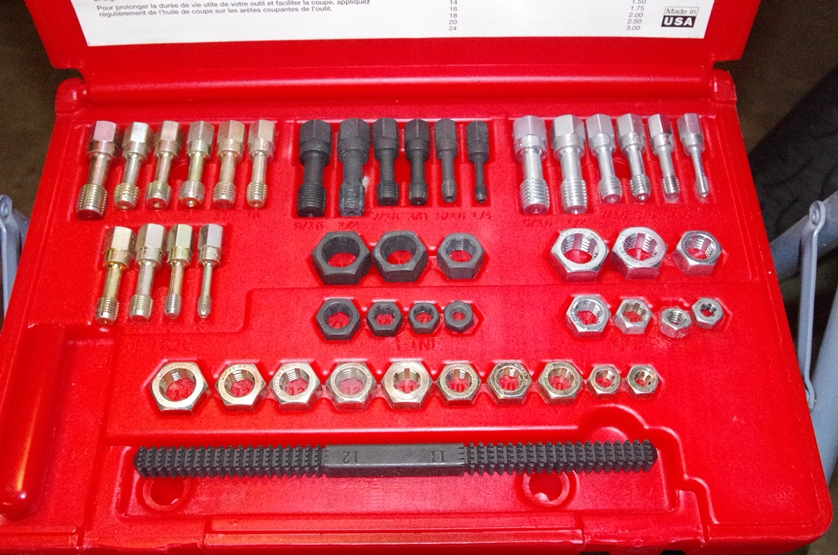 As you can see they look more like screws and nuts than taps a dies. Using a tap will remove not only the gunk but also some excess aluminum making the thread weaker and since it's aluminum it's not very tough to begin with. The holes in the inner primary are countersunk 1/4"-20 threads: 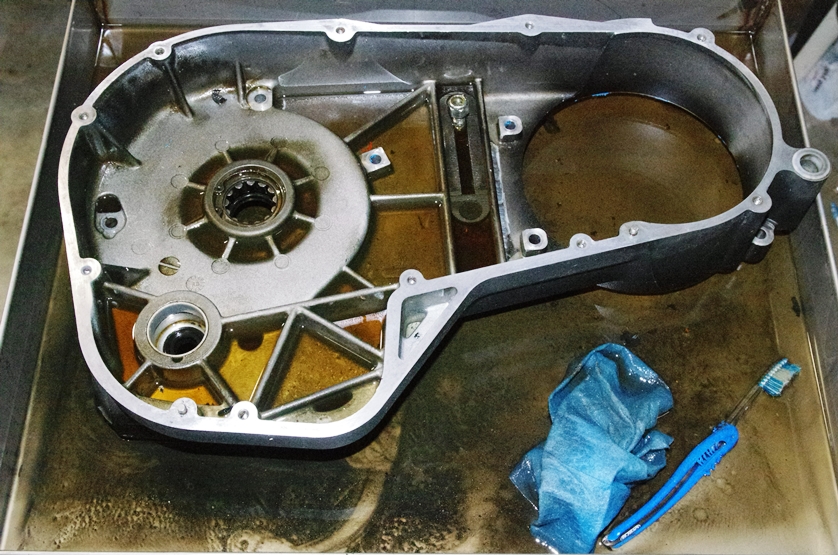 To clean these you'll need the proper sized thread cleaner and an 82 degree countersink. Ofcourse a gasket scraper would be used first: 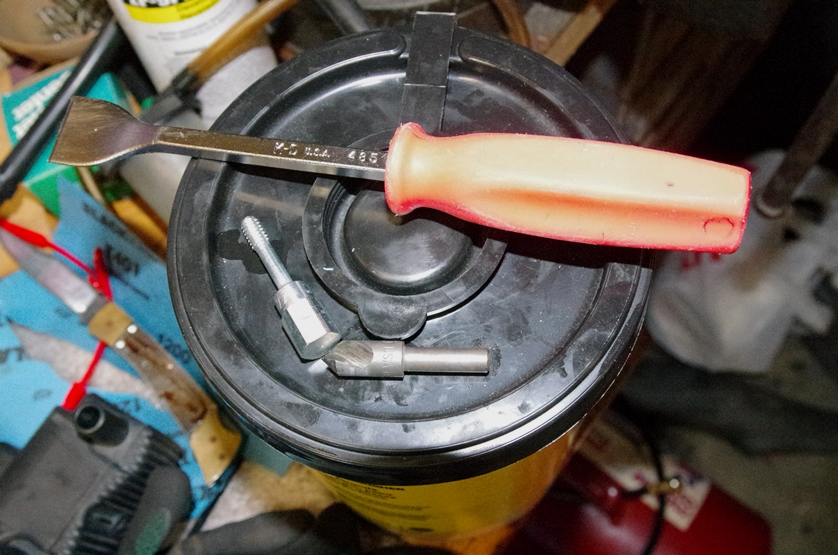 If machined properly a tapped hole will have a countersink in it. This allows the tap to start easier and allows your bolt to start easier too. However, this countersink is also where a lot of the loctite collects. A quick twist of the countersink will remove the leftover loctite and allow the thread cleaner to start easier too. I'm going to change the bearing and seal in this part. It's what rode on the inner bearing race I removed earlier. Thanks to inventory taxes in Illinois and Missouri the only part the dealer stocked was a new belt. Everything else had to be ordered from Harley. And they say the internet has killed small business! | ||
Zac4mac |
Hey, I recognize that thread kit. I have the same kit... use it on almost every head I do. The countersink should have been done after the threads were cut, HD leaves a �false thread� at the top that I always clean up. I have a strong feeling it�s the cause of most instances of crossed threads in heads. Always start threaded parts with your fingers not a wrench... especially spark plugs. Z | ||
Tootal |
The countersink should have been done after the threads were cut, HD leaves a �false thread� at the top that I always clean up. If you do it after it's threaded then it has a tendency to mash the first thread. | ||
Zac4mac |
I run the repair tap after countersinking then blow it out with shop air. One of the last steps I do is run all the holes with a proper screw/bolt/plug and blow them out one last time. Again, especially important for the spark plug... | ||
Greg_e |
Yeah, I bought that set of thread repair tools too, a lot of people thought I was stupid. Gotten a lot of use out of them, need to replace one of the "nuts". | ||
Ourdee |
Greg, Why do they have different finishes? | ||
Tootal |
Each color is a different thread style. There's SAE course, SAE fine and metric. Just makes it easy to put them back in the right spot. For threads that aren't in the box I've gotten quality grade 8 bolts and took a die grinder with a cut off wheel and put three grooves length wise and they worked really well. | ||
Ourdee |
Thanks | ||
Tootal |
Well yesterday I received two packages containing a new belt and the new pulleys, along with some other goodies. I removed the rear axle and lifted up the bike and rolled the wheel to the rear and was able to get to the pulley bolts with my new impact gun. Wow, should have bought one of these years ago! I cleaned the threads after removing the pulley. I took a shot of the old and new pulleys together. You can see the popped chrome on the old one compared to the new: 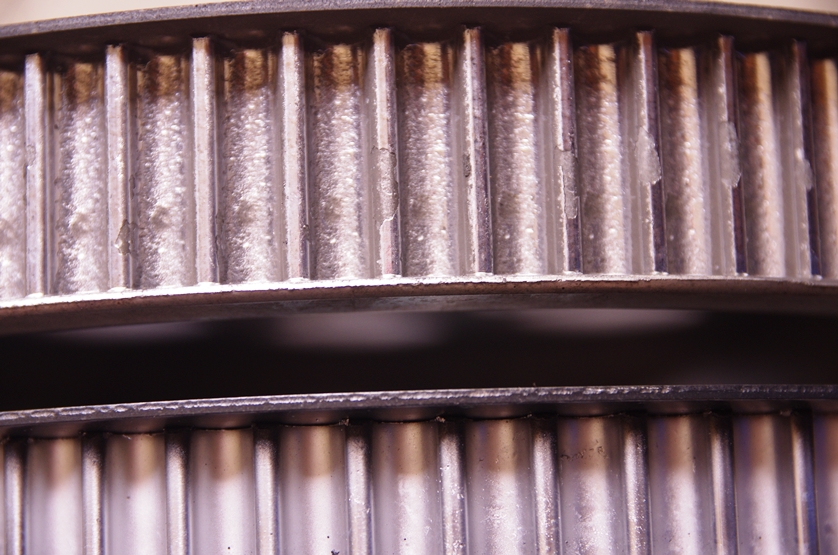 Now I just need to clean up the bolts and mount it back to the wheel. At that point I'll put the axle back in and pull off the left swingarm bracket and swap the belt. | ||
Pwnzor |
Wow, should have bought one of these years ago! It's a game-changer for sure. | ||
Tootal |
I just love sloooow cooked bacon. I set up a couple of slices on very low heat and went to the garage to see what I could get done. I was able to wire brush the old loctite off the bolts for the pulley on the wheel. I put some fresh loctite on the bolts and installed the pulley and torqued them at 60 ft/lbs. At this point I went in to the smell of bacon and it was perfect time to turn them over! 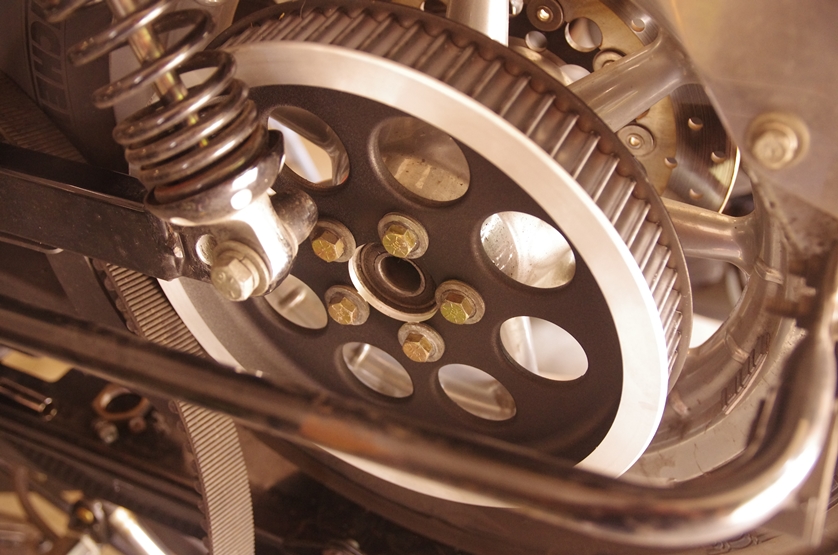 After breakfast I went back and removed the rock guard and removed the rubber bushing bracket on the frame:  Once this is removed there is a shaft that goes from the other side through the transmission housing and the swingarm. You have to hold the nut on the other side and loosen the one on this side and remove the rubber bushing. Mine are not that old so I'm going to reuse them. Once it's removed you can snake the belt around the shaft however it looks like I might have to unbolt the bottom of the shocks and lower the swingarm a little. The book says to remove the swingarm but you don't have to. 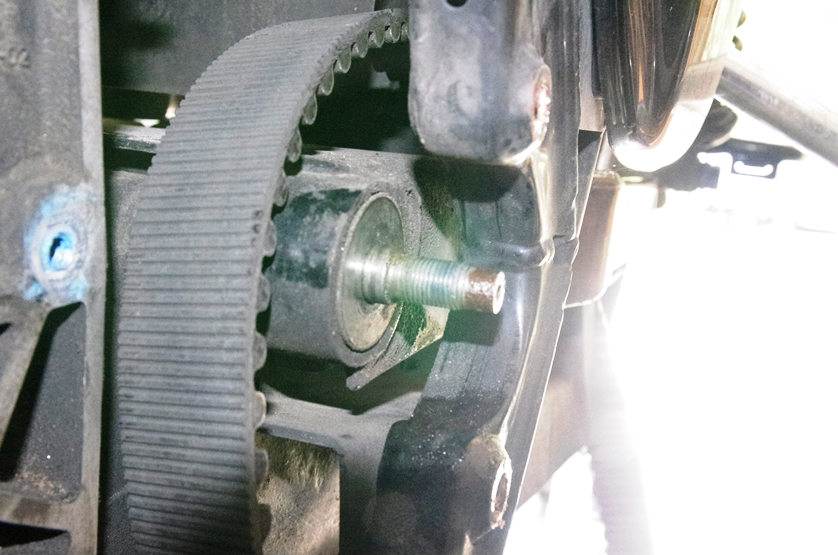 I need to go into the brewery today since I haven't been there all week. I know they need some parts repaired, fortunately nothing is an emergency. I may have to do some quality control work later in the day!  | ||
Zane |
Forget the motorcycle pictures... Are there any photos of the bacon??? | ||
Crusty |
Greg KNOWS how to cook bacon. |