| Author | Message | ||
Hughlysses |
My son is graduating the guitar program at the Atlanta Institute of Music this week. I was trying to think up something cool to do for him and I hit on the idea of resurrecting this old guitar amp I bought second-hand back in high school. 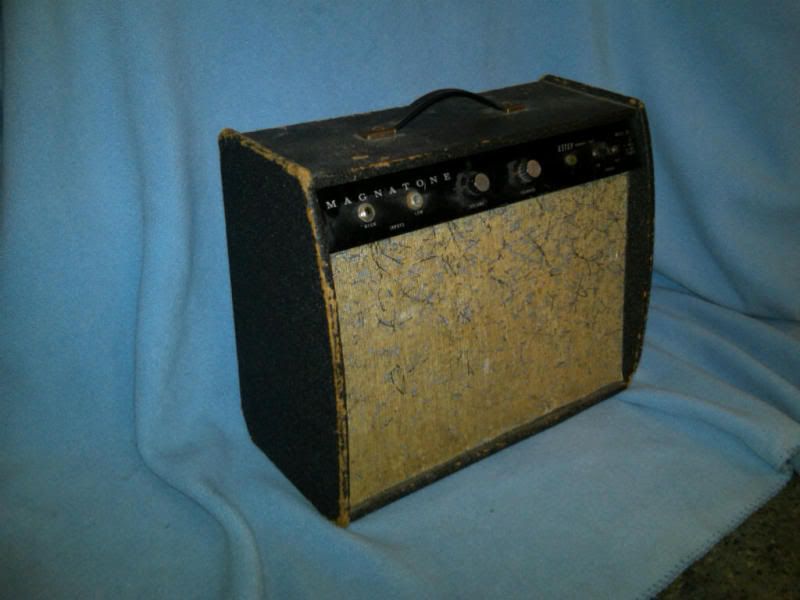 This is a 1964 Magnatone Model 401-A. All tube, with a screaming ~2 watts of power and a 6 inch Jensen speaker. The thing used to sound pretty good- it had pretty much one tone- pure raunch. About 10 years ago after letting a guitarist friend use it at my house for a practice session it stopped working, so it sat unused since then. I hit on the idea of rebuilding it about a month ago, did some research, and found out how to re-wire it to reduce background noise (the thing always had a lot of hum). I got some information at the Yahoo Magnatone group and more at the www.AX84.com forum (a forum mainly on the AX84 all-tube guitar amp available as a kit). The main idea I had was to build a new cabinet out of hardwood to replace the old chipboard cabinet that was falling apart after 45 years. I had seen photos of several neat hardwood guitar cabinets over the years and thought it'd be cool to do a cabinet for this little amp in exotic hardwood. My search for wood sources led me to ebay where there are loads of hardwood lumber for sale. Since I have limited tools at my disposal (no electric planer or thickness sander for instance) the trick was finding wood in the appropriate thickness (3/8") and in sufficient size and quantity to duplicate the original cabinet dimensions. I searched for several hours on a Saturday night and Sunday morning until I stumbled onto a supplier that sold small batches of exotic hardwoods that I could use. I was able to buy 2 packages of 3/8" wenge (pronounced wen-gay) and 1 package of 3/8" limba (better known to Gibson guitar fans as "Korina"). The 3 batches of wood provided me just enough to construct the cabinet with a little left over, leaving almost NO room for screw ups. Here's the wood right after I received it: 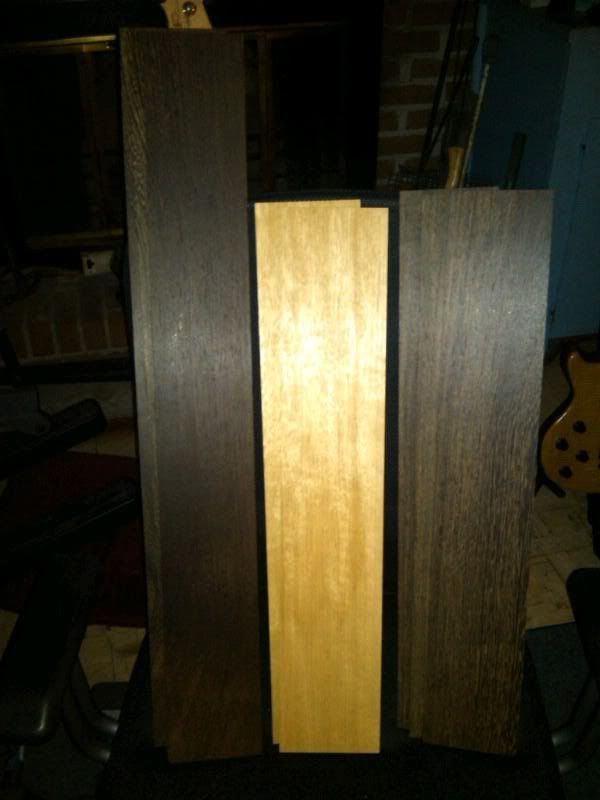 The wenge is the chocolate brown stuff; the limba is light colored. Wenge VERY hard and dense and is used for fingerboards, necks, etc. on some fairly exotic electric basses. Limba has been used for electric guitar bodies on guitars such as the famous Gibson "Flying V"; for some reason Gibson gave it the trademarked name "Korina" when they used it. The wood came thickness sanded and required very little preparation. OK, with the wood in hand and waiting, the first task was to make sure I could get the electronics working again. Here's some photos of the guts of this beast, including the original 6 inch Jensen speaker. There's not a whole lot to it; a preamp tube, a power amp tube, a rectifier tube, and some resistors and capacitors: 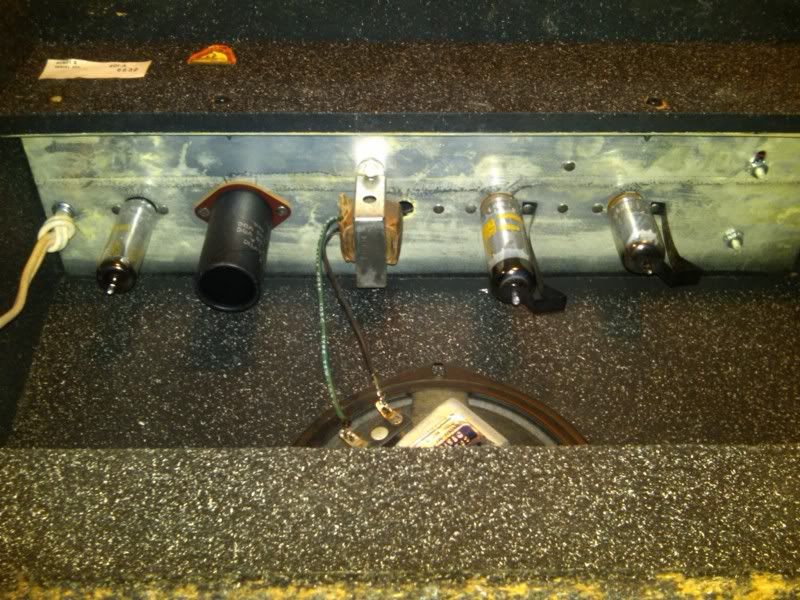 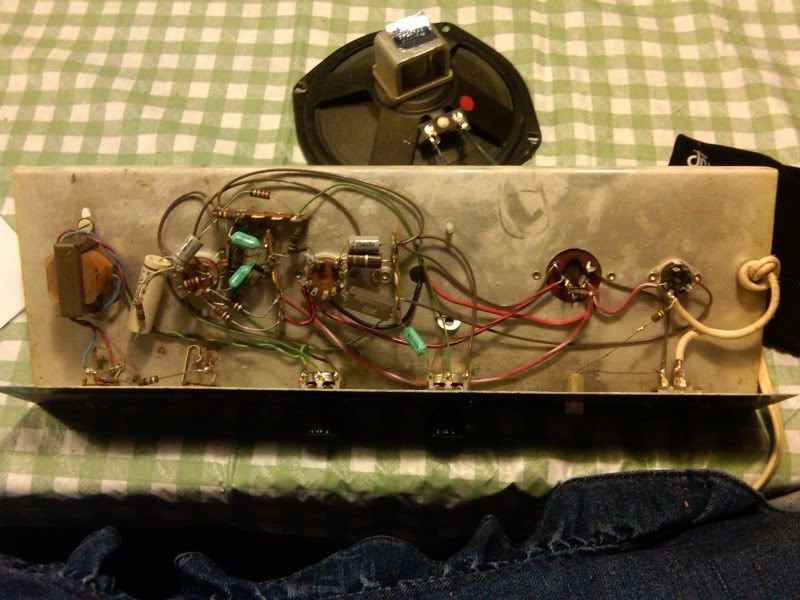 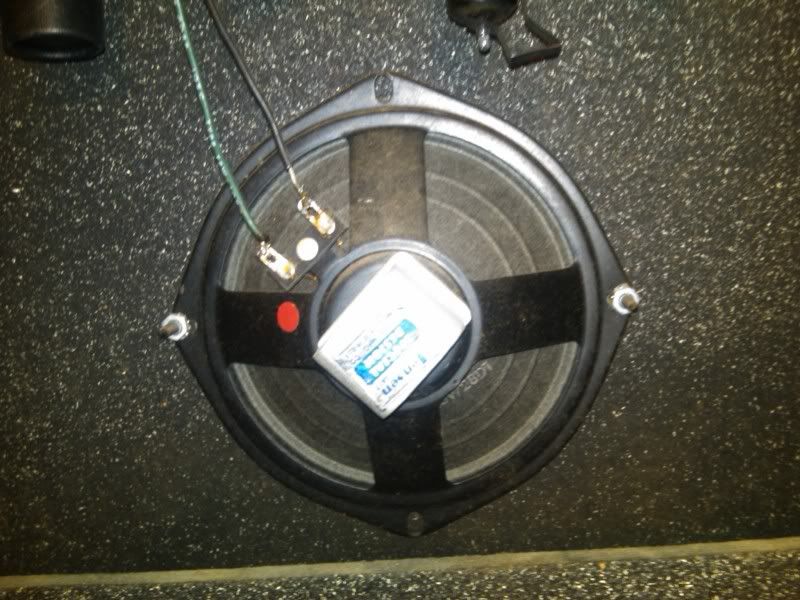 This amp is odd (and potentially dangerous) because it runs 120V straight to the tube filaments. Most tube amps have a power transformer to reduce this voltage, but they skipped that on these amps. If you have your guitar plugged into it, and grab a good ground, you can potentially feel the full 120V. (I found this out the hard way as I used to live in a dorm room with metal walls!) The way to make this amp safer is to wire in an isolation transformer which eliminates the potential shock problem. I also needed to replace the 45 year old electrolytic capacitors which deteriorate with age. This amp only had 4; 2 small ones and two big ones in the form of a 2-section "can" capacitor. I ordered these parts and some others from Antique Electronics Supply; they have just about anything you'd ever want for an old (or new) tube guitar amp. 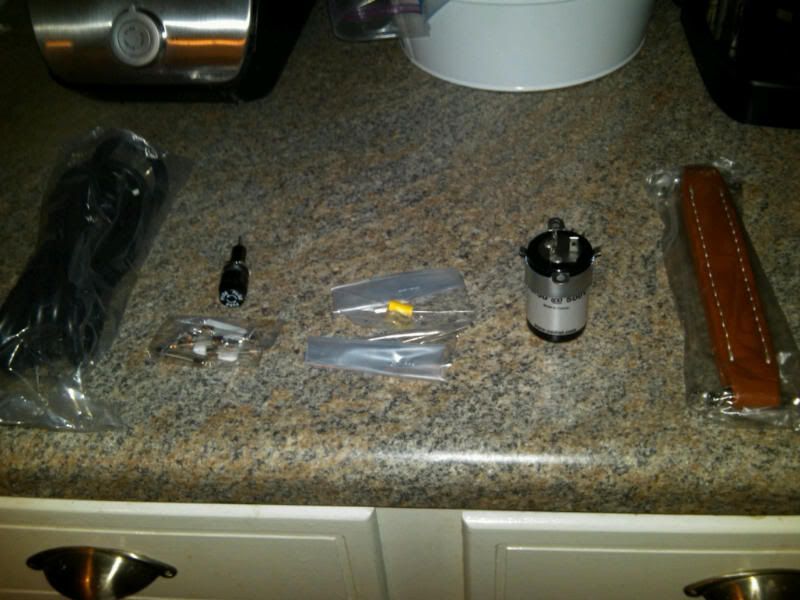 Getting the amp to work again proved to be a very simple problem; the plug on the power cord was broken. I replaced the cord with a proper 3-wire cord and plug which took care of that. The tubes in this amp are nearly new; I purchased them from Radio Shack about 1980 and only played the amp a few hours after that. Re-wiring the amp consisted of adding new ground wires from a few components based on the "star grounding" scheme. This eliminates stray currents in the amp's circuits which can result in undesirable noise and hum. Fortunately I found someone on the AX84 forum who had an amp exactly like mine who'd modified his a few years ago and he sent me detailed photos of his amp's wiring so I could verify what I was doing. This part of the rebuild was tedious but not particularly difficult. I finished that up today and was amazed to find that this amp was completely noise-free when I fired it up. OK, back to construction of the new cabinet. The first task was doing detailed drawings of the cabinet in Autocad and figuring out how to portion my wood to make it work out. That took a couple of days and a lot of measuring and re-measuring to ensure I didn't goof (no spare wood for a re-do). Here's the wood cut to length for all the pieces I'd need: 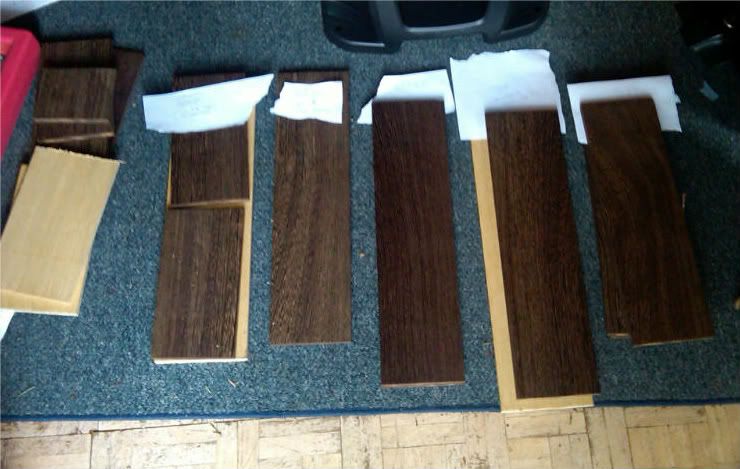 I also modeled the cabinet in Google's free program "Sketchup" so I could see what it would look like: 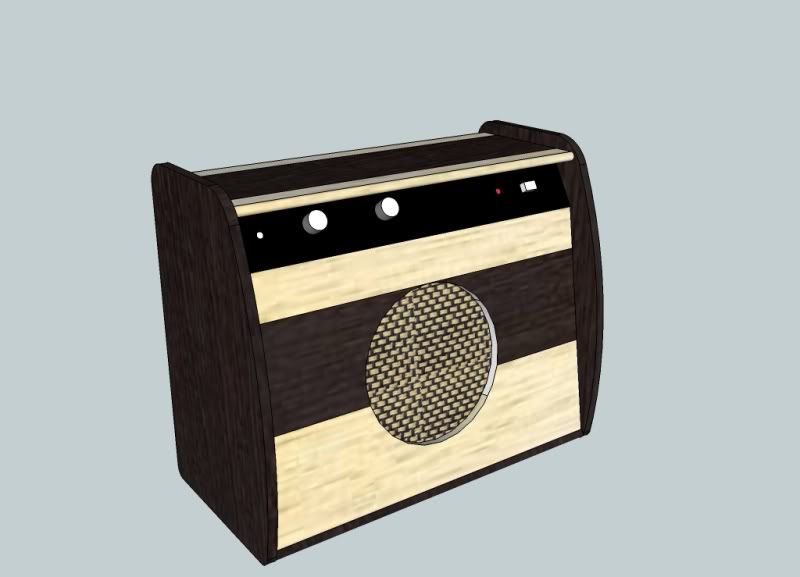 This was pretty close to the final product. Next, I had to glue various pieces together to get the widths I'd need for the various cabinet pieces. Fortunately, I do have a load of clamps that I've accumulated over the years so that part of the job went fairly well: 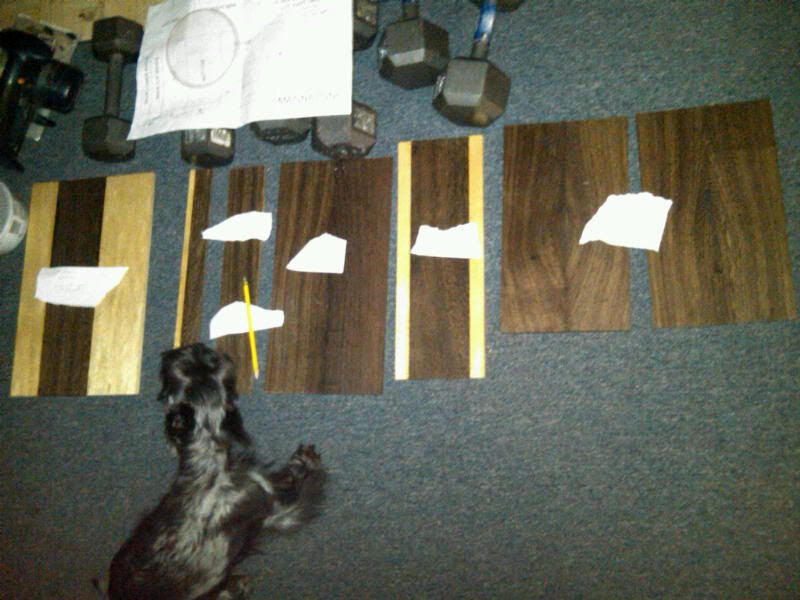 Matti, our miniature Schnauzer, is inspecting my handiwork. The parts of the cabinet were to be joined with mortise-and-tenon joints (just like the original) and this was my first try at that. I finally invested in my own router (I'd borrowed one for previous projects) and a router table. I found some good tips for making these joints on the internet and that helped a lot. Here's my first test joint made with a couple of pieces of wenge: 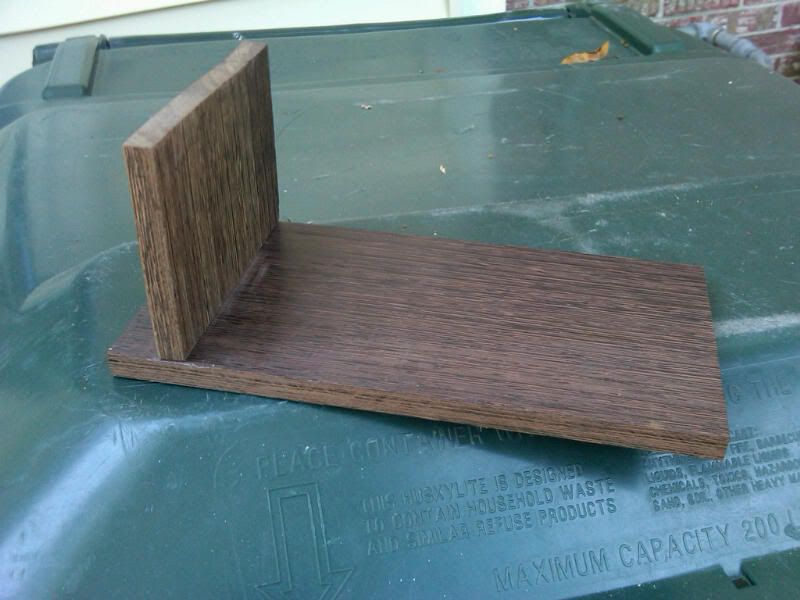 The mortises for the cabinet are all cut in the two side sections. Here are the side sections, cut to shape and with the mortises routed. No goofs! 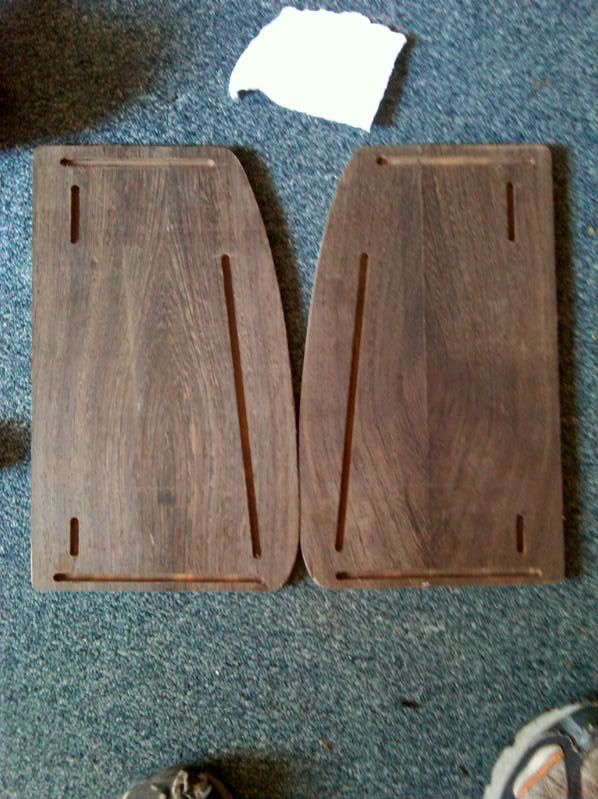 The tenons were difficult to route but each one had to be notched on the ends (so the tenon would be "hidden") so there was a lot of hand work involved. I also found some of these boards tended to warp ever so slightly which required additional adjustments to make the parts fit together. Here's my first dry fit-up of the cabinet parts: 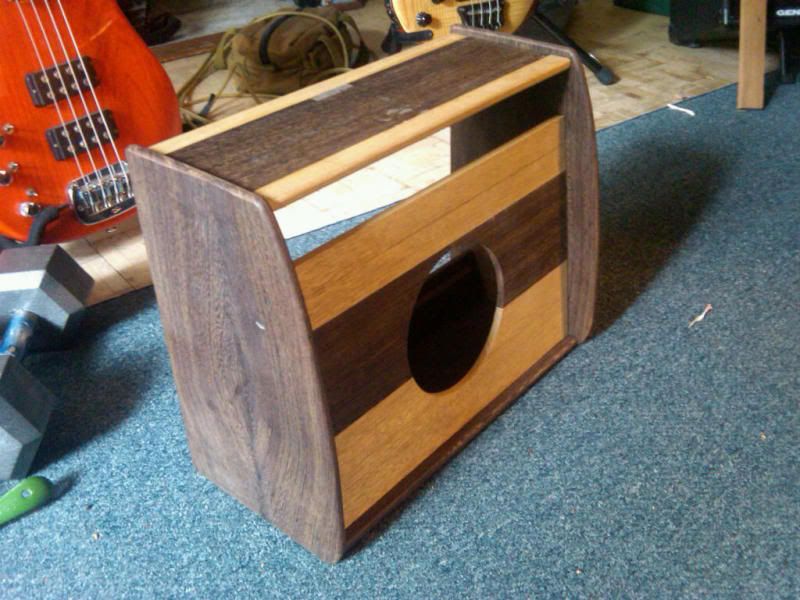 Once I was sure everything fit together correctly and reasonably easily, I took it all apart, carefully applied glue to each mortise and tenon, and reassembled. Here's where all those clamps come in handy: 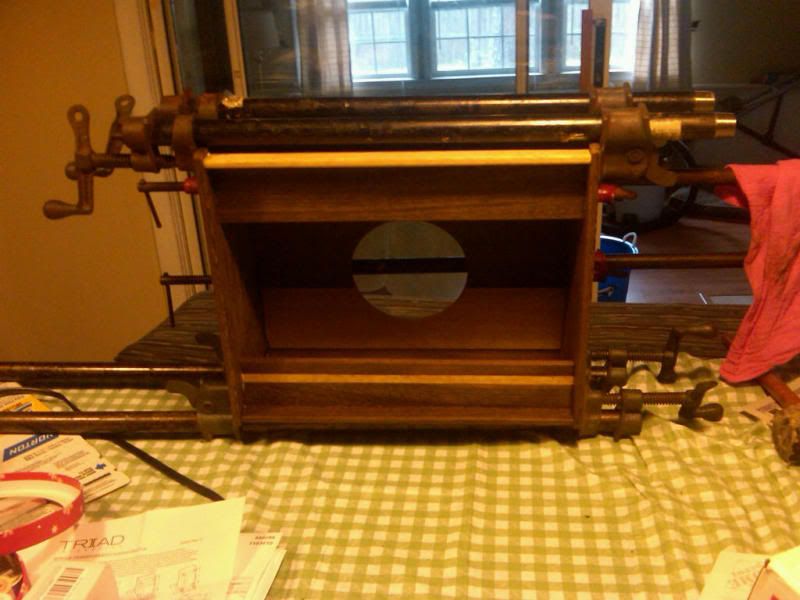 After that, I spent a couple of hours finish-sanding all the surfaces. For a finish, I decided to use Watco Danish Oil, which gives a low gloss but cool-looking finish. It's also pretty easy to do as you just rub it in with a rag. Here's the cabinet after one coat: 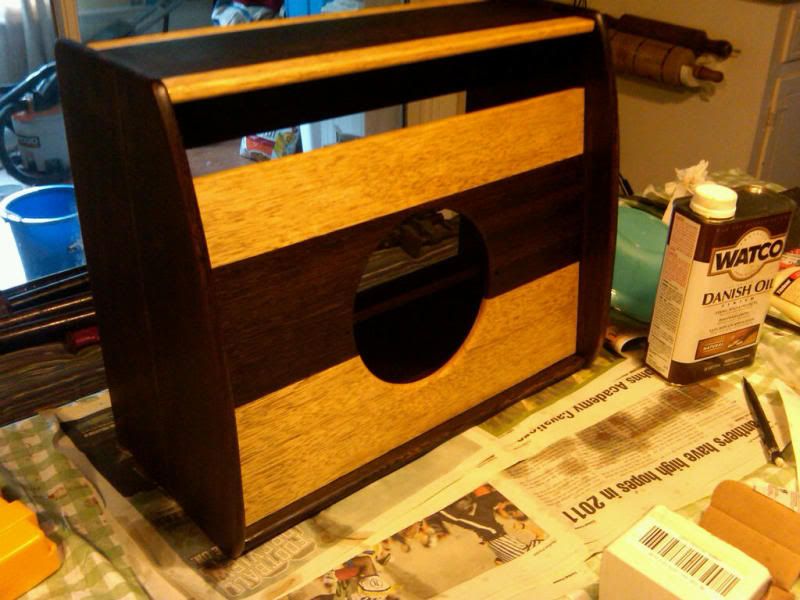 For the second coat, I used a trick I found on the internet. I saturated the surface with oil, then rubbed it in with 400 grit wet-or-dry sandpaper. This creates a "slurry" with the wood dust that fills the pores in the wenge. You let it soak in for about 15 minutes, and then wipe it off against the grain so that some of the slurry stays down in the pores. I could have done more coats but I was happy with the way it looked after the second coat: 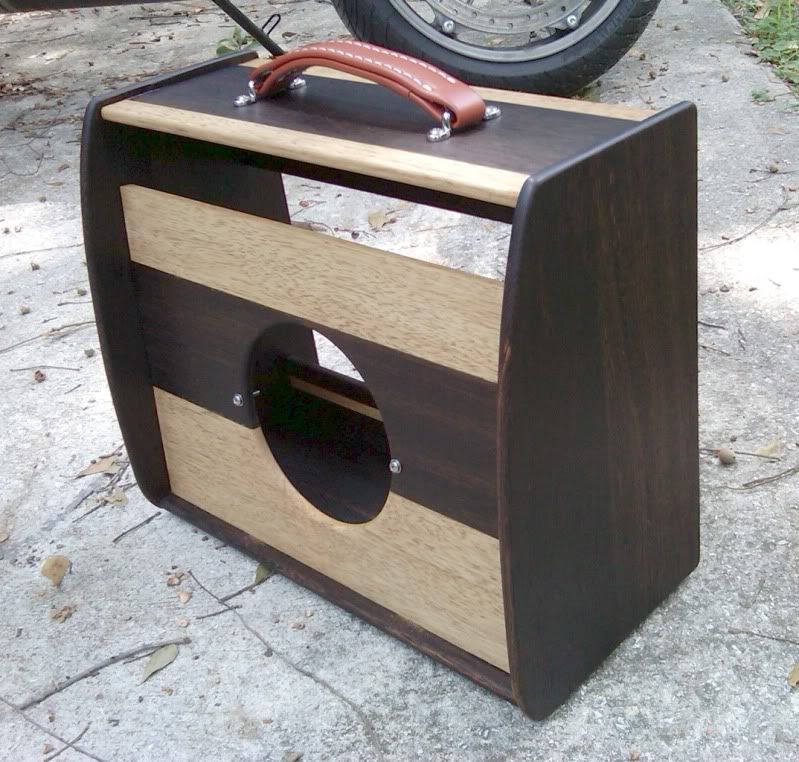 OK, today it was time for final assembly. I hit on the idea of using some woven cane (rattan) for the speaker grill (early Mesa Boogie guitar amps used this) and it worked really well. Here's the finished product: 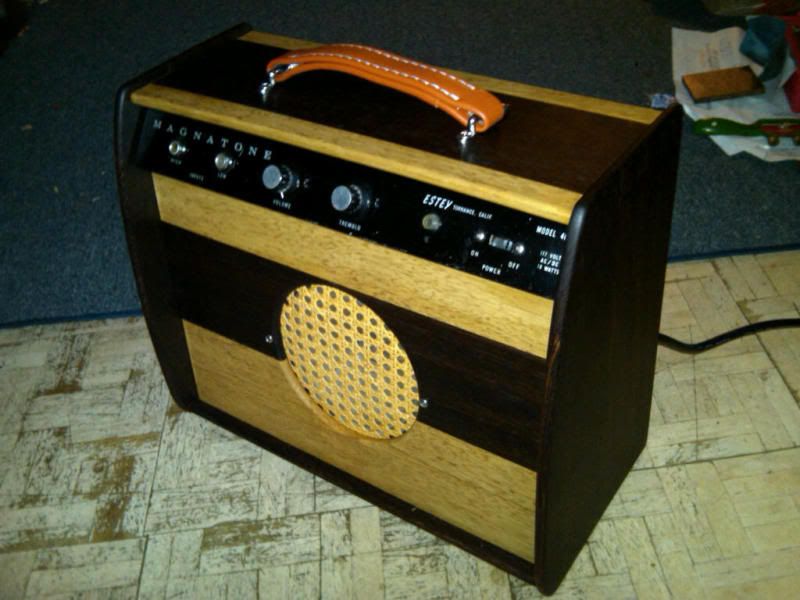 Rear view (the isolation transformer is installed in the bottom left side of the cabinet): 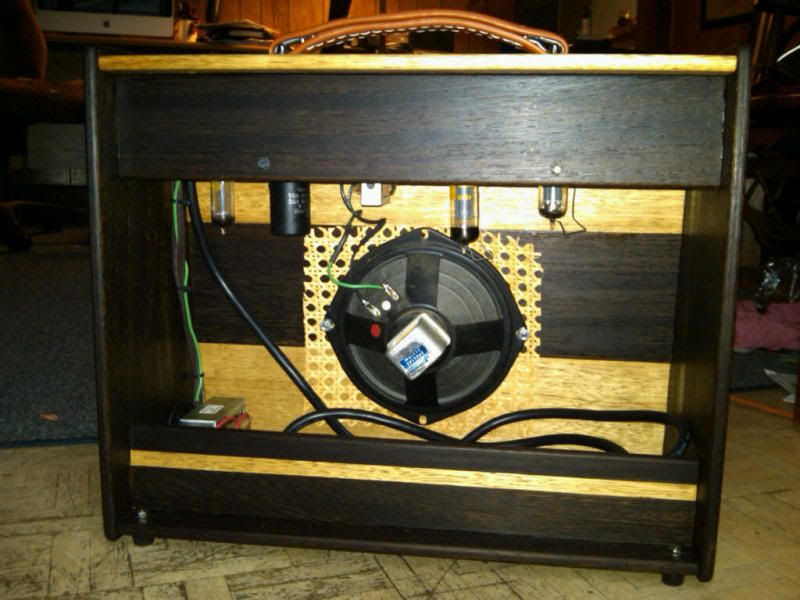 I'm really pleased with how it looks and it sounds better than it ever has. The "unveiling" is set for Friday or Saturday. Hopefully my son will be pleased to get it (and hopefully he doesn't check Badweb between now and then!). | ||
Xl1200r |
That is REALLY cool and I love the design you had for it. I'm sure he'll love it. This inspires to get off my tookus, order up some wood and build that custom stave-construction snare drum I've been meaning to do... | ||
Court |
That is absolutely amazing ...... That's no amp.... That's art!!! Great craftsmanship Congratulations. | ||
Trbulnt |
Amazing work!!  | ||
Kenm123t |
Beautiful workmanship. get spare tubes its an heirloom now! | ||
Strato9r |
Awesome! Check out what a point to point wired, class A low wattage amp, with an exotic wood cabinet will set you back! | ||
Bud_man |
That's awesome! Thanks for sharing ... He'll love it! | ||
Al_lighton |
very cool | ||
Hybridmomentspass |
welll done! very nice looking | ||
Boliver |
Wow what a great job. I hope that kid has a Leo Fender(G&L) to play through it. LOL | ||
Thesmaz |
Looks great and awesome job! | ||
Blake |
Fine craftsmanship is uplifting to behold. Thanks for sharing! Really nice work! | ||
Johnnylunchbox |
That looks beautiful. Ask your son to make a youtube video of the sound. That would be awesome. | ||
Bcordb3 |
Great job. | ||
Bluzm2 |
Cool Meter ----> Off the charts Well done! | ||
Leftcoastal |
That's freakin' awesome! I've been a pro woodworker for 30+ years and that is some fine workmanship there! Be sure to handle the watco rags when done as that stuff can spontaneously combust and ruin your day. You gonna post a vid of it in operation? Me and Johnny want to hear! Al | ||
Hughlysses |
Thanks for all the compliments. I gave it to him late yesterday and he was really impressed. I'll try to get a video of him playing through it today or tomorrow. |