| Author | Message | ||
Reepicheep |
Thanks Brad, good information. So my next step (making really good progress already) is to move the thermistor closer to the heating element. I think it will also help to just make my own heating element in the process, and just stick them all together in a single assembly with lots of potting. I'm thinking 1/2" copper plumbing pipe split down the middle. For potting compound, I think I will start simple, with clearish silicone or RTV. I want something with the best thermal conductivity properties I can get, but that is still an electrical insulator). So maybe I'll swing by and get some of these at lunch... http://www.parts-express.com/pe/showdetl.cfm?Partn umber=017-8 And put in the "next batch" order with Newark. Since I am revising the board and the software, I'll also do some focused testing at that 29 to 33 degree range and make sure I don't have a bug in the code. Heck, I'll post the code once it gets revised and let others look at it also... its neat stuff, very accessible, and I put a LOT of work into the source to make it really easy for a hobbyist to jump in. So anyone that gets or builds one of these things would be about $25 from being able to tweak their own controller algorithims... not to mention be able to make their own simple controllers to do their own things. If people haven't noticed yet, the exact same board and circuit I did for this could be two other very simple and useful things: 1) Voltage "fairly smart" idiot light. Don't install the MOSFET or thermistor parts, and run the LED to a wire that goes up to the dash. I have that code already written as part of a previous iteration of this device, it is simple and I have some good (new) ideas. 2) Smart relay. Leave the MOSFET but ditch the thermistor, and the board will only power the thing at the other end of it after your stator has come to the party. This code is already there and working. Great for HID's, heated gear, etc. It would be that same board, just with fewer parts and different programming for the microcontroller. | ||
Reepicheep |
If anyone has recommendations for good "home brew" potting compounds, please chime in! Clear RTV? Clear silicone bathroom caulk? Hot melt glue? Attributes I think we want are good thermal conductivity, cheap, accessible, and easy to handle. For homebrew it would be nice if it was easily removable (which has been my experience with all of the above), though long term that's probably not much of a concern. When we get these right, they should glue together and run forever. And Brad and Eric, if you wanted to do your own experimentation in the meantime, you could unsolder the thermistor from those boards you have, put wires on it, and position it closer to the heating element. | ||
Al_lighton |
Don't use bathroom type caulk! You really need to use electronics grade stuff. The regular stuff exudes large amounts of acetic acid and is very corrosive. Electronics grade RTV does not. look around here: http://www.mcmaster.com/#catalog/117/3389/=eznuqt Al | ||
Reepicheep |
Thanks for helping me keep my hand out of the blender Al!  Pricey stuff. I'll start with hot melt glue for my prototypes and try and figure out some way to try and keep it from oooozzzzing out when it's hot. Based on how it burns the SNOT out of my fingers every time I use it, I know its a decent thermal conductor, and I've not seen it rust or corrode anything before. Doesn't like UV though... (Message edited by reepicheep on November 18, 2011) (Message edited by reepicheep on November 18, 2011) | ||
Blake |
Epoxy. | ||
Reepicheep |
Cool. I have the resistors, 1/2" copper tube, epoxy, and hot melt glue. I'll see how it works! The resistors were 79 cents each... this could be cool. | ||
Reepicheep |
FWIW, the $.79 25 watt 10 ohm resistors can be "cracked", and you can extract a very nice little 1/8 inch wire wound un-insulated resistor core out of it. Also FWIW, the Polly single setting (36w) heaters are 8 ohms. But I got tired of working on it tonight. I have some time off over thanksgiving, maybe I'll get energy again. Or I'll just take a break and work on something else for a bit and come back to it. | ||
Court |
I'll show you how bad it's gotten . . . in the middle of the night I'm watching one of those "Hos do they do it" shows and it's about Christmas. They do a segment on making candy canes and when they were showing the sugar and corn syrup being melted and molded I have visions of this controller being potted in there . . . . Yikes. | ||
Reepicheep |
I like it! Heated grips, AND emergency rations! | ||
Terrys1980 |
We use this stuff offshore quite a bit for underwater applications. http://solutions.3m.com/wps/portal/3M/en_US/3MElec trical/Home/Solutions/ElectricalUtility/Insulating Sealing/Resins/ | ||
Reepicheep |
Cool! And $22 a pound. Not cheap for sure, but not "stupid expensive" either. I think I'll embed that extracted resistor core in something with a length of glue stick, and see how it plays out. 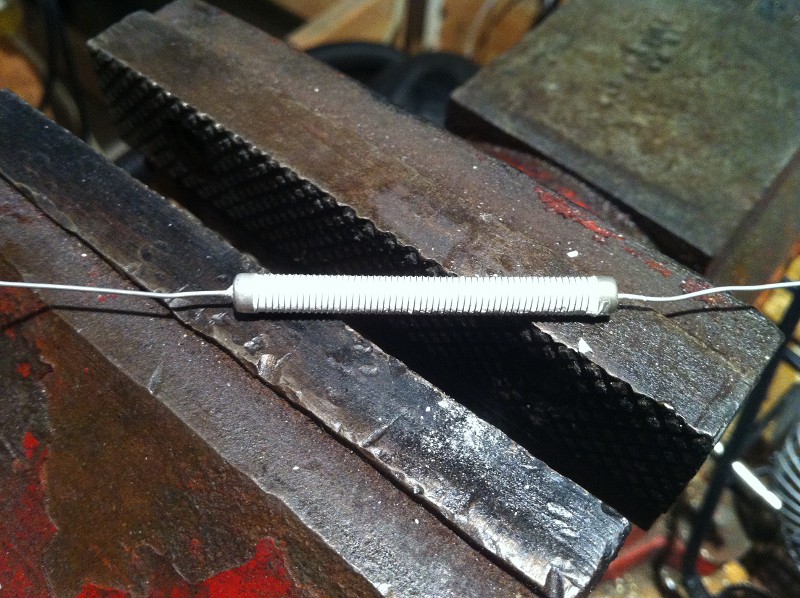 | ||
Reepicheep |
Note to self... hot melt glue burns pretty well. Whoda thunk? Moving on.  I think I need to stop doing too many things. It is absolutely possible to replace the polly heaters with a $.79 resistor and some clever potting... though it may infinge on a Polly patent (no idea, I never looked it up). But that's a distraction. Next, I'll take the heater I have in the Uly and solder leads to the thermistor, and move it closer to the Polly heater, and test that. That will simulate my new board layout. Then I'll recode the existing controller software for the new pins necessary for the new board layout, and do some testing to make sure the "hotspot" Brad noticed isn't some kind of conversion error. Then I'll make a new batch of boards and controllers (takes a lot of time and another $100 investment with Newark). No point in reinventing the Polly cartridges just yet... | ||
Reepicheep |
Focusing on the problem at hand helped! I pulled the thermistor off board and ran it with a short lead, so that when mounted in the bars it is pressed up against their inside. Just like the heater is. They are about 2" away from the heater element. They respond much better now, and overshoot much less. And I suspect you can "tune" them by how far from the heating element you put the thermistor. 2" away runs hot. Half inch away runs cool. I used insulation tucked underneath it to keep it up against the bar. Long term, there is probably a better "spring" I could be using. 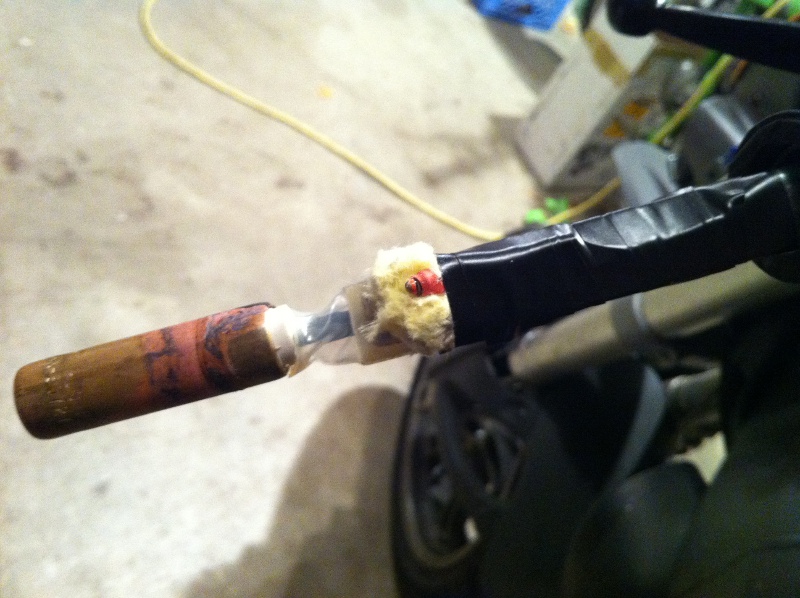 My test bed worked great, so I wired up the Uly with the new setup, but havent tested it yet. | ||
Bluzm2 |
Cool, I'm going to try that.. | ||
Reepicheep |
Let me know if you want another thermistor with leads already attached. And post if you figure out a cool way to spring mount it to the inside or the bars. I should get a quick test ride in today or tomorrow, I'll verify it's better. | ||
Reepicheep |
It worked brilliantly... almost too well. I had the outboard thermistor about 1" or so away from the heating element as pictured above. No more overshoot *at all*... it was pretty amazing. And the undershoot was less pronounced. In fact it may have worked too well, the grips were warm, but my personal preference would be for a bit hotter. So probably just a matter of moving the thermistor 2" away from the heating element. So I think I will redesign *yet again*. Now that I have a dangly wire anyway, I might as well go back to the original design, and put the stator monitor "pretty smart idiot light" back in, and just move the main controller back under the flyscreen. (Message edited by reepicheep on December 02, 2011) | ||
Reepicheep |
BTW, if anyone who has one wants me to modify it to have the thermistor off board, I'll be happy to modify it if you want to send it back. You can do it yourself, it is straightforward, but the soldering and desoldering might get fussy if you haven't done it a few times before or if you dont have small equipment. | ||
Blake |
My equipment is huge, but I think I can still tackle the delicate soldering task. | ||
Reepicheep |
Ahem. Rode to work this morning, 28 deg F, which is really just too cold for a cartridge heater to work well. At these temps at speed, your only option is "too cold" or "scald your palms while the backs of your hands freeze"... an interesting sensation for sure. The new location worked great in terms of regulation, the overshoot is pretty much completely gone now. That means that I can (and should) do a couple things to the algorithim... first I can go for a target temp a bit higher. Second, I can soften some of the "max rate of climb" controls I put in to limit overshoot. They don't need to be that aggressive anymore, and without them I can get up to temp faster when I have to cover a 50 degree delta. | ||
Blake |
I was gonna say that modifying the program parameters might work better than moving the sensor further away. Great example of controls theory with variable feedback loop scenarios. | ||
Reepicheep |
The rub I have to work around is max temp. On an 85 degree day, I suspect a 95 degree target temperature would be annoyingly hot. But on a cold day, it is probably on the low end of what you want. Having a larger distance between the heating element and the sensor lets me tune the heat to be more aggressive, like you want on a cold day, but with a lower top end, like you want on a warm day. All this is rooted in a stubborn insistence on not having an "on / off switch". I want it to just do the right thing. I want, through relentless engineering, to make it simpler than possible. | ||
Reepicheep |
Now that I have decided to move the controller back out of the bars, I could actually add another $2 worth of parts and have a second on board thermistor. One to measure ambient, and one up in the grips. That would let me simplify the algorithm quite a bit. Maybe I'll play with that... | ||
Bluzm2 |
Bill, I'm not going to be of much help for a while. I had to park the Uly, too much ice and salt on the roads now. I'm conflicted between doing the thermistor move mod or waiting for controller V2.0 Brad | ||
Reepicheep |
LOL. This is actually version 7 or so. I have the same dilemma... every time I improve the stupid thing, I have to replace another one to the Uly. I'm gonna wear out the threads on the flyscreen cover, and I have a box full of various prototype boards that I salvaged all the expensive parts from. | ||
Reepicheep |
Free to the first person to reply here that they want it (free in US, if outside US you pay shipping) A Vellman PIC programmer / exploration kit (already built and working): http://www.vellemanusa.com/products/view/?country= us&lang=enu&id=522056 Disclaimers.... This works, but for a pretty narrow niche. You need to download the right drivers from somewhere (probably Velleman, maybe somewhere else, I forget, but they were not hard to find). I seriously doubt the drivers will work with Vista or Windows 7, but who knows. They *did* work with Windows XP. They also require a laptop / desktop with a serial port that has an honest to God UART behind it. One Dell laptop I had did have one, one dell didn't, my thinkpads did, most older desktops do. It also doesn't program all PIC's, but it does a lot of them, and plenty of good ones. It has some built in LED's and momentary contact buttons as well, so you can use it to teach yourself to use the PIC's. So its totally usable if you have the right common things (windows XP, machine with serial port, real UART). Yours if you can use it! Just let me know. If you want a less limited programmer, I have a couple from these guys: http://www.piccircuit.com/shop/ Dirt cheap, work *great*. You can probably get one of these to your door for less than I will pay to ship this Velleman board. I just can't bring myself to throw it away... | ||
Reepicheep |
Spoken for. Thanks all. | ||
Reepicheep |
Update (since I had to find the thread anyway)... I relocated the thermistor about 3" from the heating element... about mid way up my board, over the IC (the big black centipede looking thing). Worked fantastic, and you can tune if it runs "hotter" or "cooler". The further from the cartridge you put the sensor, the hotter the system is biased. | ||
Reepicheep |
Just an update as this has been lingering a REALLY long time. The controller parts and algorithims are really well sorted now. The thing really works well. I used it all last year in all sorts of conditions, and while the limits of a cartridge heater are sometimes hit (they cant heat up or cool down fast, and when it is uber-freaking-cold-out they can just be "a little too hot on the inside of your hands and too cold on the outside of your hands"), they are really nice and non invasive. I'll be doing one more schematic redesign when I get time (I'm restoring a KZ400 now, which is more fun for the moment). I'm going to abandon the "in the bar" mounting solution, and make it a slightly bigger (but much easier) under the flyscreen package, and scale it to fit an off the shelf enclosure (which you can use, or just wrap the whole thing with rescue tape or something). That will also allow the return of the battery monitor LED (single LED that blinks colors and codes to tell you important things about your charging system, including transient detection). Anyway, just an update. If anyone wants me to make progress sooner, come over and help me get the KZ finished. | ||
Reepicheep |
KZ isn't finished, but I dusted off the controller project anyway. The V6 uber-heater lives! 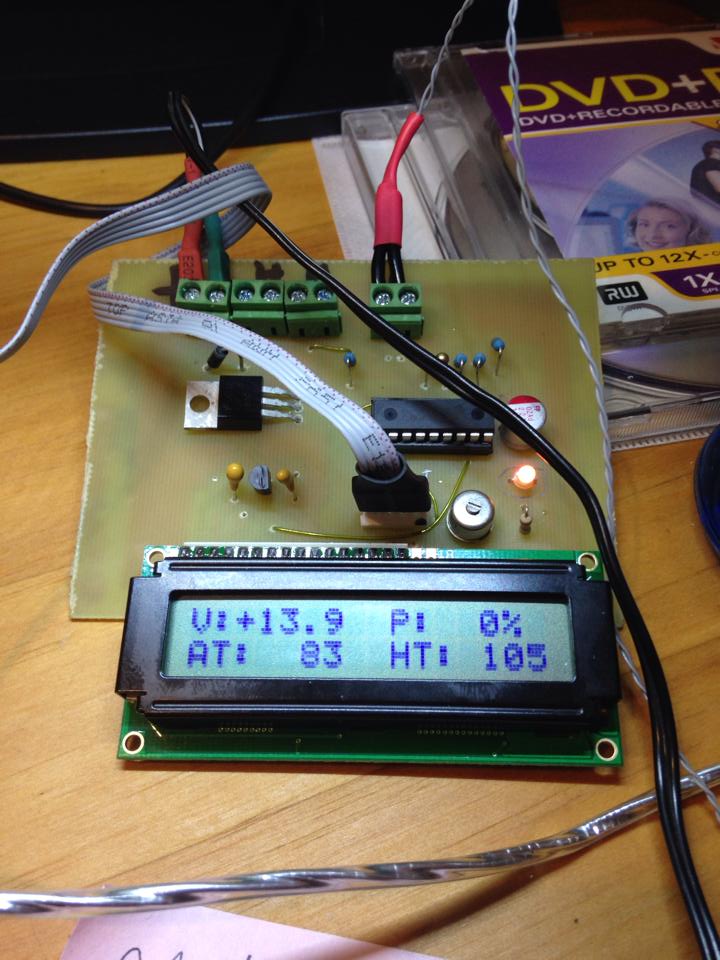 Well, it sort of lives. The temp calculation is a bit off still, and I am now wondering if the thermistors are consistent enough out of the box that I don't need custom calibration for accurate values (not really functionally that critical, but if I am going to make a thermometer, it might as well be one that is right). And I have to re-tune all the heater control algorithims, now that I understand some of the quirks I want to redo them from first precepts and see if I can really nail them. And packaging remains a big challenge. The LCD can run from an 11 pin ribbon cable. And the PCB is getting pretty tight and a hassle to fabricate in the garage, so it might be time (when I am comfortable with the prototype) to get some of those professionally fabricated. | ||
Reepicheep |
The biggest new feature that made me decide to go to the LCD (which will be purely optional in the final build, it will be driving one regardless of if it is there or not, and will work perfectly well without it)... a transient voltage problem detector and reporter: 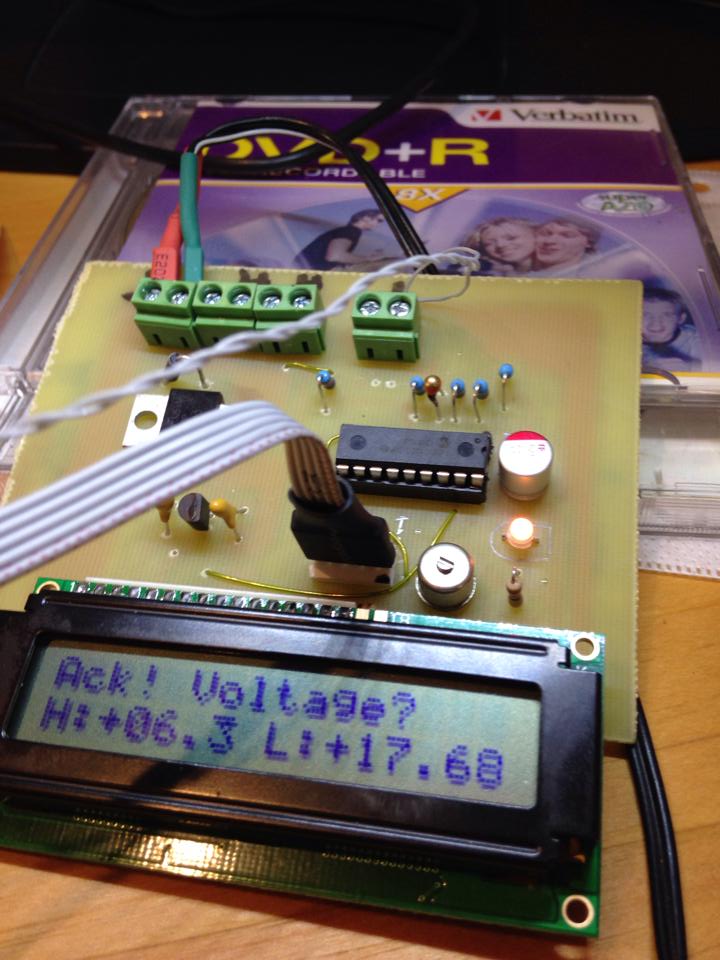 It goes into this mode when outside of the normal operating voltage range of the vehicle. A battery load test every time you thumb the starter. It takes about 3000 samples over 3 a second window and tells you the highest and lowest voltage seen. Repeats these 3 second windows until back in normal range. When back in normal range, it goes back into the heater mode. |