| Author | Message | ||
Reepicheep |
OK, the folks at a large and really classy motorcycle gear company decided not to pursue a license for the heated grip controller I designed (for fun). I don't blame them, and they were fantastic to work with. It would take a lot to go from my functional prototype phase to a packaged commercial product, and the economy isn't one where people want to take a lot of gambles right now. The design is ***finally*** well sorted. The actual algorithm to control the thing, and a critical packaging detail, turned out to be very non obvious and really tricky to sort out (which is why I am guessing I would be the first to market with this solution). Yes, it might be patentable. And yes, if I did so, it would probably be expensive to defend. So now I'm trying to figure out what to do with the design... 1) Keep shopping the design around. This would be the logical answer if I wanted to be in this business, but I don't. Its just a fun hobby. I have a day job, and I like it. I would love for the hobby to be self funding, but I don't want to give up the time it would take to make this an actual business. 2) Publish most of the design (everything but the firmware) and sell DIY kits with preprogrammed chips, or even just the programmed chips if people want to completely build their own device. Its not a complicated circuit, and all the parts are easy to source. People could figure out the algorithim eventually, especially if they have a device in hand, but they would still probably be looking at 40 to 100 hours to reproduce the program. 3) Really throw open the design completely, and publish everything. I don't know anyway to protect the hardware, but I could make the software open source. Make it a platform that anyone can take and run with if they find it interesting. And maybe still sell kits and chips if people don't want to be bothered creating their own boards or programming their own controllers. 4) Do #3, but also patent it. So it really isn't open source, but I would grant people rights for personal use. The issue here is that I would probably be out $5k at least by the time it is patented, and all that does is give me the right to spend even more on litigation that might result. As earlier stated, I do NOT want this to become a business, why ruin a perfectly good hobby?  I'm leaning towards (3) right now. It would be the least lucrative, but the most entertaining. Thoughts anyone? | ||
Blake |
I agree, #3 seems the most fun and rewarding. | ||
Reepicheep |
 After trying a lot of different things, the minimalist version of this controller (the best I think) now mounts right inside the bar next to the heater cartridge... It uses a PIC microcontroller with a fairly sophisticated algorithim to control heat. It also leverages some basic physics principals to further enhance it's operation. Key features include: 1) Smart voltage sensing. When the key is on and the device is powered up, but the motor has not yet been started, the controller will wait before actually running the heat. This is to keep your battery from being drained running the heaters (which can draw decent current). The feature also effectively detects a stator overload or failure, and cuts off the power to the heaters when the bike is out of "chargin margin". 2) Adapts to any heater element. I use it with the "cheap" polly snowmobile heaters (one setting, $19 or something from Dennis Kirk). You could also use it with a 15 watt resistor (I have some on order to try). In point of fact, you can use it with a 10 watt 12V light bulb, though I doubt it would last long in a handlebar. | ||
Bluzm2 |
Bill, that is AWESOME!!! I want/need one today! I'd buy 2 kits from you today if they were available. I think #2 or #3 would be work. However #3 is kind of the way things are going now. Trying to protect IP can be quite expensive, for a single product like this probably doesn't make sense. Maybe publish it in Make or someplace like that. Did I mention I REALLY need one of those??? Let me know where and how much and the $$ will be on the way. Seriously.... Brad | ||
Reepicheep |
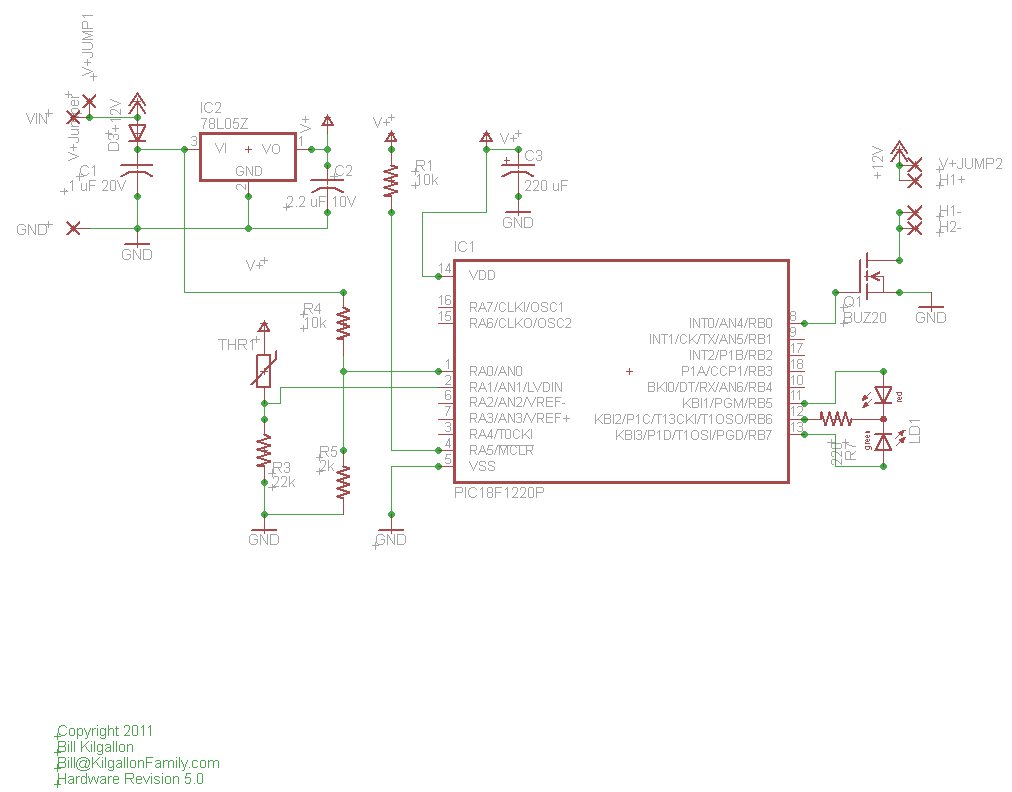 Fairly simple circuit... It's amazing how much you can do with just a few parts and a PIC. Perhaps $10 in hardware (including the board).  I've been fabricating these at home using laser printer / toner transfer techniques. They work well, but it's a big messy chemistry experiment. The tin plate solution has a limited shelf life, and is $6 per pop, so that makes smaller batches more expensive. And then you have to cut down all the individual boards, and drill all the holes. Next step is to find a board fabrication house and just pay them to crank out 100 or so boards (probably end up $3 to $5 each at that volume)... If anyone has used any of these before, I would welcome any insights they could offer. | ||
Reepicheep |
Let me check inventory Brad... I may have two extra already built. I'll email. | ||
Reepicheep |
One controller can run both grips just fine. The weakest link is actually the trace on the PC board... I expect the thing could drive a 50 watt load with no probelm, maybe even 100 watts. There are two minor downsides to running just one controller: 1) You need to run 3 wires into one side of the bars (instead of just 2). Not a huge deal, but it's a bigger hole you need in the bars, and takes a bit of fishing. 2) It senses based on just the bar it is in. I have it on the clutch side. So if I were to ride for a bit on a cold day without my hand on that side, it sees a LOT more wind chill, and the throttle side would start to go into serious bake mode while the clutch side holds the right temp (but requires a lot more power to do so). The alternative is to just use two controllers. That way you just have two wires going to each bar, and each side does whatever it must to regulate temperature correctly. I have several of these built, so I could use two, but I just use one controller on the clutch side. It doesn't bother me at all. In fact it entertains me to feel the right grip heat up when I uncover the left grip. | ||
Marksm |
I would love to have a pair of those.... | ||
Prior |
I've run a prototype for a bit and it's really cool. The one I have is mounted under the windscreen so doesn't really measure bar temp and was prone to be a bit cool sometimes (not a huge deal), but really hot at other times (pulling over to pull a fuse sin't always fun)... That said, I'm in for buying one of the newly designed ones; one because it's a really cool device and two to support Reep in his quest for building such cool things. Nice work Bill!!! Keep it up! | ||
Reepicheep |
Thanks Alex. You are right, and that was why I abandoned that approach. The original vision was "a better on off switch", which is what yours was. So it was really effectively a heat controller dial that was automatically set based on the ambient temperature. That sounded like a good idea at the time, but I could have saved myself the trouble if I had done a bit more math. Think about it... a motorcycle that is stationary on a 40 degree day is effectively at 40 degrees. Easy. But a motorcycle going at 75 mph on a 40 degree day is effectively at 24 degrees (if you are a mammal or a heated grip). So the grips can literally see an effective temperature change of 16 degrees in 5 seconds (stop light to interstate). So that design had to choose which end of the spectrum to target, and targeted somewhere in the middle. So it was too hot when you were stopped and too cold when you were rolling. Still far better than a two position switch, but I knew I could do better. So now it is closed loop. That complicates the design a bit, as now you have to have the sensor in proximity to the heater. I first didn't like that idea, because it meant a potentially fragile temp sensor and some delicate wiring running up to the heater element. It's trouble waiting to happen, so I really wanted to avoid it if possible. You can tell I am a software architect hounded by complexity... I can be pretty relentless in trying to keep things simple and elegant. Entropy and I are personal and long time enemies. Thats when the brainstorm came to just move the entire controller up into the bars. That also solved another problem, which is how to package the whole controller. For personal use, I just wrapped the sucker with lots of electrical tape, but that would be pretty lame to buy something from the xxxx fancy motorcycle parts catalog that came with a roll of electrical tape and said "wrap tightly". Now, the "packaging" for the controller is the handlebars. I can just slap shrink wrap tube over it. That did loose the voltage monitor LED part of the controller though... which was another cool feature in an earlier version. That's another project for another day, and this circuit already has everything it needs to do it (just don't put in the MOSFET, use lighter wires, and run a longer wire to the LED. The picture shows the completed current version. The two on the outside are the latest version, the one in the middle was an earlier version (pretty much the same thing, but a different board layout). The redesign was to allow the controller to fit in smaller inside diameter bars than the nice big steel ones on the Uly and Lightnings. The battery is just there for scale 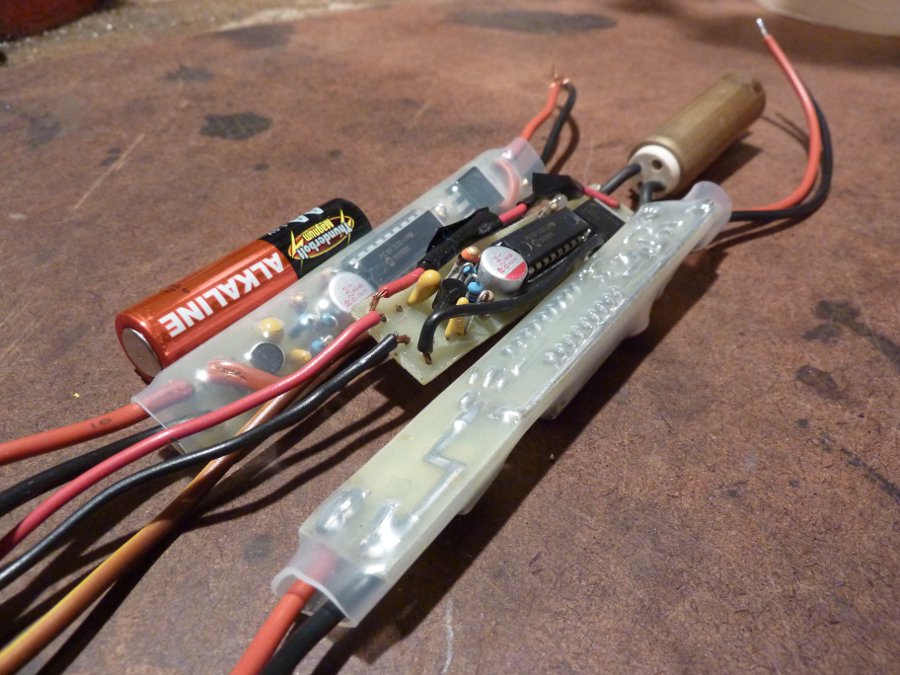 (Message edited by reepicheep on October 21, 2011) | ||
Reepicheep |
For the tools, it's actually pretty easy to get into building PIC stuff once you clear a few easy hurdles. Like a lot of tech these days, the problem is "too many options". Start by picking a version of the PIC. After a lot of hand wringing and trying different ones, I settled on the PIC18F1220P. Its reasonably cheap, reasonably powerful, and it is supported by my development tools and programmer. Google it to see specs, it has several analog inputs, several discrete (0 or 3v) inputs and outputs, and runs with an internal clock if you can tolerate 5% or 10% temperature drift (which, unless you are building a clock, you can probably tolerate). If you do need tight timing, $2 worth of crystals and capacitors will lock it down to be perfect. I think I picked a different PIC for the chip that I use to investigate and play with... something more expensive (read: $4 instead of $2), with more pins. That one drives an LCD, which makes development and debugging a lot easier. But again, that's another project for another day. The 1220 would drive an LCD fine, but you run out of pins, and can run out of memory if you have a complicated program. My heater controller program is maybe 15 pages of C source code, and it more or less fills the PIC. I only had put moderate effort into keeping the code tight to fit (just a "don't be stupid" approach... not going to extremes to save RAM). I don't even use any of the EPROM writable space yet, no need. 15 pages of C source code may not sound like a lot to young punks these days, but if you are a C programmer, you are probably thinking "15 pages is about 12 pages more than I need for many problems". The awesome things about these Pic's is that they are so cheap and easy... $8 worth of parts to have 4 analog inputs and 12 discrete outputs (which you can mix and match as needed). That's enough for 4 analog sensors, 4 discrete inputs or outputs, and a complete LCD driver. My own little robotic minions.... | ||
Bluzm2 |
Bill, We are in the presence of GREATNESS! This kind of stuff really floats my boat. I wish I did more with my "electronics education" over the years. I went to the network infrastructure side of the world right after school.. never did much with the electronics paper I spent 3 years getting. Have you done much with the Arduino platform? Brad Oh yeah, my "C chops SUCK! Never did figure that one out. I started out on assembler and never learned the higher level languages in depth. (Message edited by bluzm2 on October 21, 2011) | ||
Reepicheep |
To program the PIC, you need a compiler, and you need a programmer. The compiler I use is from Microchip, MPLAB: http://www.microchip.com/stellent/idcplg?IdcServic e=SS_GET_PAGE&nodeId=1406&dDocName=en019469&redire cts=mplab Free in the basic version (without a lot of limitations). If you run out of space and need to aggressively optimize code, you can gain another 10% to 20% of space by upgrading to a $ licensed version. I haven't found the need. For the programmer, I settled on this guy: http://www.piccircuit.com/shop/56-ica03-usb-pic-pr ogrammer-set.html Works great... I have two of them, minor differences in versions, both work great. If you run the right 4 wires on your prototype board, you can ditch the ZIF socket and program and emulate right on the development board. I have a schematic and prototype for that as well, but that's still another project for another day. (Message edited by reepicheep on October 21, 2011) | ||
Reepicheep |
Audrino is great from what I hear from people that use it, but for me it was a non starter... as the boards are still $20 or something a piece. I was shooting for a $5 per unit price point... something less capable, but far cheaper. I was looking at this to be a programmable replacement for simple analog circuits, not a real computer controller (which is what I ended up with, but had to get up to $8 or so). TI has a pretty awsome little microcontroller as well, that can run on picoamps or something ridiculous, and that are also absurdly cheap. I just went with the PICS because they are older and there is lots understood and easily discoverable about them. Brad, stay tuned... I'll publish my prototype setup as well (which includes a 16 char x 2 row LCD). For $50 you can build it out and have it all running. You can start with a little demo program I wrote in C, and "play with it". You will learn C in short order... its an awsome little language, and the really hairy bits aren't used for microcontroller programming anyway (or aren't required at least). | ||
Bluzm2 |
Cool Bill I really look forward to it. Audrino would have been WAY overkill, I was just wondering if you messed around with one yet. I have a bit but not much.. | ||
Reepicheep |
For the circuit and board layout, I am using Eagle Cad. http://www.cadsoftusa.com/ Decent software... free for non commercial use, pretty pricey if you want to make money off it. Yet another reason to open up my design. If I wanted to sell this board layout, I would have to buy an eagle cad license, or redo the whole layout on another software package. Routing the boards is a bit of work, but strangely satisfying. Like a big puzzle. | ||
Reepicheep |
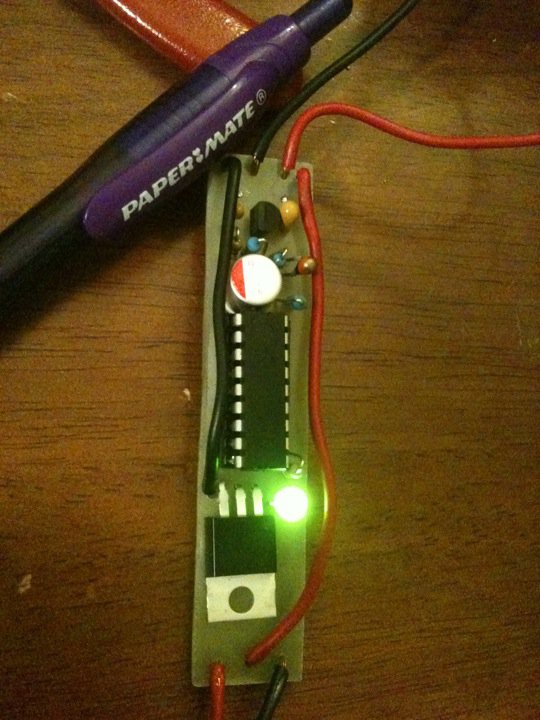
Installation is pretty easy. First, prep the controller. Cut the wire for one of the Polly heaters down to under an inch. (Leave the other full length.) The closer it is to my controller, the "cooler" the heaters will run. It expects a little under an inch. If you go too short, and the wire breaks, you might run out of wire on the Polly heaters. Solder each to the board as shown in the pictures (polarity doesn't matter). 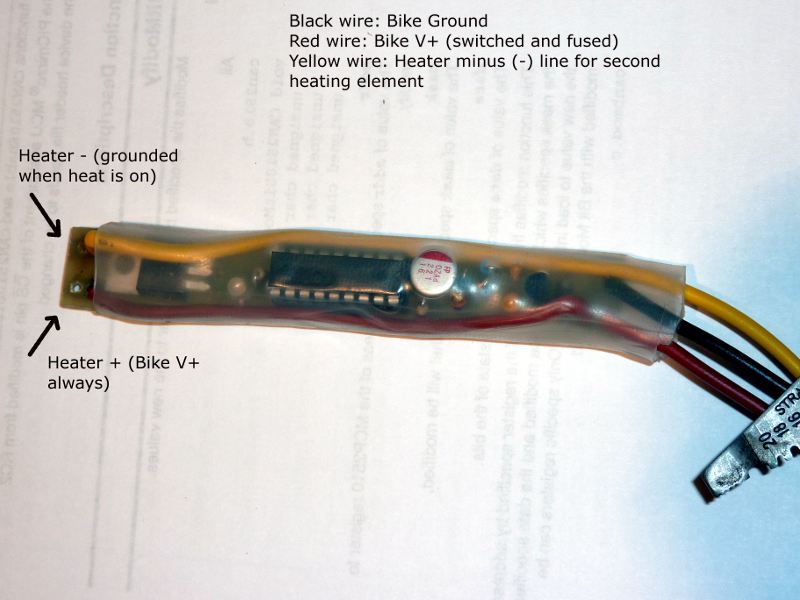 It probably wouldn't hurt to seal both ends up with some electrical tape, or RTV and electrical tape if you want to get fancy (I didn't). You just want to keep things from shorting over time as things vibrate in the bars. I have about a season on my setup, and see no wear at all. Next fish the wires through the bars via a discrete hole somewhere at the base. The Uly already has them drilled, trying to put them in my 9sx was an exercise in broken drill bits and frustration... so you might want to just start with the Dremel tool and a tungsten carbide bit. Fishing the wires through is actually pretty easy. Get a piece of thin stiff wire, push it in the hole you made and towards the end you want to come out, until it pops out the bar. Then tape the wires you are pulling to it, and pull it back out. The wires will get far enough out you can get hold of them with pliers and work them through. The heaters work better with insulation on both ends... so stuff a little bit at the end of the controller away from the heating element before you work it into the bar. Just wrap it around the wires. It doesn't have to be much, just enough to keep things from getting drafty inside the bars. Once the wires are routed to under the fly screen, hook the red to the bikes V+, and the black to ground. No extra switch necessary, but you do want it switched by the ignition, and it should be fused (don't blame me if this burns your bike down). On the Uly, just tap into the accessory line. On the 9sx, it may take a bit more hunting... I had HID's routed to a relay going to the battery, so I took the old headlight line and used it. The only problem with that was that when I ran my high beams, I turned off my heater. Generally a bad thing, but as I was testing algorithms (and roasting hands) it saved me a few times  That leaves the yellow wire to control the other heater at the other grip. Install it (again, the insulation on both ends makes the cartridges work better). Hook one wire from the heater to the same bike V+, hook the other wire to that yellow wire. Make sure the ends of the bars are plugged (by grips, or plugs, or whatever. You don't want air blowing around in there. That's all! To test it, switch on the ignition. Do this before you pull the controller into the bars. You should see the LED on the board cycle through green yellow red. I could claim this is an exhaustive self test, but its really just playing, I did it because it looks cool. After that 1 second "self test "... you will see one of three things... 1) Green LED. That means its warm, and the controller decided no heat is needed. 2) Yellow LED. That means the controller wants to heat, but is choosing not too, because the motor isn't running yet (or your stator is toast), and it doesn't want to kill your battery. 3) Red LED... the heat is on. Be careful, if it is #3 without the heater and controller in the bars, it will pour heat into the Polly cartridge trying to heat your whole garage. The cartridge will get hot, but until the whole garage warms up, the controller is still cold. It will heroically keep pouring heat to the cartridge. This makes the Polly cartridge hot enough to burn the snot out of your fingers when you grab it (don't ask me how I know, and don't ask me how many times I learned it...  ). You need the whole assembly in a metal tube so the heat from the cartridge can get to the controller. If you want to play with it, I used 1" copper plumbing pipe scraps, works great. ). You need the whole assembly in a metal tube so the heat from the cartridge can get to the controller. If you want to play with it, I used 1" copper plumbing pipe scraps, works great. If I pull it apart, or when people start installing these, somebody can shoot some better step by step install instructions. Meanwhile, ask if you have any questions... (Message edited by reepicheep on October 22, 2011) (Message edited by reepicheep on October 22, 2011) | ||
Reepicheep |
OK, my current stash of built prototypes is spoken for. I have parts laying around to make 3 more complete controllers. More than that and I'll have to make another batch of boards, and make another order from Newark. At that point, I can "homebrew" another 10 boards or so, or drop about $100 to get 30 to 50 boards prototyped. Add another $10 to $15 for parts to populate them, and the time to program the PIC's and assemble the boards. Though with a nice commercial PC board, the kit would be pretty practical, they would be pretty easy to build yourself (though the board is pretty tight and compact). I'll build out my existing stock and lets get honest feedback from people on those before I commit to a bigger commercial run. So if you have one, please post the good, the bad, and the ugly! | ||
Reepicheep |
More data... if you have the Renthal tapered bars, my controller might fit (with some minor mods), but the polly heater itself is too wide. If you grind off the little "tab" on the heater cartridge, it is .627 inches. My board is 14.96 mm without any heat shrink tape. It would probably fit in a 15mm inside diameter tube fine if I soldered the chip direct to the controller (instead of socketing it)... which would work fine, it would just mean you can't reprogram the chip (which you would never need to do anyway). Three people have one on the way, and I hope they report back with reviews (pro and con). I'll build up the 4 I have parts for... I'm sure somebody will want 'em. | ||
Marksm |
hope you didn't already send one to me.... My Renthals are too small inside. | ||
Reepicheep |
Nope... I didn't send yours yet. We have to find you a smaller heating element. Thanks for measuring the Renthals! | ||
Reepicheep |
That hookup description sounded way worse than it is... 1) Hook the first heater cartridge to the two holes at the end of the board (minor soldering required). 2) Hook the first wire on the other heater to V+ (ignition switched and fused) on the bike. 3) Hook the second wire on the other heater to the yellow wire coming from the controller. 4) Hook the red wire from the controller to V+ (ignition switched and fused) 5) Hook the black wire from the controller to ground. 6) Do a quick test before stuffing the controller in the bar (so you can see the status LED do it's happy dance). Stuff a little ball of insulation before you stuff the controller in the bar, then slide in the controller and heater, and stuff a little ball of insulation in after, and plug the bar end. Repeat for other bar, but without the controller, as it is just the heater. That's all. No switches, no muss, no fuss. | ||
Reepicheep |
41 degrees this morning, with frost in low lying areas, and I was cozy. Ahhhhhh. Once this is mounted, the status LED is of course buried in your bar. It's mainly there for testing your setup or diagnosing problems later. If you want to see the blinky light to tell what the controller is up to, you have two choices. The first (and least recommended) would be to unsolder the tri color LED from the board, and run three wires, and put it wherever you want on the bike. Cool in that you get all the info all the time. A hassle in that you have to run those three little fragile wires, and hope they don't break (which would just be a matter of time). It's totally doable though, and maybe with enough careful routing they will last. The second option is the "yellow wire". Just grab any 12v friendly indicator (or an LED with an inline resistor... I can help you size it). Hook the + end to switched and fused bike voltage, and the "-" end to the yellow wire. Viola. When the heat is on, the lamp is on. Be warned, the heater is switched on and off every few seconds (effectively pulse width modulation) to control the heat... so it'll be an annoying blinky thing. Though kinda cool to watch your robotic minion at work. The original version of these heaters (before I buried them in the bars) had a clever little "voltage monitor" light. I didn't copy the signal dynamics light, but it was a similar solution. But mine had a few other neat features baked in. I dropped them when I went into the "in bar" design, but I think building a new one that does even more is my "next project". It may even be time to bust out an LCD (if I can figure out an easy way to weather proof it)... 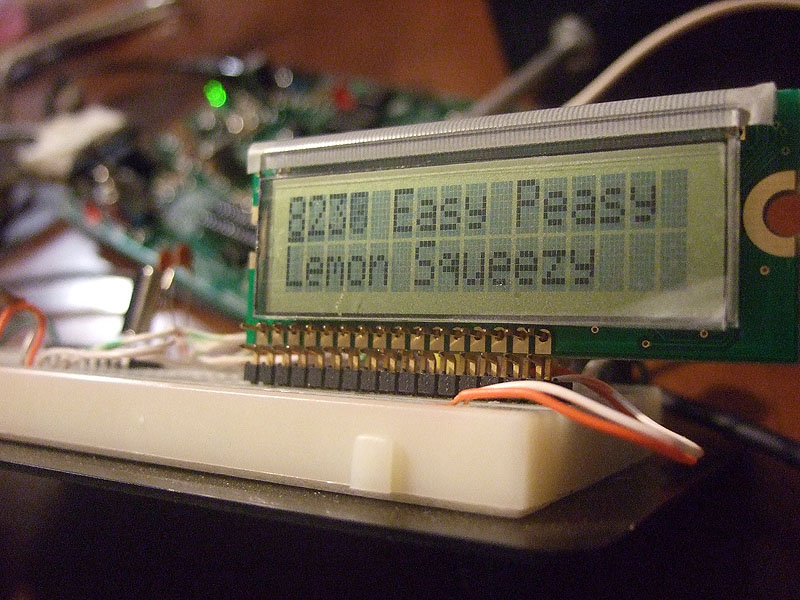 | ||
Reepicheep |
Here is the polly heater you can use. You will ditch the switch and trim the wires (Polly used really nice wires by the way, save them). https://www.denniskirk.com/polly/hot-hands-electri c-handlebar-heater-kit.p391802.prd/391802.sku I am not aware of any of our sponsors that sell them, if anyone carries them, please ping me ASAP and I'll change that link to your site. Those are the "single setting" snowmobile heaters. You do NOT want those without a regulator of some kind... on == "roast". The controller will work fine with the polly "motorcycle" heaters also. They are like the ones above, but have an extra wire because they have a low power heating element in addition to the high power element. Just hook the regulator up to the high power wire, and don't use the low power wire. But those two element units are $10 more, and you don't need them with this setup. I'm personally running the $21 ones at the link above. (Message edited by reepicheep on October 25, 2011) | ||
Reepicheep |
33 deg F this morning for a 20 mile back road commute to work... very nice. You could feel the controller working... some thermal overshoot when I came to a stoplight after a long 55 mph stretch. This is because the heater was still pumping out the 3x the amount of power needed for 55 mph, but the bike had just come to a stop. Once the temperature starts going up, the controller sees it, and cuts power back, but there is some latency in the system and the heat will climb for a bit even after the controller turns off the cartridges. Three controllers went out this week, I'm interested in getting feedback. I'm still curious if people with the factory heated grip kit spend a lot of time switching between hi / low / off while riding, or tolerate significant temperature swings. | ||
Schwara |
I need to put more conscious thought into what is happening. Part of my issue is that my ride into work is relatively short now ... 20 minutes max, and only a handful of miles get over 45. I'll need to get up early a few times so I can ride a bit further and faster and then I'll get back to you on the factory grips. For the time being I generally just use the low setting and then if I notice things feeling pretty cold I'll go up to high. I've just been tolerating the swings with speed. It's a little annoying but since this is the 1st time I've ever even had heated grips these are better than nothing. I don't know that I would have gone with these had they not come on the bike. They seem a bit $$$ to buy after the fact for what you get. I do recall a longer ride a few weeks back when the temp dropped quickly after sunset. On that ride (mostly highway) I can remember switching back and forth I few times. High was too hot and low was too cold and obviously when I got off the highway and slowed down everything changed again. I'll start paying closer attention. | ||
Reepicheep |
I probably triggered this whole thing because on the 9sx in "the old days" there was no good place to mount the high / low switch. It ended up in an awkward position to switch while riding, so it was annoying to change back and forth. Had it been where the factory switch kit sits, I might still just be switching it today... The rest, as they say, is history... | ||
Blake |
If I were reading an advertisement about the controller on a moto parts web site or in a catalog, what would it say? Provides precise thermostatic control for any handlebar grip heater? What temperature settings does it offer? >>> I'm still curious if people with the factory heated grip kit spend a lot of time switching between hi / low / off while riding, or tolerate significant temperature swings. Some but not much, not to where it's bothered me. How about some thermoelectric cooling grips for us in the Sun belt?  | ||
Blake |
You consider approaching BMW about your controller scheme? Seems like they more than any might be interested in it. | ||
Blake |
Sounds like your control loop just needs a little tweaking and you'll have something really useful/beneficial for the market. Remember us small people when you are lunching with T. Boone and Gates. |