| Author | Message | ||
Peter |
Jim, Thanks for the links. I'll be buying something when we move in August. You said the Thermal Arc was AC/DC and you welded aluminium with it? On their site it says that it is a DC machine. How does that work? The P-Wee� 200 GTS is a single-phase, 115/230 VAC, single-phase 50/60 Hz DC inverter arc welding power source with Constant Current (CC) output characteristics providing the best combination of power, portability and convenience. Designed for STICK (SMAW), High Frequency TIG and Lift Start TIG welding applications, the unit comes standard with an adjustable hot start and automatically adjusts arc control for smooth and easy operation with all electrodes. | ||
Jim_witt |
Duh, Sorry about that bud, I didn't snag a brochure on that model and I linked you to the wrong model above. It's the PRO-WAVE 185TSW that I was using and yes I welded aluminum with it. Of course they have additional compact models that were feature rich, more amps and more expensive. Like I said, one hell of a bang for the buck for light duty welding and nearlly half the price of the Miller I want. Then again it's not a fair comparison but it does weld aluminum! -JW:>  | ||
Jim_witt |
Was at our journeyman upgrade welding school today (we have to certify every 6 months) and thought I'd throw up a few pictures for those interested. This is a diametric narrow groove welding machine, setup on a 14� schedule 120 wall test coupon in the 6G position for a 100% x-ray test. The particular coupon will require 1 stringer pass, 8 passes to fill and 3 over lap passes for the cap. After the initial setup of the machine (which can take several hours to several days) on the 14� pipe, each pass takes approximately 25 minutes. Of course Q.C. looks at every single pass, including the tacks. Since they�re not standing next to you throughout the entire process, you have to look them up each and every time (which can take several hours). The window taped onto the end of the pipe (besides being sealed for purging) allows the operator/welder to look-in (as we call it) his stringer (first pass). Some specifications require a flush stringer bead on the inside (meaning flush with the I.D.), others with a 1/32� suck-back stringer bead (concave i.e.) and sometimes 1/32� push (or convex bead). The machine also comes with a remote camera not shown in the pictures and is used in hot areas (which 95% of our work is). It�s used to monitor the physical welding process (under cut, overlap, down slope, upslope, tungsten oscillation, arc gap, and welding speed etc.). If adjustments are necessary at the machine (which always happens) you get to send in the guinea pigs to soak up their allocated rems. We�re getting ready for a major steam generator shut down at the Palo Verde Nuclear Generating Station in September. Every welder must be thoroughly familiar with all the dress out procedures, protocols, setups, different schedules, alloys, pipe sizes and filler wire before the shut-down. Of course we all go through an extensive back ground check including a visit with a shrink (I even passed that puppy)! 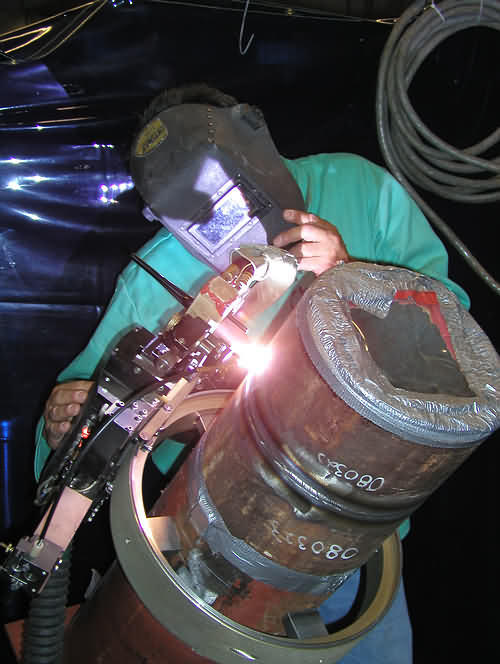 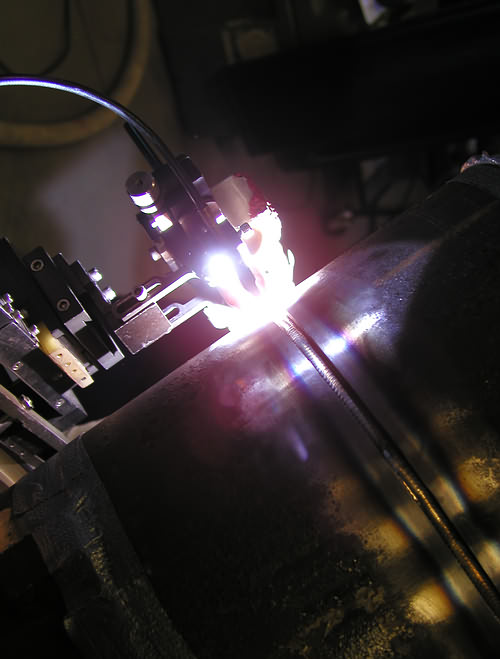 -JW:> | ||
Jim_witt |
We have 60 refrigerated and exhausted test booths (as they're called) at our welding school, with every imaginable welding process available. 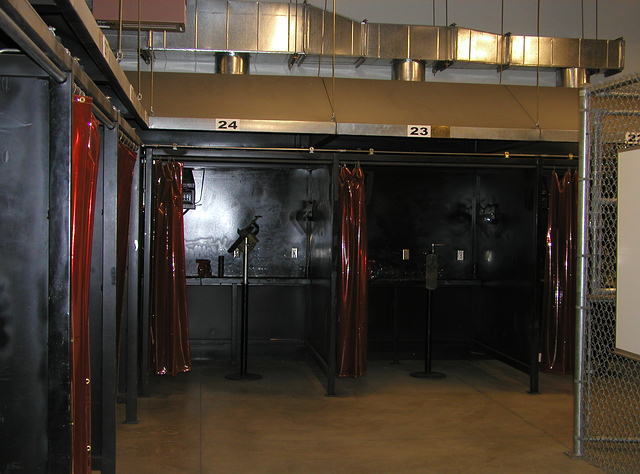 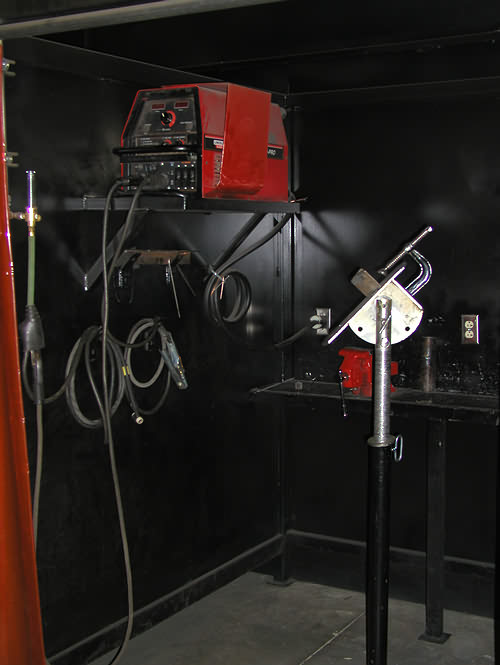  -JW:> | ||
Noface |
ahhh the life of a steam fitter. I work with a guy that used to steam fit at Nuke plants out in the Midwest. Of course you now have much nicer rigs. So what visions did you see in the ink blots? Lot's of Buell's I hope Jody S. | ||
Henrik |
Now *that's* the kind of welding I'd like to see someone do on my parts. Great looking welds there Jim. Henrik | ||
Peter |
I'm not buying a TIG now..... I'll just post you all my bits. | ||
Al_lighton |
Air Compressor recommendations? Small change of subject from welders to Air compressors....I've got a Cambell Hausfeld 20 Gallon Air compressor...It's small tank means it runs continuously, it pressure switch is kinda cheap and the manual on/off switch part of it broke twice before I replaced it with an inline switch on the cord, and it's noisy. So I'm gonna buy a BIG one. Having good air in a shop is SO nice. Any suggestions out there? Brands, models, features, sources, prices, etc? Quieter is good, don't want to disturb the neighbors too much. pointers appreciated. | ||
Ocbueller |
Al, Kind of fond of the upright tanks myself. The cheap variety found at Sams or Price Clubs seem adequate enough for the hobbyist. They fit nicely into small corners. For painting and such the larger tank does help. SteveH | ||
Oz666 |
Steve, I bought a Craftsman Professional upright - mostly because of the 175 lb. max pressure. Air tools run much better at 150 lb. than the ~ 110 or so you can get from a more standard compressor. I'm not too sure of the "oiless" design, time will tell. It's a 2 stage compressor, "portable" (has wheels, but it's HEAVY), runs on 117 volts, costs less than $400 (on sale) and is very quiet. I believe it uses a 1750-rpm motor instead of the more common 3600-rpm units. The "V" compressor design makes the sound a little more pleasant to some of us.  It won't run a 1/2" impact continuously but air ratchets or Rodac - no problem. The only thing I don't like is the tank drain seems a little difficult to access. YMMV It won't run a 1/2" impact continuously but air ratchets or Rodac - no problem. The only thing I don't like is the tank drain seems a little difficult to access. YMMV  Oz Oz | ||
Bluzm2 |
Oz, Do what I did with my big upright tank. Remove the valve at the bottom, screw in a 90 deg elbow, extend to front or side of tank with approprate length black pipe, reattach drain fitting with straight coupler or 90 elbow (depending on room available). I used a straight coupler on mine. Brad | ||
99x1 |
Has anyone used Loctite 660 PressFit repair? My right rear wheel bearing has spun in the hub - there is not much damage (noticed while changing tire), but it is loose. From Loctite 660 datasheet: LOCTITE� Product 660 is a single component, anaerobic paste consistency retaining adhesive for cylindrical joints. This product cures when confined in the absence of air between metal surfaces. This product possesses excellent gap cure characteristics. TYPICAL APPLICATIONS Used to bond cylindrical fitting parts, particularly where bond gaps can approach 0.50mm. Typical applications include restoring correct fits on worn shafts, spun bearings, and damaged keyways. TIA (Message edited by 99x1 on May 28, 2003, %time) | ||
Ocbueller |
Oiless type are definitely louder. The piston will eventually wear out. On the upside its really easy to rebuild. SteveH | ||
Jim_witt |
OLDFireManJim wrote: Are there any need to know tips on welding stainless tubing---Jim W,Pete? Jim, Dunno, hard to say since you didn't mention what process you're using. Either way your welds will probably look like $hit but that's why they make grinders. Plus the body work will hide it anyway. Let me know what you doing (MIG/TIG) and I'll give you a few pointers. BTW, I would think the hardest part would be making degreed fittings (if you need them) or rolling offsets that take off less than the fittings (their are formulas for all that so it doesn't look like a plumber did it). If not and you can use standard bends then you won't have a problem. -JW:> | ||
Peter |
FMJ, Truth is, I'm actually a plumber by trade Better off listening to Jim. | ||
Jim_witt |
Pete, Sorry about that! It's just an expression that a steamfitter uses all the time. Damn, no offence dude! I have the upmost respect for you and your header looks outstanding. -JW:> | ||
Peter |
Jim, No offence taken at all. Seriously, when I see pictures of your work, I see a professional. When I look at mine, I see a plumber, and that's the truth! | ||
Stevedplumber |
Can anyone tell me the tip or trick to removing the oil filter on my Cyclone? The first and only time I did this oil was just about everywhere. I did try to place a piece of cardboard under the filter but it still ran amuck. J&P Cycles has an oil changer helper for the Harleys, but they don't carry one for the sporster engine. | ||
Jim_witt |
Pete, Thanks for the kind words but you're selling yourself short. I still need to clean up my act with the Plumber comments, getting to old for shit like that. S'later, -JW:> | ||
Jim_witt |
Steve, I never had the problem. Just use some aluminum foil. If you double it up (or buy the thicker stuff) it works great. Just slid it up behind the filter and conform it to the contour of the front of the engine and drain it into whatever. You can get a screwdriver and lightly push the foil up behind the filter too. Works every time for me dude. -JW:> | ||
Jim_witt |
Steve, BTW, I was going to buy one of these pups but I never did. Maybe this is the answer for YOU? Dunno, -JW:> | ||
Stevedplumber |
Jim or Pete Either one of you fellow Buellers Union brothers? Steve | ||
Ara |
Steveplumber: For really clean oil changes I recommend the following. 1. Get a plastic grocery bag and use the handles to tie it to your bike so that it functions as a bib under the oil filter. In case you dribble, it'll keep the oil off your voltage regulator. 2. Get a round, plastic juice can and cut the bottom and part of the side off so that it'll fit around the filter and direct the oil away from the bike via the pour opening in the top. Keep it, it's reusable. 3. Get a 1/2 gallon plastic milk jug and cut it like the plastic joice can, above, but with lower sides. This is to catch the gear oil from your primary case and direct it away from your exhaust system to your drain pan. Also reusable. Russ | ||
M2me |
If you have a Palm Pilot-type PDA here is a great program that I've been using for the past year or so. Auto Slate You can keep track of fuel, oil, tires, maintenance, etc. It's really nice and only $15. It's all I use my Palm Pilot for besides keeping track of phone numbers and addresses. | ||
Wman |
Stevedplumber, I picked up a piece of fiberglass angle(frp) on a job. Lossen the filter, let it drain into angle sloped away from engine. Not a plumber but I am a Union Tinknocker. | ||
Stevedplumber |
Wayne, I am a Union Plumber down here in Maryland. Glad to see that a fellow Union worker is buying a American made product. I saw your profile nice M2 you have there. If you don't mind me asking you a question: What did you use to cut off the tail section of your bike where the tag and rear turn signals bolt to? Steve  | ||
Awprior |
Steve, I did the same thing to mine, just haven't updated the pic. I used a hacksaw and keyhole saw to rough it out, then a little bit of filing and sanding to make it look just right. I also remounted the turn signals up a little higher to the curved part, drilled new holes and used a piece of angled fuel hose as a spacer. I buy Union guys beers all the time to get my work done, does that count??? No joke, where I work, they know 10x that of some Engineers. Alex | ||
Wman |
Steve, I did the same thing Alex did. Also when I moved my turn signals I switched them to X-1 style. Alex, Anyboby who buys Union guys beer is alright by me. | ||
Rookie |
Any tips, tricks or special tools for installing the intake manifold on a 99 M2, it was a booger to get it off. | ||
V2win |
Hey Rookie, How is it going? The best tool I know of to reinstall the alan bolts for the intake manifold is a long ball end allan wrench. I like the one with a handle like a screwdriver. Its about 9 inches long. I us a 1/4" box end wrench on the shank so I can get plenty of torque on it once I get it almost tight. There is a special 90 degree ball end tool you can buy from H/D or an independent H/D tool supplier like Fog Hollow in Pacific Mo. But the long screwdriver style tool is very useful on other projects and worth the money. I think McMaster-Carr has them online. You should be able to pick one up from your local Mac tool or Snap On dealer too. I have used a nromal ball end allan wrench and just put a small box end wrench on the short end also but it takes more time and I am usually in a hurry. Later |