| Author | Message | ||
Obiewan |
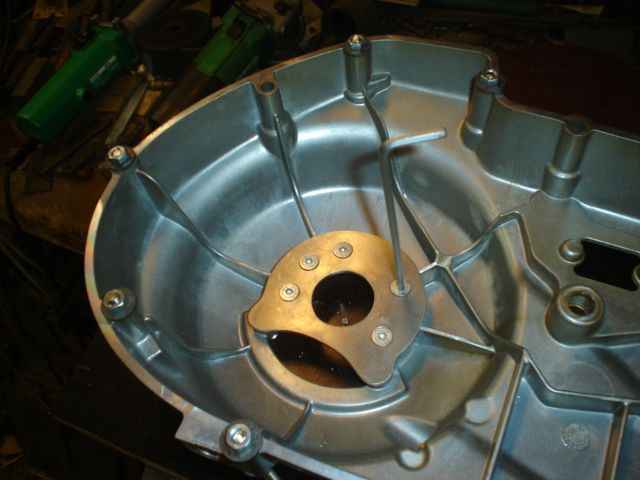
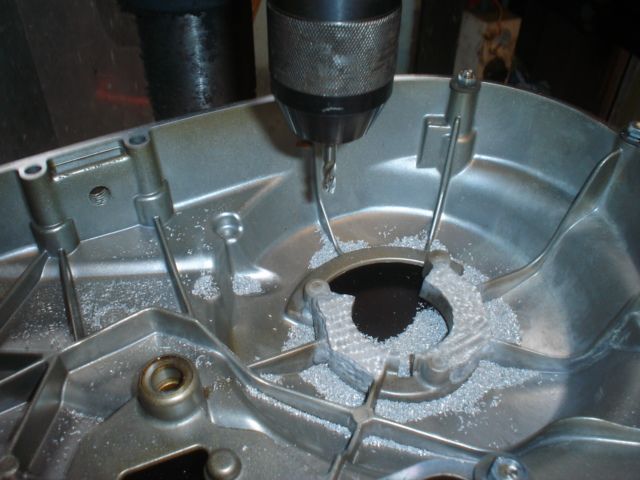
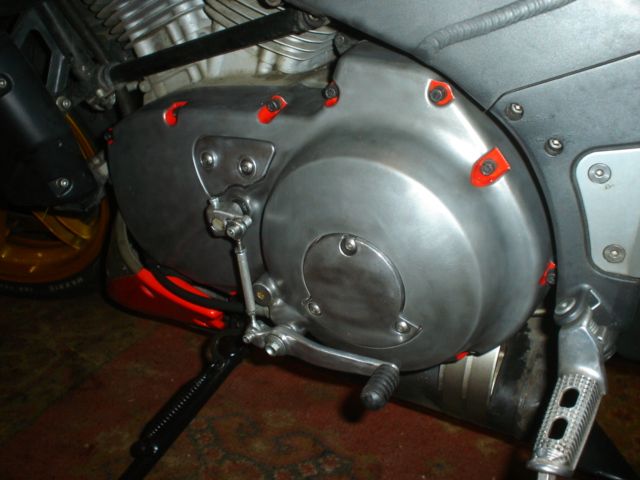
Primary cover repair. This is how I repaired my primary cover after the lip inside the cover broke off. (See image) At first I thought ‘I’ had damaged it by not adjusting the clutch play correctly (too tight). I later took it to a local mechanic and he seemed to think that it might have been slightly damage before I attempted to make the adjustment. When the adjustment was made the part failed due to the already fractured lippy thingy (Technical word for the thing-of-amabob that holds the clutch adjuster away from the clutch itself ) I guess I’ll never know for sure. Either way, I decided not to order a new primary cover but rather try to repair the one I have. It’s broken anyway so why not try. I see this as a week point in the engineering of the primary cover. What I’m trying to accomplish is a fully functional and permanent repair for this problematic design (This is only my opinion) The images and repair shown below is only the preliminary attempt, but fully functional and working flawlessly so far. In other words, it is not the final product. That will come later after all the testing is complete. I would like to mention that I’m not in any way a machinist. I do have access to a mill that a friend of mine purchased a few months back. We had no idea how to work the darn thing so the book to the mill was out constantly. That being said, if I can do it, so can you. After the cover is removed the first thing to do is to drill out the (3) holes where the screws in the cover went. You are only going to drill the very back of the holes to expose the threads Be careful here and try not to damage the threads that are already there. After you have cleared the metal from the back of the holes, use a ¼” tap and tap the entire hole so a new bolt will thread all the way through. Picture from inside cover 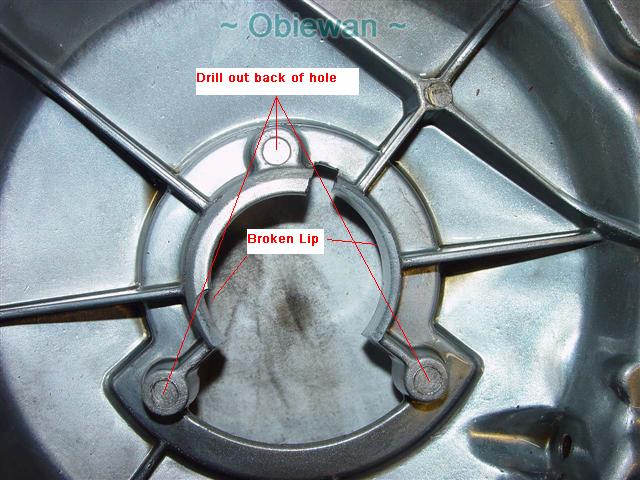 Picture from outside cover 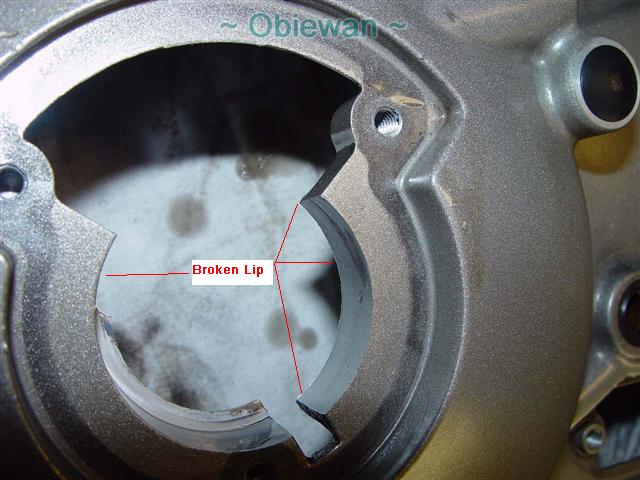 Next I use a small plate from an electrical outlet cover. Shaped it and drilled holes in it to match the holes in the cover. 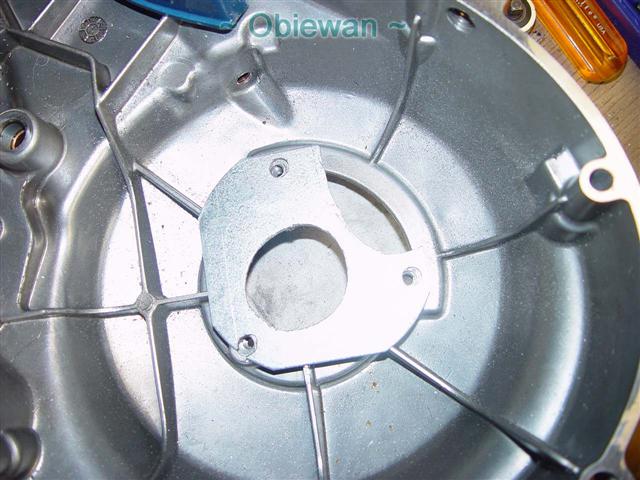 I then I used 1½” X ¼” stainless pan head screws to go through the plate and through the cover to the outside. I also shaped the area where the screw is on the inside so the screw would recess into the metal and leave more room between the actual clutch and the new metal plate. The stainless screws from Ace Hardware  Metal plate installed for now, but still not ready. It was too close to the clutch so this is where I had to mill some of the metal off of the inside. I ended up having to remove approximately 3/16” . It depends on the thickness of the metal plate you use. Hold it up to the clutch and check to make sure there is plenty of clearance. 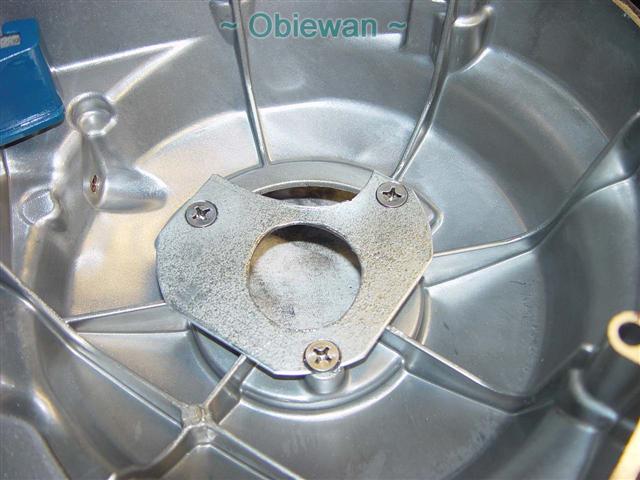 milling the metal 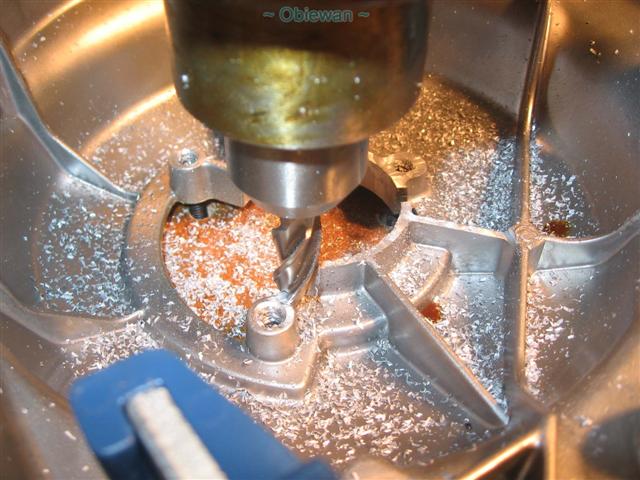 The hard part here was making the surface flat for the milling machine. I took a flat piece of wood and fastened it to the bottom using the three holes that the cover is attached with and tightened it up until it was level with the table of the mill. You will have to use a small wedge and tap it in on the low side some because the cover is not flat at all. 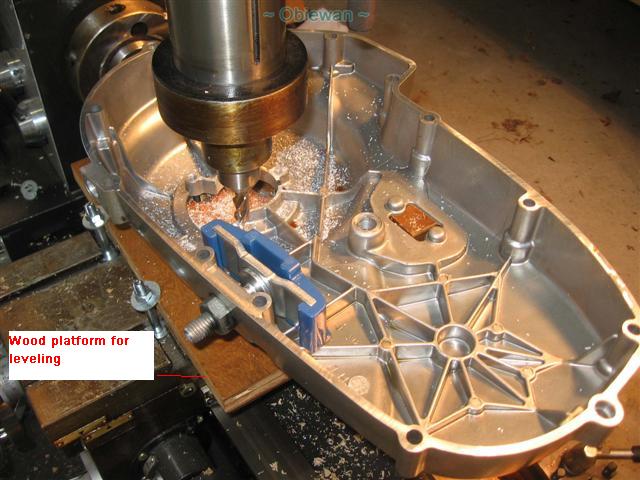 After I milled the metal from the inside cover to allow room between the clutch and the modified lip thingy (metal plate) I had to redo the bevel for the screws so they would recess flush to the plate. Next I added the plate and screwed all the screws in. Here is how it looks from the outside with the new lip thingy in place. 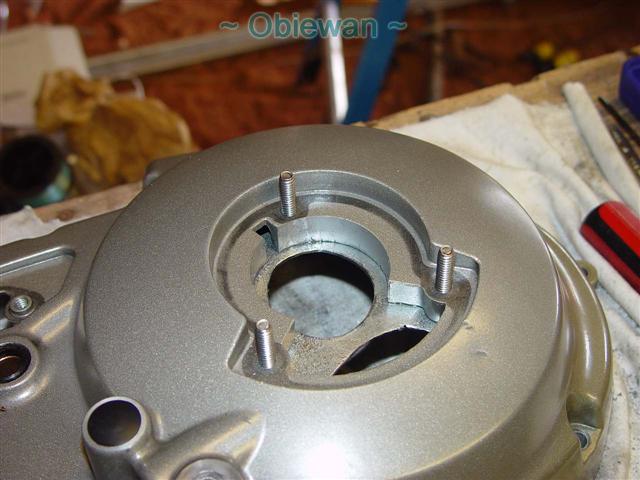 Different angle 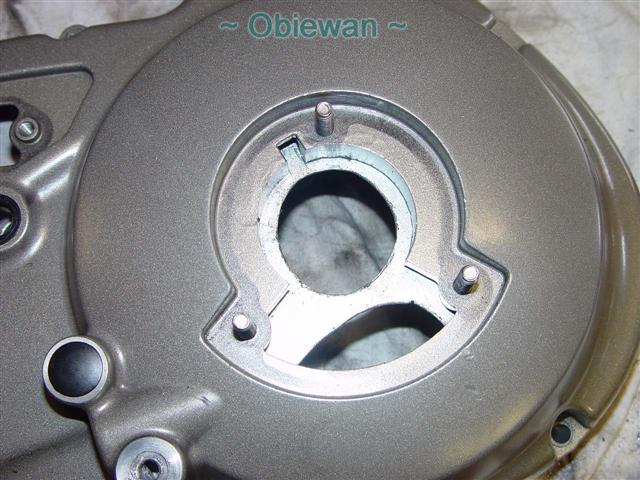 Put it all back together, add locktite to the three stainless screws tighten them down real good. Now the screws had to be a little long due to the holes on the cover were not designed for nuts, but instead for the phillips head screws. I had to add washers so the nuts would not hit the black cover on the outside. I will add a spacer to this and stainless acorn nuts to make it look better. I also found out that when I tighten the nuts on the outside it had a tendency to loosen the stainless bolts, so be careful and make sure that doesn't happen. 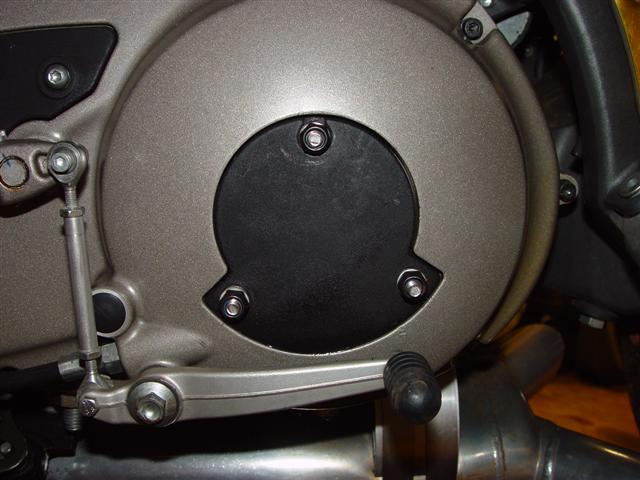 Different angle 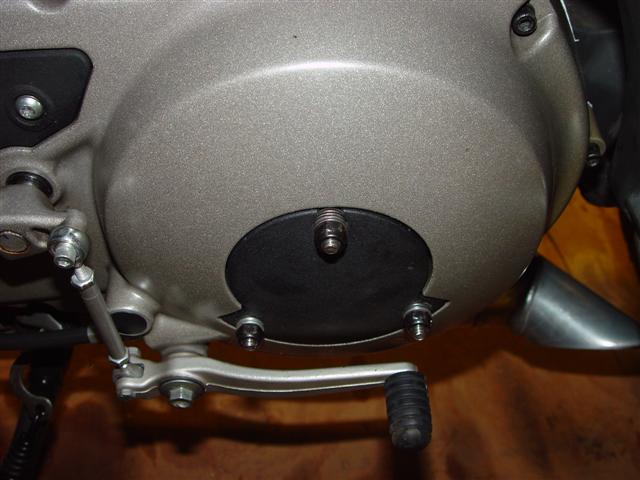 There it is. I adjusted the clutch and the cable. Added fluids, pushed it out of the shop and fired that puppy off. Popped it in gear and it worked SWEET! Actually hasn't worked that well since I've had it. It only has 5700 miles on it and has never shifted this good. I have two colors for it, black and blue. Can't decide which one I like the best, so I change it out every once in a while. 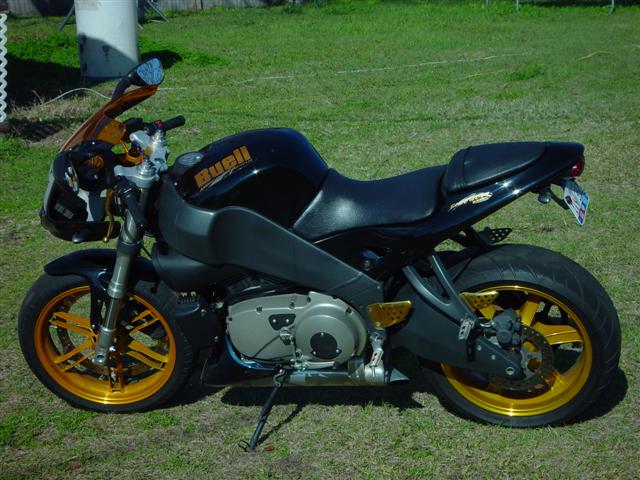 Crappy image here, compressed too much. 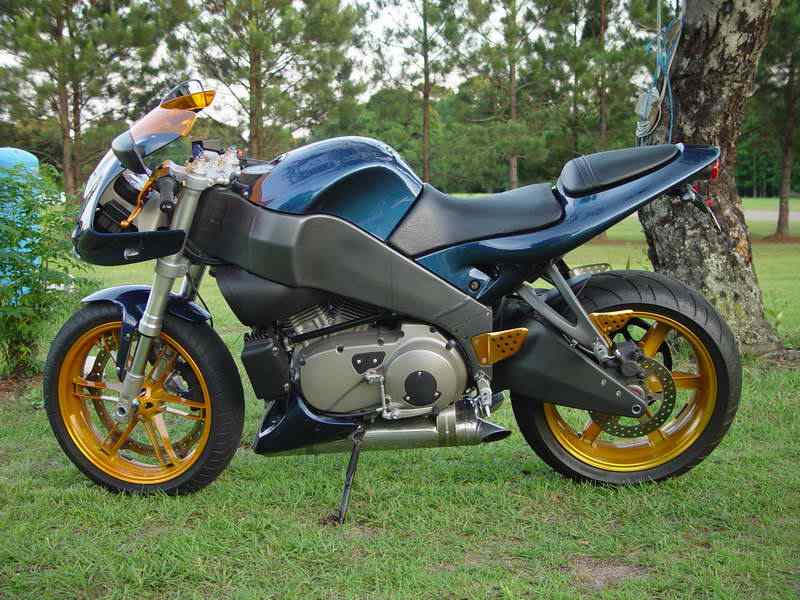 I'll be more than happy to help anyone who has had similar problems if needed. If anyone has suggestions, please let me know. | ||
Sparky |
Very ingenious! I like it. Now you don't have to worry about stripping out the Torx screws.  As a suggestion, you might want to consider slotting the ends of the screws enough so that you can keep the screws from turning while tightening/loosening the outside nuts if the inside nuts loosen any. | ||
Obiewan |
Good idea. That or grind a flat spot in it to be able to grab it with a wrench. Actually maybe even better is to make the holes large enough for the bolts to go through without the threads and making the screws permanent part of the added metal plate. Welding the screws to the plate or something like that. Thanks for the input. | ||
Reepicheep |
That'll be good for a double take when people look closely at that derby cover | ||
Blake |
Excellent! Thanks for sharing! | ||
Obiewan |
So far it's holding up good. Thanks! | ||
Obiewan |
Dankie Blake, all working fine still. | ||
Anthonye |
Thank you for sharing. I will add this "pearl of wisdom to my treasure chest of knowledge" and hopefully never need it but if I do I will give you the credit. Tony | ||
Torq |
Obiewan, thank you so much for sharing and your timing couldn't have been more perfect. On Tuesday last week my primary cover did the exact same thing-right down to the shorter lip being completely broken off and the longer one with edges broken off. Although I did not have access to a mill I do have several grinding wheels and discs. Similar to your procedure I was able to grind off flat the back of the cover down to the support ribs. I also used a electrical box cover for the plate, and even though I had access to aluminum flat plates they were too thick and would have contacted clutch assembly. Your screw sizes were spot on but during my repair I had noticed that the lower two screw holes did not interfere with the clutch basket teeth and reduced effort and time by not beveling those two lower holes to use pan heads but used round heads instead, which also secured the plate more firmly to the cover. 1000 miles so far and also no problems, not to mention my shifts also feel smoother and neutral is also easier to locate. Currently I have 18,000 miles and am also not sure to the cause of the failure? | ||
Bertman |
I just broke the exact same ear off of my primary cover this past weekend. Luckily I was off the tight, curvy roads when my clutch gave up the ghost. I have a new cover on order from Andy, but I'll also try to upgrade the old broken cover too. As soon as I saw the damage I said to myself, "I've seen this somewhere." Good write up Obiewan. | ||
Obiewan |
Torq, I had a blast posting all that information. I'm glad it has help some of the riders out there. Sounds like you are a "fixityourselfer" also. LOL. Good job and I see the changes you made were great. GOOD JOB!! Thanks for posting your comments as well. It servers to help all of the riders with similar problems. I have close to 1000 miles on mine also since the repair, and smoother shifting for sure. It never has shifted like that. Cause of the failure--- I think we both know the answer to that one. Hell if a bunch of back yard mechanics can make and design a better system, don't you think that they could. They need to make that part replaceable. Then it would be stronger for sure. The biggest problem I have now is keeping the front tire on the ground, and waxing all the CBR's and Busa's on the corners. LOL Don't make me. I'll send a photo. lol. All I can say is good job my friend. Thanks for posting also……… | ||
Obiewan |
Bertman, Man you are lucky for sure. Work on that broken one so you will have a backup when it happens again. It will happen. That's why I decided to fix mine "once and for all". Let me know if I can help in any way. Happy Buelling! | ||
P47b |
Hey where was this post when I needed it back in Oct. | ||
Ducxl |
Ok.It happened to our '05 12r today.I knew i'd seen this failure posted on the Badweb before. I've adjusted Sportster clutches PLENTY of times in the past 16 years.THIS seems to be a weak engineering design.Am i wrong? | ||
Sokota |
Apparently that lip is taking the load of "unloading the clutch pack", it does appear somewhat fragile in design. Buell went to a lighter spring in 06 , possibly the same as the 984 spring ? Nice repair pictured above, better than factory. Could also try the lighter spring ? | ||
Obiewan |
Just wanted to let everyone know; this repair is still working just fine. Not one problem. Although it was not that easy to accomplish, it seems to be a permanent fix. | ||
Packrat |
Tip of the hat to ya for taking the time to take pix of your work as it was in progress. Damn fine write-up if ya ask me  | ||
Obiewan |
Thanks Pacrat.. I enjoyed doing it. I hope it helps others with similar problems. have a good one. | ||
Torq |
My repair is also holding up just fine also. 23K and still goin strong. definitely a legit fix | ||
Obiewan |
Torq, SWEET! Have a good one. | ||
Moosestang |
I'm having trouble picturing the purpose of that lip? It's not for sealing, right? I adjusted the clutch on my 05, but didn't notice any part of the cover touching the clutch except the nut with the spring on it that makes the derby cover spring loaded. | ||
Odie |
http://www.badweatherbikers.com/buell/messages/142 838/483215.html?1249043054 | ||
Brother_in_buells |
And this is how i did it!!  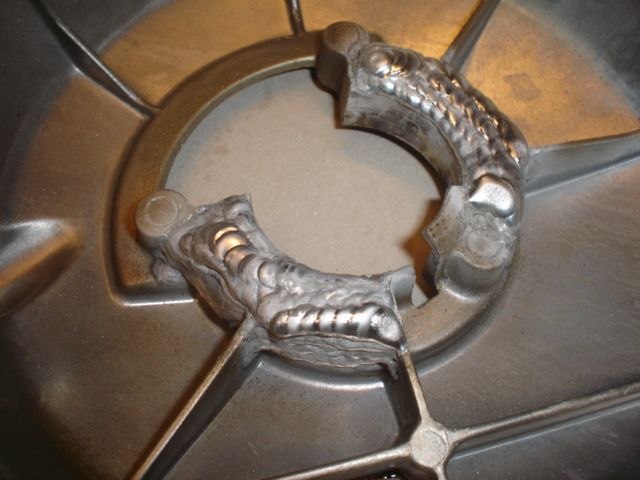 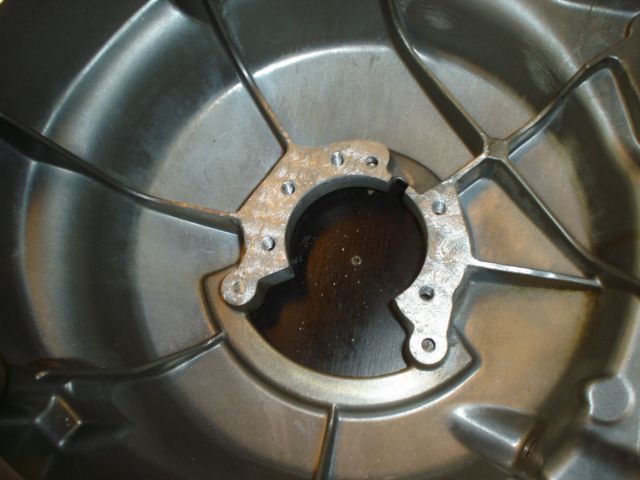 | ||
Brother_in_buells |
  | ||
Brother_in_buells |
  Now it,s better than new!! | ||
Torq |
12,000 miles on this repair, 30k + total on bike. | ||
Obiewan |
Sweet! It's great that it worked for ya. Also good to see others improve on it as well. Mine is still fine, almost 17k on mine, no problems at all. It is better than new. | ||
Blake |
Great to know. And much better than a screw through the ECM. | ||
Redhat |
I get to do the same thing, the lip broke off exactly like pictured above. I was thinking of making the bolts part of the metal plate, but that would mean the plate comes loose when you take off the derby cover, and making it impossible to adjust the clutch correctly if I am not mistaken. Perhaps the Odie way, we'll see how things go. Thanks for documenting all this, I'll try to take some pics along the way to include in this. | ||
Argentcorvid |
how much needs to be milled off for this? just the thickness of the lip? | ||
Obiewan |
been a while since I did that repair. So I'm not real sure. I think that is correct though. | ||
Capitantem |
Hi Obiewan, can you post the size of the screws again? I can only see 1½” X ¼”, are those the same size/thread as OEM? Thank you. |