| Author | Message | ||
Hippyjoe |
I'd like to share my procedure for changing or "flushing" the brake fluid from both brakes on my '00 M2. According to the manuals, this job should be done every 2 years. I haven't seen any clear and easy instructions on how to do this simple job. So here's how I flushed both brakes out in a half-hour. What I like about this method is that, if you're careful, you won't need to bleed the system afterward, saving a lot of time and hassle, and precluding the need for any kind of brake-specific vacuum equipment. Also, as long as you're careful, it's a very clean job to do. Here's what you'll need.  Actually you can get it down to a cross-tip screwdriver and an 8mm box-end wrench. I didn't have the box-end wrench, so I needed a socket to crack the bleeders open and tighten them down at the end. I paid 2 and a half bucks for the DOT 4 at Carquest. The drain tubing is standard battery hose, available at any battery shop. The catch can is a plastic juice bottle. Make sure you use DOT 4, or whatever is specified for your bike, don't mix brake fluids. Also stand the bike up as straight as possible with the front end pointing straight ahead to level the front master cylinder. First step is to remove the little rubber cap on the bleeder nipple, then crack the bleeder loose. Use a box wrench or socket on this!! 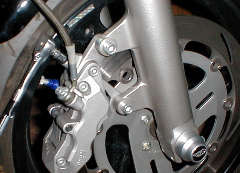 Mine weren't overly tight and my 12-point worked, but a 6-point, 8mm box wrench or socket wouldn't be a bad idea. Once you crack it loose, snug the bleeder back down until ready to drain it. I started with the front brake and elected to finish the front before moving to the rear. Next step was to pull the front master cylinder cap, plastic gasket, and rubber boot. This way I can keep an eye on the fluid level as I'm draining it. It's important to keep the bottom of the reservoir covered with fluid to prevent air from entering the system.  I folded up an old t-shirt and laid it on the tank. DOT 4 will eat paint. Fortunately my m.c. doesn't squirt fluid everywhere with the top off... make sure to check yours gently before beginning to pump the fluid with the cover off!! Also be careful not to let any trash get on the cover components or into the open reservoir. Now it's time to start draining the fluid. Place the drain tube over the nipple along with the 8mm wrench.  For this step you'll need basic physical coordination. If you're riding a motorcycle, you should have this coordination anyway. With your left hand, squeeze and hold the brake lever. With your right, crack the bleeder open. A quarter turn will do. You will feel the lever compress to the end of its travel, and see fluid come through the hose. While holding the lever compressed, close the nipple snug with the wrench. Release and squeeze the lever, and repeat the sequence of opening and closing the bleeder nipple. The key is to keep air out of the system by closing the bleeder before releasing the brake lever. I ran the fluid almost to the bottom of the reservoir, about 10 pulls on the lever, before refilling. I ran another full reservoir of clean fluid through the system, and the fluid coming out the tube ran clean. Once the fluid runs clean, you're done. Fill the reservoir to the top mark, cap it, tighten the bleeder with your socket, wipe everything clean, replace the nipple cap, that's it. It wouldn't be a bad idea to wash the tank off, just in case. The rear brake is just as easy. Again, start by cracking the bleeder open with a socket. Then attach the tube and wrench, same as with the front caliper. 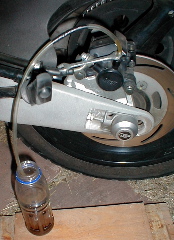 Next step is to remove the cap from the rear brake reservoir. It's the round black cap covering the round white cylinder above the right side of the swingarm. Don't forget to clean the cap off before removing it. Then I leaned over the bike from the right side. With my left hand I worked the bleeder wrench. 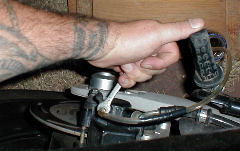 Again, you'll need basic coordination for this step. I used my right foot to depress and hold the brake pedal. Then, while holding the pedal down with my foot, lying across the seat, with my left hand I opened the bleeder nipple. The pedal will depress to its limit and fluid will enter the tube. Hold the pedal down, snug the bleeder closed, release and re-depress the brake pedal. Repeat the sequence at the bleeder, again being careful not to allow air into the system: Make sure the bleeder is closed before releasing the brake pedal! As with the front, the rear was pushing clear fluid after draining the initial reservoir and one complete refill with clean fluid. Once you're pushing clear fluid, fill the reservoir to the top mark, cap it, and button up the bleeder with the socket, wipe it with a rag, and replace the rubber cap. That's it. The whole job took less time to do than to write up. Once you're done, make sure the controls feel the same as before you started, and check that the brake light works. If you're extra cautious you could do one brake, ride the bike for a while, then do the other. But really it's just basic brake bleeding 101, and as long as you're careful to keep air out, your brakes should be fine. Mine are. One final pic... 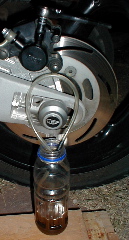 Take it from an old hippy, drain your tube for the next time, and dispose of the old fluid properly. The earth will thank you with miles of good riding karma. One caveat to this procedure I can think of is, first check the condition of the fluid in the reservoirs. Pull the caps and shine a light in, if there are chunks of crap in the bottom, it might not be a good idea to shoot obvious crud down through the lines and calipers. In this case it might be better to suck it out first, wipe the reservoirs clean, then figure on having air in the system. But considering the relative newness of Buells, and the quality of the components, I would figure that many bikes could use this top-down flushing method. Another warning concerns torque on the bleeders. Remember-- it's steel threads going into aluminum, and if something strips it'll be the caliper body. It doesn't take much to snug the bleeders to prevent air from entering while bleeding, a light snug is fine. SM lists final torque on the bleeders at 3-5 ft/lbs. That's not a lot of torque. After riding for a while, check the bleeders. If all is dry, it's fine. If there's seepage, tighten 'em down some more. | ||
Ragnagwar |
That's the way I've been doing it for years. Sometimes it's just hard to convince people that the simple process is the best way to go. Even tried the Mity-vac, and went back to tried and true. "Rags" | ||
Djkaplan |
"The earth will thank you with miles of good riding karma." I've been recycling everything I drain for the past 26 years. I have an ancient army surplus jerry can that I empty into the oil sump at an auto-parts store. Most people I know that do there own work don't do this, they just pick a corner of their property and use it as a dump. The horror... | ||
Djkaplan |
Excellent write-up by the way. I know the procedure, but it was still a good read. | ||
Hippyjoe |
Thanks! Kind of a long-winded tech tip, eh? Main reason I did it was, when I bought the bike, the owner had been really meticulous on maintenance and fluid change. But when I asked him about changing the brake fluid, he got this dumb, scared look on his face. It's something that hardly ever gets done, but it's really not that hard to do. | ||
M2drew |
Cool...perfect timing as I need to change my brake fluid, don't think its ever been done and it looks brown! What size tubing was that? | ||
Hippyjoe |
Tubing measures .160" i.d., which I guess is 1/8th... although I used the end that had been flared from being stuck on the battery vent, 180" i.d., which might be closer to 3/16ths. Length is 18", which was just about right. | ||
M2drew |
thank you sir... | ||
Saszta |
Nice tip, thanks. May the karma gods lay a path of smooth, traffic free twisties at your feet. | ||
Shaolinwind |
Hi there, new 97 M2 owner. I am following this procedure step by step. I found however I need to replace the bleeder screw for the front break caliper. Does anyone know the size I need to replace? |