| Author | Message | ||
Blake |
I've used a scissors jack to lift from under the front shock mount to remove the front wheel. It's a bit precarious, but if you are careful (block the rear wheel, set the rear brake) it works well. You end up with the jack, kickstand and rear wheel in a three point stance. You may cringe at my makeshift method for lifting the rear (page down to pics 6 thru 9). | ||
Reepicheep |
Just bought a one-ton capacity comealong last weekend and anchored it into the rafters. Should have done it a long time ago, easy to set up, easy to take down, whips the bike right up. $30 for the comealong (manual lever actuated winch thingy), $30 for misc heavy rope and mounting hardware, and about 30 minutes work to get it properly supported from the rafters in the garage. Bill | ||
X1glider |
Blake: very scary lift! And damn you for making me look at all the pretty pics on your trip. That's ok, I'll be touring the Tetons in 4 weeks! Reeicheep: cool idea. Wish I had exposed rafters in my garage. | ||
Reepicheep |
Who said they were exposed?  Thats what the drill is for. The ropes come from the rafter (reinforced with a 2x4 to form a triangle to an A ) and go right through the plaster ceiling, and then the comealong attaches to the dangling ropes (heavy nylon deals, total of four coming down). It does not look perfect, but it is just a garage... Guess if there was a room above it would be a different issue... | ||
Uwgriz |
Does anybody know if there's a Fram sure-drain that would work for our bikes? It sure would be nice to not have to drop the muffler to change tranny oil... | ||
Blake |
No need to drop your muffler to change tranny fluid. Use a pump via the clutch cover, or if you are concerned about excess metal on the magnetic plug, shield the muffler with foil or whatever and drop the plug, then install using a thin blade to support the plug while you get it started. I use an old kitchen knife. Note: If married, be sure to wash knife before returning it to the kitchen drawer.  | ||
Blake |
Not sure if Fram have a sure drain size that will fit a Buell tranny drain. I was just looking at some of the Fram drains at Walmart the other day. I really don't think they will work on a Buell tranny drain. It appears that there is to little space to screw on the drain hose/fitting due to the proximity of the muffler. | ||
Court |
A man who has heard, no doubt, some of the ugly stories of the "list of Buell parts" I have run through the dishwasher, over the years. Look. If it's not water soluable, the dishwasher ain't gonna hurt it. This, by the way, applies ONLY to Mr. Coffee units WITHOUT fancy printed circuitry for clocks, timers, et al. I had a very ugly (and well documented) "incident" with the Krupps folks. Court NOTE: the above "water soluable" caveat does not apply to anything that has ever been given to or recived by a child as a "pet". This entire subject evokes very ugly memories and I don't want to talk about it anymore....anybody seen fluffy? | ||
Bomber |
All I've got a Cruz tool kit that works pretty darned well, with one exception . . . . . I've been able to find no place on my Y2K M2 to stash it . . . .too big for the "toolbox" that mounts the tailight . . . . . . any ideas? thanks | ||
X1glider |
My 20k service started off pretty bad. First order of business was to remove my wheels so I coupld replace the tires. 10 pumps on the lift and "CRASH!" The square tubing was obviously too thin where the bottle jack applies the force. 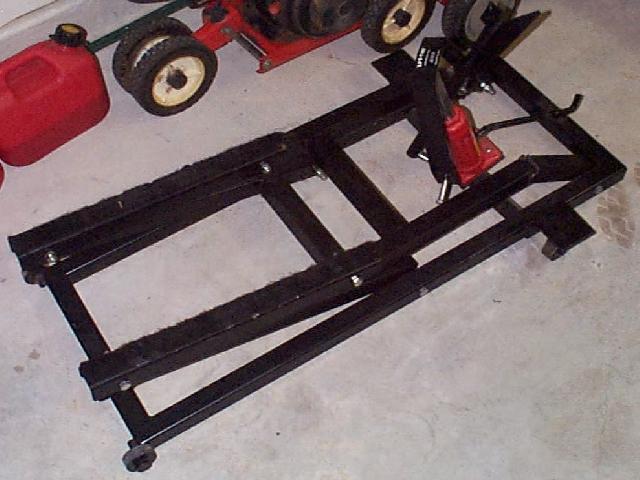  I'm looking at buying an "EazyRizer" made in the UK. A little pricey but very versatile. Will lift beam style frames and has adapters for sport bikes like Buells as well. www.bikelift.com | ||
Roadrunr |
X1: If you want the same type of jack you have in your pic, go to "sams club" aka wally world. For about a buck twenty you can buy one  or ping me and I will sell ya a fairly new one for less or ping me and I will sell ya a fairly new one for less | ||
X1glider |
Hey Roadrunr, didn't realize we were neighbors. I live in Tomball. When I come back from Wyoming I'll drop you a line to go for a ride. Nah, these lifts suck. The spacing doesn't actually clear the oil and tranny pan on the Dyna since it's under the bike instead of under the seat. Won't do a Buell either. I think I'll spend the 500 and get the EazyRizer lift. It's a worthwhile investment that will pay for itself down the road in $65/hr savings at the local shops. | ||
Buellzebub |
x1, who made your "lift", imo looks like a poor design... shoulda sleeved the pivot points tomball, ain't that where BJ services, or monica as we call them here in canuckland, have their fabrication facilities? | ||
Roadrunr |
X1: We may have crossed paths, if you have ever been to a little ice house called "blue door" it's on 1488 N 2978 just across the street from where I live. Sheet loads of bikes there every sunday! Gimee a holler some time.  STEVE STEVE | ||
Seeeu911 |
Bob, I just love the Pit Bull stands. Well made and very sturdy. look at them here. http://www.pit-bull.com/ | ||
Henrik |
Ditto on the Pit-Bull's Henrik | ||
Tgroghan |
If your looking for a lift.... and you do most of your work in your garage. Go in the attic and re-enforce one of the cross beams, drill through the dry wall on the ceiling and put a triangle mount(pointy side down)...like used to call folks to dinner. Then attach an engine hoist to the end of it. Use some sort of tie down straps on your bike but this time you'll be lifting it up. This helps in changing the front tire. I place a pit-bull stand on the rear of the bike for stability. That was before I paid $150 for my second pit bull stand, for the front. Thad | ||
X1glider |
I was actually given a replacement lift. I can't see using a pitbull on a hog. I suppose I can make it work tho. I really need a lift that will lift the hog and the buell at any point I choose, by the frame or wheels. The ez-rizer wil do both and do it well. The broken lift above is apparently a 50 dollar kit that anyone can buy and build at home. Some build them and sell them to people like me for 100. Now I know better. It was my first lift. Yes it is a very poor and mechanically inefficient design. Buellzebub: just missed you. I ventured up to Waterton while on my trip in the Tetons. A short jaunt for you. And I see it won't stop snowing there. 12" in the past week. I'll make a quick board topic of my trip when I develop pics and get some time. I have much catching up to do now that I am home. Yes BJ is here. I worked for them many years ago. Roadrunr: U ever get any flak from the bandidos at the blue door for riding a buell? I don't go there. Had a few "incidents" in the past. Thought it best to stay away from now on. I'll give u a holler when I catch up on my sleep. | ||
S2pengy |
S3 clock on a S2 Yes it can be done and end up with a flush mount. First I do not recommend tearing up good S2 parts and being a member of the Antique Motorcycle Club of America I guarantee it will decrease the value of you bike, but for those who can't leave things alone; 1. Remove the dash assembly 2. Leave the gauges intact and don't try to remove the idiot lights 3. Remove the S2 emblem by sliding a razor blade underneath 4. Place a 2 inch hole as far to the right as possible leaving room for the securing u bracket of the clock mount. The reason you want to go as far right as possible is clearance with the wiring block connections on the front fairing mount... The 2 inch hole is a bit small and some filing will be necessary. 5. Trim about a 1/16 of an inch off of all four spades coming out of the clock and gauge light so they are shorter. 6. Find 4 Harley Davidson 90 degree spade female connectors part number 9898 and install these on the spades. 7. Temporally mount the clock with the light assembly installed, you will find the dash will not lie flat because of the clock light assembly. The tunnel the light assembly slides into is allot deeper than the light assembly I trimmed about a half an inch off the tunnel. Now it should sit flush if not trim some more as necessary. 8. Wiring choose one of the spade connectors from the gauge light and the ground from the clock and run both wires to one connector at the ground point on the tach or front fairing mount... I went with the tach So I could remove the dash without removing the front fairing ground screw... 9. Positive wire for the gauge light. If you follow the two Orange wires coming from the tach and Speedo they connect together at one of the electrical connection blocks there is an empty hole just below this on the block. Put a Harley Davidson male pin in this hole with your wire using connector part number 72039-71. That socket is live on the other half of this terminal block . 10. Power for the clock. I no longer have the stock ignition switch as a matter of fact I am on switch number three... Because of this I no longer have the connector at this point instead I have three male/female bullet connectors covered with shrink tube. I spiced into the one coming from the battery. You could just run a wire from the positive battery terminal. By the way draw for the clock is 1-2 millie amps. 11. If there is interference with the wiring terminal blocks on the dash you can either push the bock all the way through the mount hole on the fairing support or flush it out using RTV to hold it in position. All this was done on a early S2 manufactured in October of 1994 later bikes might have differences so check it out before diving in. Also keep in mind that because the dash is fiberglass the clock mount u bar could wear through with its sharp edges. An early S3 dash which is heavy plastic could hold up a bit better but then the problems associated with the idiot lights come into play. To remove the idiot lights you either have to break the housing or pull the pins out of the connection block. Also the S3 dash has a recess for the metal S3 logo which may not get completely covered due to offsetting the clock to avoid the wiring blocks... If you want there is even room to reinstall the S2 logo between the clock and tach at the top. As with anything you try this at your own risk... | ||
S2pengy |
S2Mods & Tips First I do not recommend tearing up good S2 parts and being a member of the Antique Motorcycle Club of America I guarantee it will decrease the value of you bike, but for those who can't leave things alone; 2001 shifter on a S2; The Buell kit # 49074-01y is a direct bolt up with these additions; I had to add a 1/4 inch spacer to bring the shifter further out from the primary case. The spacer was placed between the shift lever mounting bushing and the primary case, without it on upshifts I hit the primary case... This is with the S2T peg mounts, with the S2 peg mounts you may have to extend the threaded upper eye to get the shift lever even higher. The peg mount in relation to the shifter location seems to be quite a bit higher on the S2 and S2Ts. The recommended lever tie bar length is 4.6" and a maximum of 4.7" with the S2 mount peg mounts and engine shift lever at a 3:00-4:00 position my length is at 5.25" Oil filter; Use the longer Dyna oil filter Harley Davidson part number 63812-90. Drill a 1/16 inch hole in the muffler mount directly below the filter near the upper case through bolt. Install a worm drive clamp on the oil filter with the drive unit at the 1:00 position and run safety wire between it and the hole you just drilled... Added oil capacity and no chance that the oil filter backing off... Cruise control; Install Harley Davidson part numbers 56397-74c & 56396-74a and while you are at it safety wire the throttle cable housings to the cable guide at the carb end.. They have been known to come out of the cable guide with very bad results... Turn signals; They have a drain hole make sure it is on the underside. If you have clearance problems between the rear turn signals and saddlebags, remove or install washers between the saddlebag mount/frame/aft fairing as necessary. Don't forget the foam tape in the saddlebag recesses for the turnsignals... Grease fittings; Install threaded grease fittings on swingarm and at the frame for the steering head bearings, increases life of the bearing by quite a bit. Windshields; The 3 inch extended Gustafsson does not help it just tapers the wind at you.. Do not use graphite sprays such as Dri-slide for cables it builds up at low points causing friction which leads to cable failure. Old Buell part numbers; If it has a y at the end of the dash number the part is Buell only otherwise it is a Harley Davidson part. As with anything you try these things at your own risk... | ||
Mikej |
Thanks for the preview Todd. Unfortunately my S2 was already slightly butchered on the dash before I got it, so I'm just taking advantage of that fact. I'm also missing all the "special" paperwork that came with them, so I consider my S2 to be a rider. I'm off to BattleTrax for the day. MikeJ (runnin' late, but hopefully not last) | ||
Roadrunr |
Anyone: Does anyone here know if there are any mech./ elec./ or torque spec changes between the 1999 and 2002 year X1's. | ||
Spike |
Anybody know of any special tools or tricks to installing isolators? I was told I needed a frame spreading tool but it turns out the local dealer can't get one for a few weeks. I checked Sport Twin and ASB, neither seemed to have anything for isolators. I managed to get the old isolators out and one of the new isolators in, but I just can't squeeze the 2nd one in place. Thanks, Mike L. '99 Cyclone (paperweight) '95 S2 (borrowed) | ||
V2win |
Spike, Yep, I have seen a "special little tool" for installing the isolators at my local Buell dealership. It so happens that the service manager and I are good friends and he let me borrow it. It involves no spreading of the frame but does make it easy to get your bike back together. Perhaps you can buy one if you can not borrow one. If not, go to the ATC site and check out the info there on relacing isolators. His suggestion is to spread the frame slightly with a home made setup. BE CAREFUL if you try speading the frame. Good luck. | ||
Al_Lighton |
Do not spread the frame. Follow the instructions at ATC. The only "special" tools you'll need are some big bolts and washers, and a crowsfoot wrench set if you don't already have one. Home depot has eveything you need. Takes less than 4 hours the first time you do it, about half that the second time. seeisolator replacement | ||
Spike |
I've read through the stuff on ATC, but I don't fully understand the part about squeezing the isolators. I understand that all it takes to squeeze them is bolts and washers, but how do you get the bolts and washers out once you've squeezed the swingarm back in. It seems to me that you'd trap the washer in between the swingarm and the frame. Can anyone explain in more detail? Thanks. Mike L. '99 Cyclone (still down) '95 Thunderbolt (borrowed, now with flat tire) | ||
Jmartz |
Spike: The Boston group article suggests the bolt and washers as a stedying method to get the wafers started. Once you have achieved this put a 2x4 across the passenget peg triangles and smack it with a short handle sledge hammer. The frame/isolator group will ease down with every hit. Then put the axle back and take a ratcheting tie and wrap it around the frame and axle and use it to realign the bolt hole if necessary. | ||
Hootowl |
The bolts compress the isolators in the frame long enough for you to slide the swingarm block past the edge of the isolators. After you get the block in between the isolators, remove the bolts, and slide the block the rest of the way in. | ||
Spike |
Finally the job is done! I ended up using my old '99 Shifter and a long bolt through the isolators to compress one side while I slid the other isolator in place. Many thanks to all who replied. Mike L. '99 Cyclone (on the road again) | ||
Bomber |
all . . . of all the jobs required when one is involved with vehicals of one kind or another, brake bleeding is close to my least favorite (only surpassed by bodywork/painting . . . . .) I just got donw using a pressure bleeder I got from Eastwood (auto restoration tool and supply joint) called the Easy-Bleeder (all you medics and EMTs relax) . . . . ..from the UK (as evidenced by both the Union Jaack on the packaging, and the odd mix of inch and metric measurements found in the documentation) . . . it's cheap (35 cash dollars american) and uses a tire as the pressure sourse (follow the directions, and do NOT use a tire w/more than 20psi of air in it . . . . fairly spectacular spray of brake fluid in the garage when hooked up to 40psi!) I've been attempting to bleed the family support vehicaal (1931 Model A) for a week, off and on . . . both using the draft-your-daughter to pump the pedel and the mighty-vac suck the juice through the system methods, and never really got anywhere (did manage to flucsh the system nicely though . . .ran almost a gallow of fluid through it) . . . . . 20 seconds with this pressurized deal, and the old bi, er, dear has better pedal feel than my 99 mustang! I had to make an adaptor to find the master cylinder cap . . . . took a grand total of 5 minutes give me a shout with any questions (yep, I know Henry shipped 31s with mechanical brakes . . . this car had juice brakes put on it about 10 years ago . . . next is the generator-to-alternator conversion . . . . ) |