| Author | Message | ||
Aaron |
It breathes in? Past the umbrella valves? | ||
Lake_Bueller |
Bomber, Found were the little brass thing went. All is well (it even runs!!). Actually road to work today (wind chill of +4). Mennis | ||
Bluzm2 |
Lake, Was it the brass grommet that goes in one of the holes on the top diaphram cover? Left front screw if I remember correctly. | ||
Lake_Bueller |
Bluz, Good call!!!! Except its the back right screw. The one that the throttle adjuster attaches to. My hat goes off to the tech guys at DynoJet for the answer (after they scolled me for not having a Buell service manual). Mennis | ||
Buelliedan |
Aaron, If you believe the hype then we are lead to believe that "The Cure and The Devonator" allow the breathers to suck and blow!!! | ||
Jasonl |
Does that brass plug cover an potential intake leak or what? I left mine out....>0 | ||
Lake_Bueller |
Jason: I was told its there to provide some extra strengthening for the idle adjuster. It's probably not crucial but I figured they're smarter than me so I left it there. | ||
Jima4media |
I just had my rocker boxes drilled out by Modesto Buell, and poof - my oil breather blow-out days are over. I also got the new Harley / Buell metal rocker box gaskets installed too. The pictures are over on SacBORG.com Jim Armstrong X-2.5 | ||
Orion |
Aaron: Damn, I hate it when I'm too ignorant to even understand if I'm being made fun of.  I remember being told the filter was necessary when I put my Forcewinder on, so set me straight and hook me up with some details (I'll also read Jose's saved breather discussion). J.D. | ||
Ara |
Due almost entirely to my past discussions with Jose, a case of excellent Danish beer, and several sleepless nights, I believe that I have stumbled across a very good and surprisingly low cost breather solution. What I did was buy another L-shaped breather fitting to replace the straight on that's on the front jug. I drilled through the sides opposite the Ls and silver-soldered in 3/8" hose barbs to make the L-fittings into T-fittings. These I installed on both jugs so that the T is oriented vertically. To the upper ends of the Ts I attached the hoses that I'd previously installed that run back along the frame to a filter that has two hose barbs, one on either end. This accommodates the gases. To the lower ends of the Ts I attached about six inches of clear polyethylene hose with a screw drain installed in the bottom of each. These accommodate the liquids, and use of the clear hose enables me to easily check to see when they need to be drained. The gasses go up, the liquids go down, and the pieces of clear tubing act as long skinny catch cans. The clear hoses can be zip-tied to the frame. Easy, cheap, and it works. After a 250 mile Interstate run at 75 to 85 mph, each clear hose had about 1/2 inch of liquid showing. If anyone is interested, I can scan a couple pictures. Russ | ||
Aaron |
JD: I *think* the idea of the filter is to absorb to liquid component of the blow-by, so it doesn't drip. You have to clean the filters periodically, else they drip when they get saturated. Your umbrella valves shouldn't allow any significant amount of reverse flow. Russ: good idea ... similar to what they do on the Blast, except the gaseous component gets sent back into the intake on the Blast (not good IMO). They use a long piece of hose as a catch can, though, it extends down to the swingarm and has a plug in it for draining. AW | ||
Ocbueller |
Russ, Please do scan a pic, sounds like one of the better setups I have heard of. SteveH | ||
José_Quiñones |
Pics, please, Ara, it sounds good, and the clear tubing adds to the "wow" or "what the heck is that" factor! | ||
Ara |
Pictures tomorrow, fellas. I (duh) forgot to bring them with me to the office where the (duh) scanner is. Russ | ||
Ara |
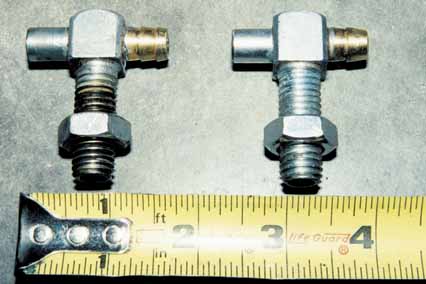 This shows the modification to the factory "L" breather fittings to make them "T" fittings.The additional leg of the fitting is a brass 3/8 inch hose barb that's been sortened for this application. The factory fitting is drilled out from the inside, using the existing leg of the fitting as a handy drill guide. Use a drill bit that matches the interior diameter of the existing leg. Then expand the hole from the outside using a bit that will accommodate the new brass insert. Drill just short of full depth so that you have a "shoulder" inside the fitting. When you press the brass hose barb into the fitting (use a c-clamp or vise), it'll stop at the shoulder. Then with a propane torch, acid flux, and silver solder, you solder the steel and brass parts together to make strong and permant joint. 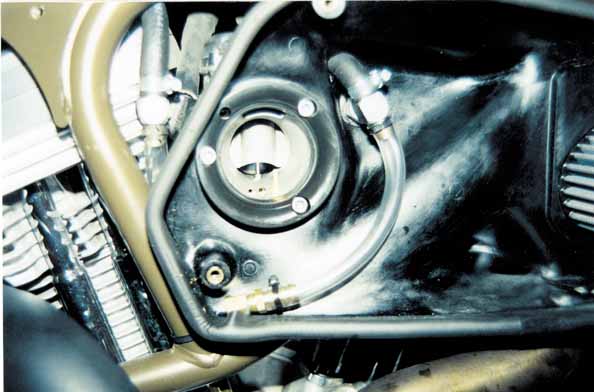 This shows the installation of the two new T-shaped breather fittings. The black hoses that go up from the upper leg of each T-fitting run to a two-barb breather filter placed under the rear bodywork. That accommodates the gasses. The clear hoses that go down from the lower leg of each T-fitting end in a brass screw drain. The clear hose on the rear jug can be seen just below the T-fitting, is zip-tied to the frame downtube, and the brass screw drain is just visible below the frame side rail at the very bottom of the photo. The one on the inside of the airbox is clearly visible. I prevented crimping of the upper hose on the front jug by using one of the factory L-shaped rubber breather hoses and a double-ended hose barb to join it to the long hose that runs to the filter. I can easily check the clear drain hose on the rear jug to determine when both need to be drained, as the two jugs should produce breather liquids at approximately the same rate. Questions? Russ | ||
Bomber |
Russ . . .any time your day job doesnt work out, you could get a gig as a technical writer ... nice solution, well explained thanks | ||
Spiked |
Russ, Great work. I've only got three questions: Where did you pick up the two-barb breather? Is that a stock sized K&N filter? What are you using to hold the filter in place? Thanks in adavance. Spike | ||
Ara |
Spike, The two-barb breather is from J&P Cycles (www.jpcycles.com), although it looks a lot like a K&N product. The filter body is 2 inches in diameter and 1.5 inches tall. The ends are chromed, as are the 3/8 inch barbs that are on either end. It's part number 12-012 and J&P's price for it is $14.99. The stated application is for 1993-99 Big Twins and 1991-2001 XLs. (usual disclaimers apply) I chose that filter for two reasons. First, one of the considerations in the breather system is volumetric efficiency and I wanted very much to get away from the factory arrangement that tees the two breather lines together. That reduces the volume of gas the breather system can handle by half. By running independent breather lines to each end of the filter, I thought to preserve the volumentric efficiency of the breather system. Second, I really didn't want to have to use two separate filters when one will do nicely. And I found that if I zip-tie the breather lines to the frame rails, the stiffness of the lines on either end of the filter support it without additional mounting gimmicks. I hope this helps. Russ | ||
Bluzm2 |
Russ, I think he was asking about your air filter in the bread box. Right Spike? BJ | ||
José_Quiñones |
Nice work! | ||
Ara |
Oh, yes BJ I think you're right. The engine air filter is a K&N in the standard size. As you can see, the factory shroud around the air filter is missing as is the snorkel. I believe that the close fitting design of the filter shroud and the single air path out of the shroud is restrictive. My solution was to replace the shroud with a flat plate of aluminum that has two holes in it to accept the stock pair of air filter bolts to hold the air filter in place. The air box functions only as an air plenum for the intake system and does not do double duty as a sound deadener or as a catch and diversion device for crankcase gasses and liquids. Steve, Bomber, BJ, Spike, and Jose: Thank you all for your favorable comments. Some of the credit goes to Jose, as he has a breather solution on his bike that inspired my own. Russ | ||
Bluzm2 |
OK folks, I decided I was going to be the guinea pig for you's all. A while back someone posted about mods to the center rocker box section. It involved drilling the drain back hole to 1/8 inch and chamfering the umbrella valve hole with a 60 degree reamer. If I remember correctly, the wrench at Modesto swears by these mods. A brief history on my 2K M2.... 2400 miles - rear rocker starts leaking at left rear corner. 9100 miles front rocker lets go in left front area. 10500 miles - rear starts piddling in same spot as before. At about 8500 miles, I installed a carbon ham can air filter. At the same time I rerouted the breathers. Down to a T then back up and under the rear fender. I didn't have any problems with drool or puke after the reroute. After I changed the front RB gasket, rubbers and umbrella valve, I started to get a bit of drool out of the breather filter (just behind the license plate). After a semi-spirited ride I would get a a bit of drool on the rear tire from the filter. Not much, just a couple of thimble fulls. When my rear RB let loose again, after tear down I took a close look at the way the umbrella valve seated. It looked like it wasn't pulling down all the way and seating very well. BTW, the RB leaked in the exact same spot as the first time. Bottom line, I used a 3/8 drill bit that had about a 60 degree angle and drilled from the top to recess the hole a bit. I took it down about 1/2 to 3/4 the total thickness of the casting. After installing the umbrella valve it appears to seat much better. Much more flush than before. If you look at the bottom of the valve rubber, it is thicker where the stem attaches. Drilling the chamfer allows the valve to pull flush and seal better. Also, I installed the new 1 piece steel gaskets. I probably won't know until sometime next year weather they last or not. I didn't do the front gasket, just the umbrella valve mod. I'll do the gasket when the paper one lets go again. It's late and I'm tired. When I had the rear apart, I did a bit of polishing. I'll post later on some cool polishing stuff. Having the right buff wheels and compound really makes a difference. Night All Brad | ||
José_Quiñones |
Russ, I still like mine better.  See it here. | ||
Spiked |
Ara, Thanks for the info. I've been scanning the local autoparts stores and motorcycle shops, but I haven't been able to find a two-barbed filter. I guess I'll end up ordering one. Spike | ||
Ara |
Sure thing, Spike. BTW, I came up with what I think is an even better way to employ the two-barb breather filter but it won't work with the factory airbox. It WILL work with an aftermarket air filter set-up like the ham-can and the Force intake. Simply put, the breather system is laid out in an H shape with the two-barb filter in the position of the crossbar of the H. The factory L-shaped breather fittings are used without modification, but turned to point downward (as per Jose Q) to permit the flow of liquids. A pair of short pieces of hose are followed by a pair of T-fittings oriented horizontally so that the two-barb filter can be connected between the two breather lines. At the bottom leg of the T-fittings you put the clear tubing with the drain fittings at the bottom. I think that this would actually work better than my set-up because there's a lot less hose and therefore the gasses should flow with less friction. But as I said, it won't work with the factory airbox. Russ | ||
Bluzm2 |
well, The initial results are in, I'm getting MUCH less puke after the umbrella valve mods. On Sunday, I ran pretty hard for about 45 min. 5-6k stuff, hard launches from stops, etc. I've had NO drips from my breather. Need a bit more time to be sure, but the mods definately helped. Not much riding season left up here but I'll report back later with more results. If you read the description above and look at the following pics, it should make sense. Brad This is the stock middle rocker box section. 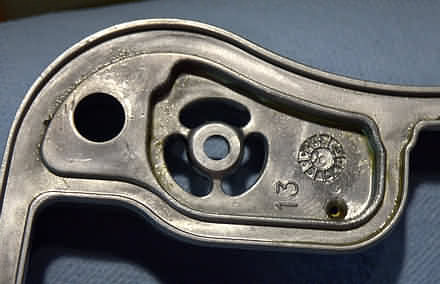 This is the modified version. It's hard to see, but the small drain back hole on the left has been drilled to 1/8" 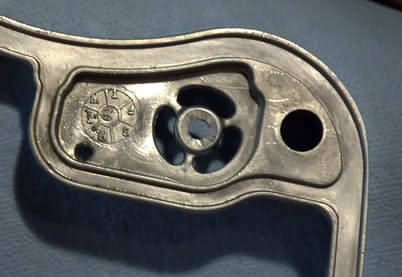 | ||
Spudman |
When I added the new air cleaner (drag specialties) I also routed the breather lines to a filter. I had the filter in a secluded area to keep the look of the bike clean. After about a thousand miles the filter would drip due to excessive condensation of oil mist. Below is a pic of my old setup looking down with the gas tank removed (air cleaner on right, oil mist filter on left, breather hoses T together before oil mist filter): 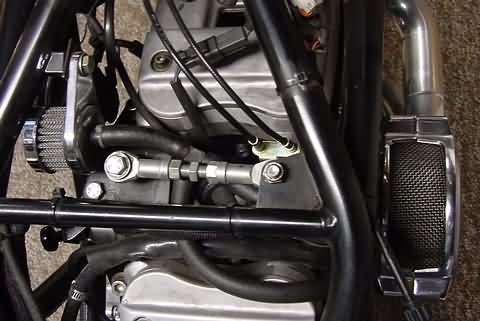 Well, I got tired of cleaning the drippy mess and installed a puke can last weekend. I went with the Jaz catch-can as it had everything I wanted at a reasonable price. I found a hidden spot to mount it under the tail section bodywork using the frame down tube in front of the oil bag, pic below: 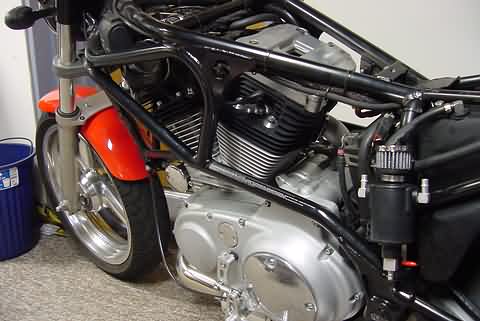 A hose clamp was opened up, then looped around the frame tube, and closed again. The end of the Jaz catch-can bracket was slipped under the hose clamp, then the clamp was tightened up snuggly. The catch-can was positioned far enough down the frame tube so it wouldn't make contact with body work. The bracket provides enough clearance between the frame tube and catch-can that the hose clamp and existing oil return line have plenty of room, pic below: 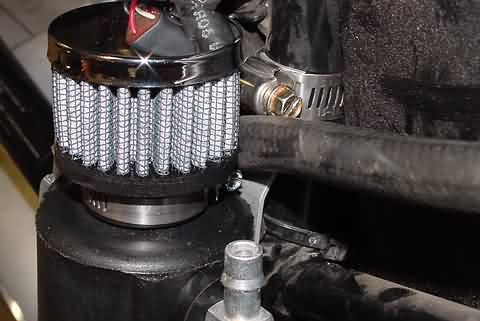 | ||
Spudman |
Two separate lines (used 5/16" fuel hose) were routed from the breather bolts 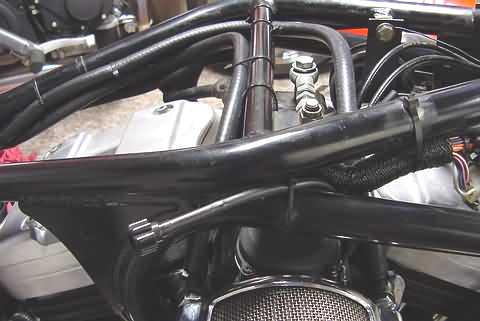 to the catch-can and zip tied along the way. 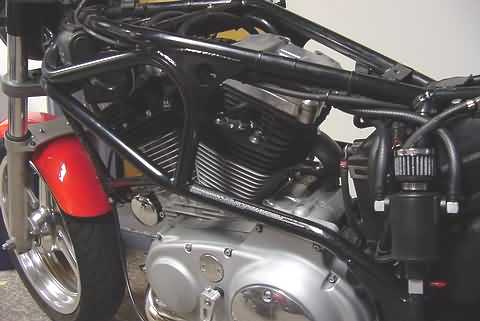 Note how the hoses reach their highest point after they come off the heads, then all down hill to the puke can, I didn't want Mr. Gravity to trap any puke in the line. | ||
Spudman |
Here is a look at the finished install from the rear. This pic was taken from a squatting position to show where the puke can is located. From a normal position you can hardly see it. 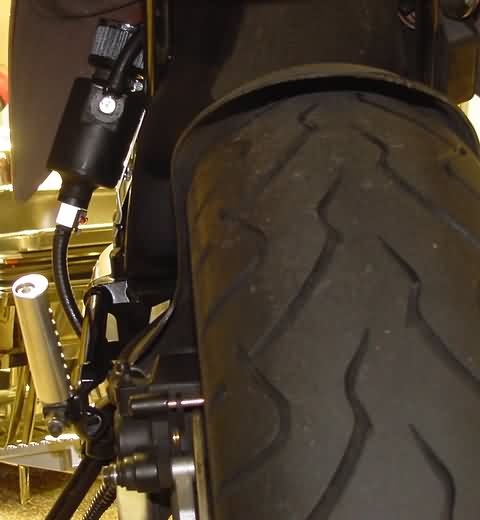 And here is the finished install from the left side. Easy access to the drain lever while retaining a clean look. 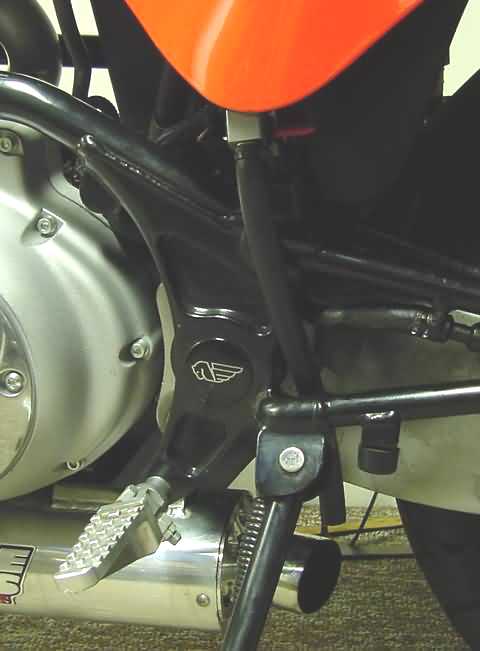 The bike is running really good now. Starts easier, revs quicker and sounds meaner. I don't have the time or dollar$ to do a 100 dyno runs like Aaron to justify the previous statement, but the seat of my pants says it's better. I suspect my original setup was not maintaining constant atmospheric pressure, not a good thing. I've put about 600 miles on the bike since the mod without any problems, only smiles. Enjoy | ||
Blake |
Bluz, Spudman: Great pictorials! Thanks! |