| Author |
Message |
    
Greg_e
| | Posted on Saturday, June 01, 2013 - 04:46 pm: | 


|
You are going to have a massive problem when you want to raise the engine again, same problem only in reverse.
You might be able to get a swingarm stand in there and pick the rear wheel up, this way when it was time to jack the engine back in place it would be easy to either lower, or ask someone to help by lifting the end of the stand a little so all the weight is on the wheels of the stand. I move mine around a foot or two on the stand all the time, and mine is a cheap harbor freight stand (the black tube version).
If not, the next time you have work to do, you might want to bolt the stands to a moving dolly so that it will roll. |
Blugorilla
| | Posted on Saturday, June 01, 2013 - 07:01 pm: |
|
I'm sorry to see the troubles you are having, but I'm keeping very interested, as I'm about to do this myself. I have my fan and gasket kit already.
One question... why the PCV valves? Are they clogged, or just for precautionary since you will be in there? |
Schwara
| | Posted on Sunday, June 02, 2013 - 12:26 am: |
|
Definitely just in case items. I also got replacement studs for the headers. I would rather have them on hand and not need them then have to place another order and wait. The valves I might replace regardless since I have them. If the one in the back is bad that seems like something that could have stressed out the gasket. I would hate to change the gasket & fan only to have another problem. The fan replacement by the way is interesting. I don't recommend it unless needed. Between the removing the shroud over the shock, removal of the shock, and getting to the fan plug ... it was a fun & educational afternoon. I didn't really need the extra personal time with the bike after restling with the engine. As with many things I'm sure it's easier the second time but I'm hoping that won't be for a very long time. |
Schwara
| | Posted on Monday, June 03, 2013 - 10:01 am: |
|
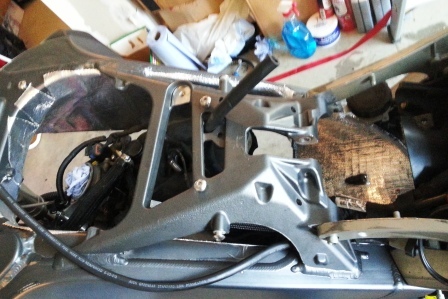
Finished: gaskets, plugs, PCV valves & grommets, & entire inside of frame and airflow path for fan cleaned out spotless (& oil free) 
Started: making patterns for Thermotec liner & also have parts laid out to compress shock spring for disassembly to put on Jason B lowering collar
Work left: get Thermotec on, get new fan in, replace shock, replace shock cover (can't wait for that one), replace header, raise engine, and attempt to get everything plugged back in and screwed back on ... correctly
It's been interesting and educational but I hope I don't have to do anything else like this for a very long time. This would have made a much better winter project.
As a side note, I just realized that I made no mention of messing with the fan itself. I researched engine rotation but not as much on fan replacement. I went pretty much by the book but also had some notes from Jason B in regards to getting the shock out to put on his lowering collar. I removed the shock cover / shroud (that was fun), removed the shock, and then got out the fan. Having the engine rotated down gave me a bit more space to work, but even with that I could not seem to get a good grasp on the fan plug to disconnect it. The wires are not long. I tried getting an extra hand from my wife and then eventually just cut the old fan cable to get the fan out and away. Once it was out it was easy to get the old plug out. Next time I have to replace a fan (heaven forbid) I'll probably just cut that wire first thing to save time and frustration. |
Greg_e
| | Posted on Monday, June 03, 2013 - 09:03 pm: |
|
Next time it won't take that long to rotate the engine, you already know where everything is and what you need to do. |
Schwara
| | Posted on Tuesday, June 04, 2013 - 09:56 am: |
|
I got the original collar on the shock changed out last night with Jason B's lowering collar. For people who asked about doing this in the past I used the Harbor Freight MacPherson strut spring compressors. They were OK but not great. Because of the geometry of the spring, the other shock components, and the thickness of the hooks in the compressor, fitting both in was interesting and I could not get them directly opposing each other ... which is important I discovered. The spring wasn't compressing evenly and also started to bend to one side. I ended up adding a ratchet strap (per Jason's original instructions) and that leveled things out. To do this with ratchet straps alone you would need better ones than I have and I might still have chosen to use three instead of two just because you have less load on each. The MacPherson strut compressors were very nice when releasing the spring after the collar was in. I could do it very gradually turn by turn instead of just releasing the ratchet strap. That spring has a ton of energy. One time it snapped into the collar by an 1/8" or 1/4" and just that alone woke me up quite a bit.
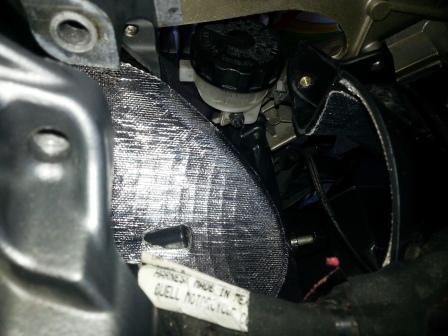
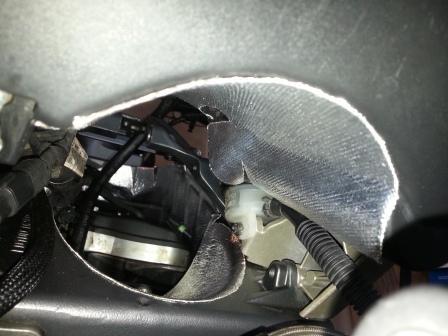
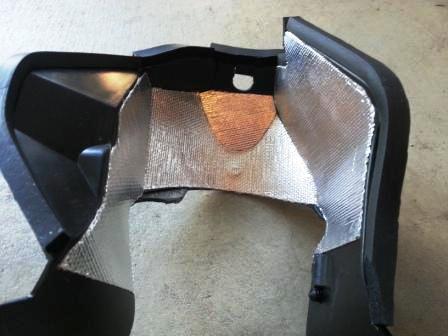
I also got the Thermotec in. The role from A.S.B. is actually pretty big so if you were just lining the inside of the frame I bet you could do 2 bikes with some left over. I went ahead and lined the ramp on the back of the frame that the fan bolts on to, the shock cover, and also the end section of the fan air path that is directly beneath the seat. I'm hoping this will reduce perceived seat heat for myself and passengers. I thought it turned out quite nice if I do say so myself. I'll probably see if I can find a new little 1/4" strip of foam with adhesive backing because the original stuff, on my shock cover that rests against the frame, was trashed from oil and disassembly. It's probably not important but if I can find something at a local auto parts store over lunch then I'll pick it up.
Tonight the fan goes back in, followed by the shock & cover, and then I start bolting everything else back on. Probably the only other side project I'll do at this point is to set up the open air box kit I got from A.S.B. a while back. I do still have a couple of other little upgrades I would like to do, but this has already taken me longer than I hoped and I want to get back on the road. The other stuff can wait for a rainy weekend. I can't wait to see the new coated pipes on and see how she runs. |
Sifo
| | Posted on Tuesday, June 04, 2013 - 10:49 pm: |
|
I'm unclear of the benefits of lining the inside of the frame with Thermotec, other than keeping the fuel cooler. If the heat isn't allowed to transfer to the aluminum frame, it must stay in the air heading through the fan, so it will be hotter as it is blown against the bottom of the seat. The seat is where I had heat issues on my bike. Then again, I did once get the frame hot enough that I got a fist degree burn on the inside of my leg where it was resting on the frame. When I opened the fuel cap, the fuel was at a fast boil.
I would look at putting some of the Themotec on the seat pan to slow down how long it takes to heat soak the seat. I also put some foam weatherstripping in at the front of the seat area to keep it from flowing back under the seat and force it out the side vents.
The biggest thing that helped was putting seat beads on the seat. There's nothing like cool airflow right on your body. I tried this on my Sprint ST and it was unbearably uncomfortable though. I'm not clear why it works for me on one bike but not another.  |
Schwara
| | Posted on Wednesday, June 05, 2013 - 09:35 am: |
|
Thanks for the comments and other ideas Sifo.
My main take on the Thermotec around the tank is to keep the tank itself from heating up. Like you indicated, I have also gone to fill up and seen my gas boiling. That is a little disturbing to me, but I assume that is is OK and part of the design as I have read many others out here who have reported seeing the same thing. On long rides in the summer the insides of my legs have also gotten pretty hot from heat coming off the outside of the tank. I'm hoping the Thermotec will help with both, but as you also said the heat has to go somewhere.
As I was pulling out the old fan and then especially as I was putting in the new one it became obvious that because of how the fan fits in it is basically pointing right at the seat. Of course there are guards to encourage the hot air to go back towards the rear tire but some of that heat bleeds through. Maybe the next generation of EBR production bikes can work in a different fan and path to blow the air straight back instead of up. Some of these other workarounds might not be necessary then for those of us who want to stay on the bike longer than 20 minutes at a time. I guess the new EBRs probably don't even have this issue though since they have other ways to pull heat off and deal with it.
One of the additions I made to the Uly over my first summer was to add Odie's Uly heat blankets and those helped quite a bit with the seat, especially on long rides. I obviously intend to get those back on but since I had extra Thermotec I also lined the entire air path around and then following the fan. I'll try to attach pictures later this morning. I'm hoping I'll just be throwing as much hot air as possible at the rear tire, which doesn't seem like a bad thing. I would much prefer for the tire to get hotter and stickier as opposed to my rear end. I might consider the seat beads you mentioned for longer rides though too. I've seen a couple of Buellers out here with them and they all seem to give good reviews. |
Schwara
| | Posted on Wednesday, June 05, 2013 - 05:50 pm: |
|
Heading on home to spend some quality time with the other woman, Penelopy ... or Penny for short. Got everything laid out for the headers and then it is on to bringing the engine back up again. I guess I should also put on the new front isolator as well.
Last night I got the fan in, shock put on, and then I also reinstalled the footrest supports. Everything was simple compared to pulling them off for the 1st time. As a few have stated, it seems to be getting easier with practice.
If interested here are a few pics of the Thermotec lined parts prior to getting the fan and shock in.
|
Sifo
| | Posted on Wednesday, June 05, 2013 - 07:38 pm: |
|
Nice work! Let us know how it works out this summer. I'll throw out there what I did on my Sprint ST too. It's got the exhaust running right under the seat. I took some extra header wrap I had and taped them to the bottom of the seat with aluminum tape. The result was noticeable. |
Schwara
| | Posted on Thursday, June 06, 2013 - 10:55 am: |
|
Headers on, O2 sensor on, connected O2 sensor & head temp sensor plugs, coil on & plugged in, new plug wires on, jam nuts on throttle cables tightened, 4 push pins put back on wire guide, new front isolator on, belt on, rear wheel snugged back up proper, raised the engine up almost the whole way and then realized I had a stray plug with no home ...
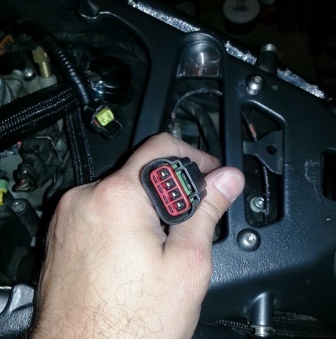
If memory serves I believe this is the plug for the exhaust actuator (which I removed) but can someone confirm that please? My actuator died within months of owning the Uly so I pulled it out, got a different exhaust & ECM, and never looked back. If this is what I think it is then I'll just tie it off somewhere out of the way.
On the headers, Al recommended that I get 3 of the header gaskets as sometimes one is screwed up in insertion. I recommend the same. I didn't even know what it was when I opened my box from A.S.B. but after reading the assembly instructions for the headers I realized that my old ones must still be in the bike. Sure enough crammed in there were the old smashed ones. I had to use a tiny screwdriver and pliers to get them out. I slathered anti-seize around the hole and then started trying to insert the new ones. They are weird. The material is obviously not solid metal, but as I was working one into place I realized they are a compressed metal wire mesh. I confirmed this when a few of the tiny needle wires kept poking we in the finger while I was trying to push. I almost destroyed one, so I was glad the spare was there just in case.
Once I confirm my plug above I will finish the rotate, put the battery back in, and then at least turn the key to look for error codes before bolting everything else up. Hopefully I'll finish her up tonight. |
Akbuell
| | Posted on Thursday, June 06, 2013 - 04:46 pm: |
|
What are the wire colors to the plug? Should be able to figure it out w/the wiring diagram.
Hope this helps, Dave |
Schwara
| | Posted on Thursday, June 06, 2013 - 07:12 pm: |
|
Thanks Dave. It turns out when I got home I found my old broken actuator and it was a perfect fit. I was wondering why I didn't snap a pic of this plug during tear down ... it was because I didn't do anything with it then. Re-assembly continues ... |
Schwara
| | Posted on Friday, June 07, 2013 - 08:35 am: |
|
She is back on her own two feet ... now I just have to get her off the hospital bed and moving under her own power.
Got the engine cranked up the rest of the way, got the front isolator bolt in, tightened up the V bracket, tightened pinch bolts on the frame and rear wheel, made sure all stabilizer bolts on and tight, and even made a last minute change out of my shift linkage to a much nicer looking one thanks to Fishxb12. That was the quickest part I have ever received and Chris is a great guy.
The only excitement was that I had to loosen the front stabilizer bolt to get the Vbracket in place and when I went to put that back on I realized that either the PO or his previous shop must have pulled that off at some point. "How do you know that?" one might ask. Well first, the bolt looked like it had a slight bend to it ... of course it was late and I was tired. I would have replaced it if I had a spare, but I didn't. Second, when I went to put it back in it appeared to want to go in at a slight angle. I pulled it back out to take a look, and sure enough during the last install they cranked it in at a slight angle, rolled their own threads in the AL, and boogered the thing up real nice. Without torque the bolt went about half way in. Luckily I had a tap the right size and slowly went back and forth as best I could clearing out AL shavings. This also took longer than it should since the previous rolled threads were at a slight angle. Finally I got all the way to the back. Lets hope it holds. I put blue Loctite on virtually every bolt and screw on this bike so hopefully between that and the cleaner threads I'll be OK. I will keep an eye on that bolt though. Tonight the testing of the work begins.
As usual, I am wondering about a couple of things ... looking for input. All major structural, engine, and electrical components are on so is it safe to turn the key and look to see if I have any error codes? After that I'm putting on the muff, velocity stack, and air filter so at that point I'm wondering is it OK to try to turn over the engine? What am I missing, forgetting, or are there other thoughts? I hate to bolt everything on when there are checks along the way I can do. Thanks again for the input and help with this project. |
Schwara
| | Posted on Wednesday, June 19, 2013 - 02:20 pm: |
|
Didn't get it finished up before I had to head out of town. Now I have it all together but sadly I still have a check engine light (same fan error code) and I don't hear my fan running. Maybe the new one is so quiet that I just can't hear it ... wishful thinking.
I know for a fact that I hooked the new fan in. I'm wondering if maybe the plug didn't seat correctly or if I might have a wiring issue.
I wanted to look in to clearing the old codes and possibly checking the fan but on an 09 I am not clear how to do this. Apparently ECMSpy only works on 08 and earlier and so far I haven't been able to make much sense out of TunerPro.
As usual, any thoughts or opinions appreciated.
(Message edited by schwara on June 19, 2013) |
Schwara
| | Posted on Tuesday, June 25, 2013 - 11:15 am: |
|
I'm an idiot ... again.
For those with a dead fan, this will probably sound obvious to everyone else out there, but with all the other things going on with the bike and summer activities I missed it. Don't forget to check the fuse for the fan. I know, pretty stupid right.
We'll I rode the bike a couple of times last week trying to listen for the sound of the new fan ... no joy. I was also investigating how to reset my error codes to see if my current CEL was old or new. Well during a conversation with a friend while I was out of town this last weekend, he commented "You did check your fuse right?".
After getting back into town last night I checked and sure enough as you would expect from a fan that is dieing it blew the fuse. I changed it out, started up the bike, and no more CEL. I had to take the wife out for a quick celebratory ride and dinner date. The new fan turned on and off as expected.
Thanks to all who helped me through this. It was a great learning experience, but as I've said ... something that I hope I won't have to do again for a while. Next time I'm certain it will be easier and much much quicker based on what I have learned though. |
|