| Author | Message | ||
1_mike |
To any of you that have ported or have had your heads ported.... How far can, or how much of the hump in the bottom of the intake ports can be "safely" removed ? OR Finish (weld in material) the hump to the gasket surface and match the hump in the bottom of the manifold so there's a smooth transition from the manifold to the head. I port cars heads for side money and have seen large flow gains from removing smaller bumps than those in the Harley/Buell intake ports. These gains could possibly be from just past idle and be most noticable from there and continue to past the stock redline. Thanks Mike (Message edited by 1_mike on November 20, 2010) | ||
Ourdee |
 | ||
Greg_e |
Hmmm... This could prove interesting. Sorry no help from me but I'll be waiting for some answers and to see somepictures of before and after. | ||
Xoptimizedrsx |
 yep... going to be juicy.... | ||
Xoptimizedrsx |
stock 20,221 miles no breather reroute used engine to rebuild for the track. very crappy cell phone pics but its all I have now. You can see a little material was added to improve flow. The hump was only changes slightly. in these. The heads were also decked .030... this whole engine was nasty but its not anymore. I think it had factory oil in it still or he only added oil if low. Thats why he wrecked it and I got the engine cheap. 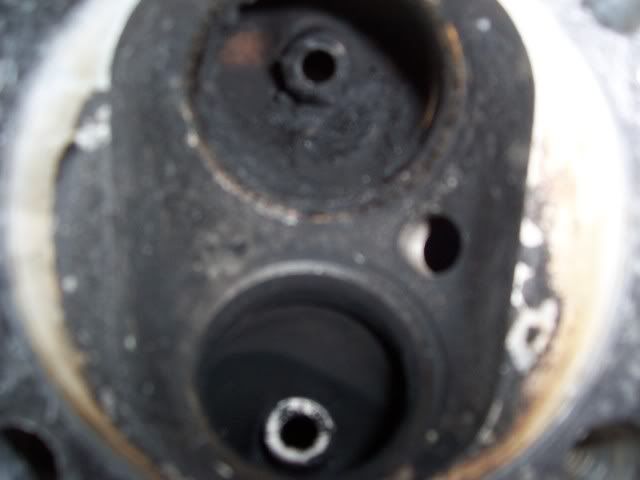 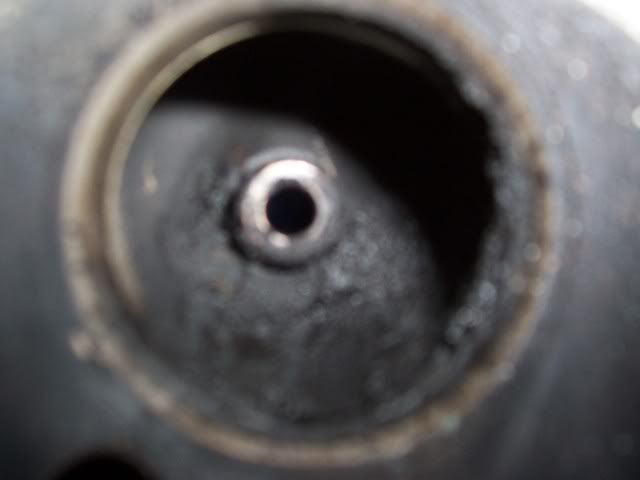 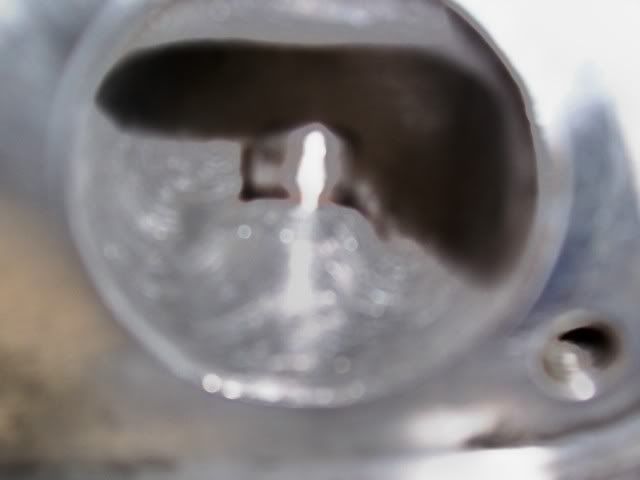 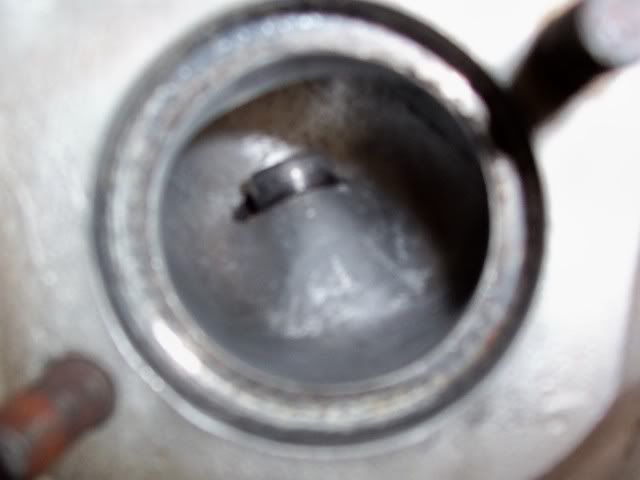 | ||
Greg_e |
Considering that I may need to pull the heads off my 9R I wondering if this is something that I could do myself. | ||
Greg_e |
OK, reading the other post it sounds like the best I can do is polish everything to eliminate any casting issues since I can't add material back into the heads. Stones and sand paper or metal cutters? Buff to a real polish or not? (Message edited by greg_e on November 20, 2010) | ||
Fast1075 |
Use sanding rolls...you can get a kit from Summit Racing or Jegs for not much money..polishing the ports is a waste of time...leave the sanded finish, it will help with airflow on the intake side where you can use it....be especially careful about changing the radius of the floor of the intake port...blend around the guide bosses and smooth the transition from port to valve seat...just don't go "hogging" out metal. The sand roll kit with mandrels, a cheap die grinder and air compressor work better/faster than a dremel tool (for instance) Don't bother with grinding stones, the aluminum will clog them in seconds...if you use cutter burrs, get good ones and use wax to lube them so the aluminum won't clog and ruin them too. But sand rolls are far safer for the inexperienced...stay away from the valve seats...paint everything with Dykem so you can tell what you are doing...in a pinch, a magic marker can be used instead..good luck  | ||
Xoptimizedrsx |
follow what FAST said... If you cant put back in only blend. ***put tape on the seats to keep from nicking them*** Use sanding rolls. get a can of spray metal workers die or any contact die from the parts store to see what you are doing. as stated. Do not polish out ports to a gloss; repeated do not polish ports to a gloss... I use alum stones which are made for alum and I also have cutters I use but if you are purchasing these make sure you get the alum cutters they are different. plus use the wax on them as well to be safe. IMO "beginners need sanding rolls only". I finish off with sanding rolls for pattern in the port and blending because they are not near as aggressive. like this but from anywhere.. link is just to show what we are talking about... Eastwood stuff... http://cgi.ebay.com/ebaymotors/Engine-Cylinder-Hea d-Porting-Kit-_W0QQcmdZViewItemQQhashZitem53e48ffc 92QQitemZ360316927122QQptZMotorsQ5fAutomotiveQ5fTo ols. better quality sanding rolls work much better... (Message edited by Xoptimizedrsx on November 20, 2010) | ||
1_mike |
Greg... Do NOT polish the intake port. You could IF the injector was way down in the port, right next to the valve stem. Not here, leave the surface rough like the 36 grit sanding roll would leave it. Though you CAN...polish the exhaust port. I wrote this in another thread - Agreed on the short turn. But for a different reason. The "flat" floor does flow better than a round floor as it goes around the short turn. This is fact. The round floor of the manifold creates terrible turbulence as the fuel/air hits the hump in the port floor. The hump, should be ramped in slowly, starting from inside the manifold to the hump in the head, thereby effectivly..."removing" the hump and creating a nice smooth flat short turn radius. BUT...why is the bottom of the intake manifold round..and not matching the cylinder head? This manifold doesn't work with other Harley engines...! There should be a flat in the manifold floor, slowly blending into the flat of the port and "eliminating" the hump...not by removing it, but by blending smoothly from the manifold...all the way to the hump in the head. This would require some welding in the port, then remachining the gasket surface flat, along with a "ramp" in the bottom of the manifold. OR.....add some weld metal to the manifold to make it flat...then weld a "tongue" that would stick out into the head and blend with the now proper flat floor... Hmmm...time to buy another manifold... Mike | ||
Greg_e |
That Eastwood kit looks like the mandrels are nicer than the stuff I saw at Summit. Still not sure how far I will go on this, but it is good to have the info. I assume the same things apply to the combustion chamber, remove any poor casting to make a relatively smooth surface if it isn't already smooth. | ||
Fast1075 |
This will help visualize a port...if you could take a port and straighten it out, it would have an hourglass shape...the reason is get the air to turn the corner from the port area to the seat area. The necked in part increases the velocity of the air in the turn, helping to maintain flow volume...if you remove the necked in part, the flow speed is lost and the air goes turbulent in the bend...you get compression harmonics that kill the airflow. There are a LOT of heads that are scrap metal (or SHOULD be) because somebody hacked 'em. If you cut the floor of the port (often done simply because it is the EASIEST part to access) you change the inside radius...air does not like to change directions, especially at high velocities..you need to do whatever you can to keep the flow laminar on the inside of the bend....the physics on the outside of the bend are different....and that is not even considering that big ole valve head you have to get the air around...seat angles come into play....and most of it is not intuitive. BTW...I killed a lot of parts over the years..."The path to enlightenment is paved with broken parts, grasshopper" And big flow numbers are not always a good indicator of how well a head will work, especially on a street bike... | ||
Xoptimizedrsx |
"BTW...I killed a lot of parts over the years..."The path to enlightenment is paved with broken parts, grasshopper" " Me too!!!! You could always have the valves re-cut for a 5 angle job and call it done. The valves and seats can actually be cut by many automotive race shops as well. I would get the New-way cutter set with video and get a few used parts to practice on. start with your lawnmower..lol then the neighbors mower. Please remember this>>>> LESS IS MORE "In Many Cases"<<<< surface clean the heads IMO is best. remove all blemishes and stop | ||
Gunut75 |
Yes, that was juicy.  | ||
Natexlh1000 |
I thought the cool new thing to do was to cut the valve seat with a curved carbide blade to make a smooth edge. Perhaps the practice never caught on/was rejected by tuners? | ||
Pash |
If I understand the hump you are talking about, I am guessing it is there for tumble... Removing it may reduce intake loss, but will change gas movement in the cylinder and at some engine speeds, may slow down the combustion process (more ignition advance and less useful work). This link gives some discussion regarding port shape and its effect on tumble: http://forums.autosport.com/index.php?showtopic=11 3276 | ||
1_mike |
Fast - Well....not exactly correct... #1, calling it a "necked down" area, and #2, the statement about speeding up the flow are both incorrect for this application, location. As I stated earlier, the raised floor...isn't so much a raised floor, as it is a "flattened" floor..(if you look closer toward the seat!)! Take your garden hose, turn the water on about half to three quarters. Now angle the hose so the water is coming out at between about 35 and 45 degree angle. Now...notice at the apex of the flow, at the bottom side...what's the shape...? It's basically..flat... Actually, no matter what the speed or amount of the water, it will flatten out at the under side of the water flow. Some may be difficult to see, it will be there. Just physics. A LONG time ago, the car guys and more recientely the bike guys found this flat floor makes the fuel/air flow follow the flat floor much better than a round floor. This actually greatly increases the low lift flow. It actually..."slows down" the flow enough to follow the floor and to better have air-fuel entering the chamber from the full 360 degrees of the valve diameter, rather than just the "faster" flowing roof and backside of the port. Yea, ruined a few myself, but have also gotten the benefit of many, many hours on the flow bench with MANY different shapes of ports. Also picked up some great tips from a coupla of the pro porters and head designers over the years. Also...NO..."tumble" is wanted or desired there. Reread the above. Any tumble that may happen is only desired as the air-fuel enters the chamber...NOT before. Mike | ||
Xoptimizedrsx |
can we get some juicy pics... I wanna learn more!!!! drawings are even good. | ||
Greg_e |
Actually, yes sketches and pictures would be very good. | ||
V74 |
can this be applied to thunderstorm heads/ports ???i want to know more too, | ||
Fast1075 |
Make a casting of the port from latex, pull it out and measure the cross section in 1/8" increments...I assure you the cross section is smaller in the turn and increases as it blends into the seat. I prefer simple ideas when trying to convey basic principles...I agree on the flat floor, but most novices will botch the radius trying to do it...the proper way is to weld it up and move the whole port up...not generally a DIY project. My advice allows DIYers to have a sense of accomplishment without too much risk. The rules are simple, keep the flow laminar, eliminate turbulence, and keep the flow subsonic...Buell had done a remarkable job with the production heads considering all the BS obstacles they had to deal with....they made a pretty good silk purse. Yeah the intake port sucks...it is from the "sideways manifold" carb on a stick ancestry...saved on development cost or something. The 1125...completely different story...good high port design to start with...great quench, great thermal efficiency....pull off the throttle bodies and check out the ports on one of those...or any modern multi valve sportbike engine. When engines went from "cosmetically appealing" to efficient black lumps is when it all changed....an XB engine is still of the "cosmetically appealing" variety...and suffers from the inherent failings...doesn't really matter, a stock XB engine, especially a pre-08 1203 is about as high strung as you can get with decent reliability anyway. My XB12s does all I need it to with the power it has with a small handful of mods I threw at it...If I ever have the heads off, I will send them to CycleRama and have them do their magic...lacking any real Harley/Buell porting experience, I will forgo the "reinventing the wheel experience". My Suzuki DRZ400 is another matter entirely...it will get the full on Hooligan treatment...lots of room for improvement there...cool engine, fully jeweled as my old marine engine tech instructor would say (means all needle or roller bearings, no plain bushings)... | ||
Rsh |
The stock Buell XB heads are very good in the standard configuration. The heads have already been hot rodded from the factory, that is one of the reasons the Buell motors have more horsepower than the HD versions. Sure a polish job would make them look good, but not really buy anything performance wise. Since you have ported car heads on the side, go ahead, it could be a great learning experience. Be mindful, It's easy to make them worse than what they are and very difficult to make them better without sacrificing somewhere else. | ||
1_mike |
Rsh - Not really talking modifying the heads too much. If you read my last post...it's the manifold that needs work. My "initial" post was just to get things started here... Though proper work right around the seat is critical, as is the seat itself. There's NOT always a trade off. I've seen the flow bench tell me this. In most cases, yea, this is mostly true. But I've seen more than a few cases, where the whole flow curve got better. The short turn is the biggest area that people screw up. This really can make or break low and mid lift flow. I normally don't port looking for "maximum" flow. I like to increase the 1/3 to 2/3 lift areas flow. Why here....because the valve spends more time here with most cams than any other place in the valve lift window. Fast - Yes and no. While if you look at the full round port...then yes, there is a reduction in port size. BUT, if you look at the real "working" part of the port, I'd bet not too much reduction in square inches. Simple only works as it can. I'm not talking about any modifications other than what I'm willing to do with my many years long experience. I've done a bit of just about everything one can to to a cylinder head. Including welding most of an intake port and raising it up about .50" and recountouring it. We then designed a new manifold, and the cars owner made the manifold out of carbon fiber. He was at school at the Pasadena Art School at the time, so he had access to making this type thing pretty easily. Was a lot of fun, and made over 50 more (rear wheel) HP in a 4 cylinder engine, head and manifold as a designed together pair, along with a larger throttle body than OEM. And yea, I too have a 1125CR and have seen the heads. and, agreed, not too bad as they are. A little cleaning, again, around the seat area and a 4 or 5 angle valve seat would help. And again, that hump in the XB head has to go. NOT....by removing it....but by welding in the manifold", to more properly blend the manifold so it also has an equal square inch and shape as the port. And to make sure there's no "space" between the two flat floors. Over the holidays, I'll try to find a manifold and start playing. I'll take some pictures as I have any real progress. Reinventing the wheel...na....just making it more "round" (!?), or in more proper terms, just better. Always a challenge, I like a challenge. Mike (Message edited by 1_mike on November 23, 2010) | ||
Xoptimizedrsx |
nice. I cant wait to see the new item and before as well as after runs. Mike |