| Author | Message | ||
Xenox |
The big thanks goes out to Gunut75 who after reading this thread http://www.badweatherbikers.com/buell/messages/32777/543366.html responded to my question , by saying he'd help me out......... Which I later found out to mean that he would actually make this part ! He asked me what I wanted and we both got together on it before I knew it he had it made, and exceeding my expectations ! Needless to say this piece is machined out of aluminum to a high degree of accuracy. I'm very impressed with the work. He seems to be a very talented machinist , and is A No. 1 in my book ! Thanks again Ian! 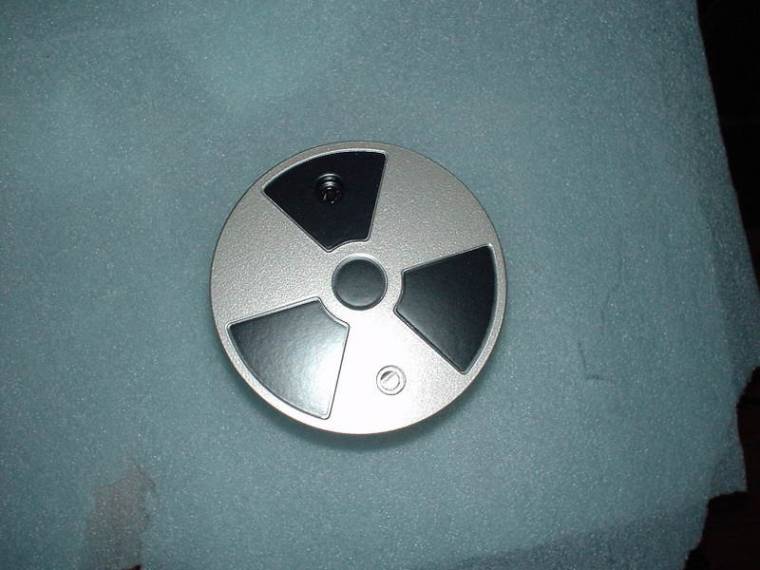   } | ||
Buellboy492 |
How cool is that? I dream of making things. Maybe someday I will learn to weld... but that is like art to me! | ||
Rpm4x4 |
Drool... I want | ||
Yool |
This is what I have on my bike at the moment.. Your pics have given me ideas.....How did you cut the pulley cover? I used a trepanning tool but the edge was too rough - hence the aluminium sheet to dress it. http://www.badweatherbikers.com/buell/messages/142 838/541439.jpg | ||
Glitch |
Very cool! BadWeBbers are the best | ||
Xenox |
Yool , nice ULY! I also include a method for locating the center of the cover for hose who would like to know: I cut the hole out by hand using a dremel with a .125" rotary file/cutter thingy and sandpaper, I wish I had a hole saw it would have made it easier (A popular auction site has complete sets for dirt). I can find the exact center by gluing a 1/2" long x .250"+(iirc)spacer that fits inside the center of the output shaft seal, I then thread 1/4" 20 X 1" (or so) allthread studs to the bolt holes that hold the cover on. I put a dab of bright paint on the spacer (after I spin the output shaft to make sure the spacer is dead nuts center), I then slide the cover on the studs until it touches the wet paint on the spacer, the exact center is now marked........... ........After I found the center I marked the center and drilled a small hole in the pulley cover , I marked the center on the disk that I could easily view through the plastic puley cover and traced the outside of the disk with a paint pen, this gave me the location and size of the hole. (Message edited by xenox on May 21, 2010) | ||
Nightripper |
I wonder if you could use a used late model sportster alloy sprocket cover and modify and machine it to a custom look. I seen cut down and drilled out sprocket covers on sportsters that look great | ||
Xenox |
That indeed would look very cool , especially as you say custom machining it.Lots of possibilities if it bolts up.... I specifically wanted to use the plastic cover on my bike because it matches the rest of the plastics on my bike, I also wanted it to look semi subtle/stock , just enough to take the edge off or break up the stock plastic piece.... Some other excruciating details =) : You can't really see it in the pics but the rear mounting post hole spacer section of the plastic cover was shortened by 3/8" approx , to get the plastic cover to sit flush with the pulley, it tilts the rear edge of the plastic cover inboard..... otherwise there'd be two little tities (mmmmm) sticking out (mmmmmm)past the pulley from the next to center profile lines in the plastic cover. They're located at the 7:30 and 10:30 positions. 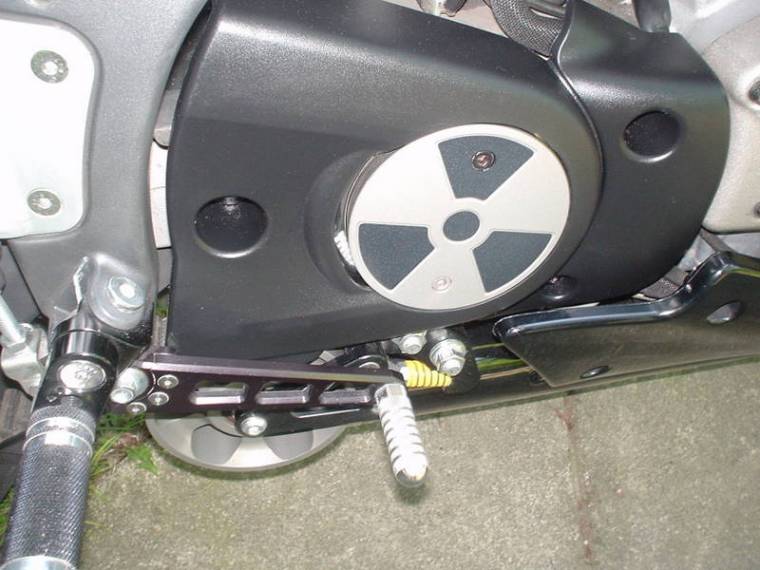 | ||
Gunut75 |
Now I gotta get pics of mine! Looks awesome Xenox! | ||
Xenox |
Gunut75 Thanks again for making this possible ! | ||
Augustus_01 |
So, does this spin with the pulley or is it just a cover for it? | ||
Xenox |
It's attached directly to the pulley . It spins . | ||
Augustus74 |
I didnt realize it spins - that is really freakin' cool! Though i think I would have painted the black parts yellow or amber. | ||
Xenox |
Thanks !The way it works with the stock plastic cover seems to be a big part of it. I have to thank Gunut75 again ! Who made this possible , great BadWeber, great person ! I just realized in the pictures the disk seems to be in the same position , I can see how it may look like a static cover. I was thinking about doing it in amber , orange or yellow even before I had the part......I finally settled on the black and magnesium tone , as I didn't really want it to stand out too much,I wanted it to stand out on what it is. Of course people not familiar with XB bikes may not really know the significance...It looks really good in person I'm very happy with it. Now that you mention it though .......You could match the pulley cover black parts to the color of the bike , blue, red , yellow or whichever color the plastics are .............. I wanted amber or such to match the wheels originally though , but as I mentioned I settled on the black , I'm sure amber would look cool too , especially on a all black disk, lots of possibilities ........ Ok I'm starting to get all OCD maybe I need to go to bed. Thanks again! Thanks Gunut75! | ||
Augustus74 |
Amber would match the wheels or the yellow like the radioactive (or whatever it is) sign.  | ||
Thepod |
Love to see a video of this if you get a chance to post it... | ||
Jaylightnn08 |
Hey man, nice bolt. What kinda footpegs are those? Did you have to modify your stock rearsets? Thanks man, looking to update mine without dropping six hunge on new rearsets\ Justun | ||
Xenox |
No mods plug and go , pm sent. | ||
Nadz |
bump for video! | ||
Im_joedirt |
Looks great, really sets your bike off. Gunut75 any chance of shipping one to AUS/ | ||
Xenox |
Thanks , btw the silver is magnesium tone , and the black is vinyl cut by a plotter to fit the pockets, and finally rustoleum flat clear for the final coat. The rustoleum gloss 2x stuff is some outrageous performing stuff , but I found it was way toooooo glossy . Naturally could not of been possible without Gunut75s wizardry.......Thanks Ian! The part has gone through several heat and cool down cycles and still looks like day one. |