| Author | Message | ||
Xb1221 |
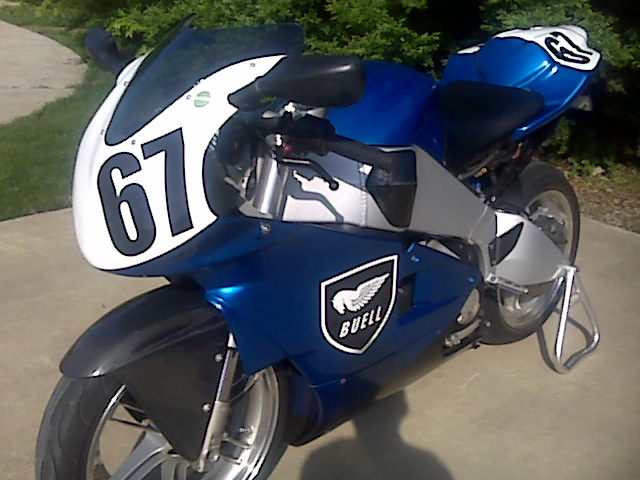
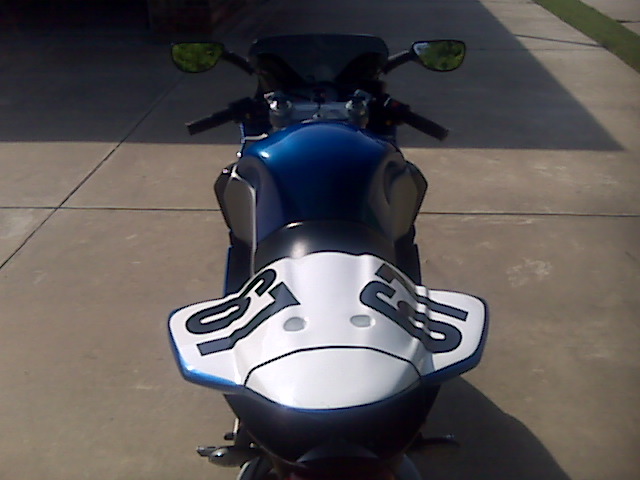
Sorry haven't replied back w/ the pics on this old post. Life will do that to you sometimes. I can't find it and assume it's archived. I bought an '04 Lightning (see pic w/ frame sticker) that was morphed into a CCS/Formula USA race bike, #21/721, last August. Way cool Craigslist score!! I call her Ruckus. She has the race sub-frame and lots of other necessary upgrades that were done on these bikes. Reading up on this series the Lightning was used more than the Firebolt as the starting point. This sub-frame and therefore the entire Firebolt tailpiece can fit on any Lightning also. For those that like to mix and match parts....may the makeovers begin!! More on this bike later when I post the whole package on this site. May move some extras that came with the sale that I won't ever need....they'll be in the Classifieds section on this site. Bike will go in the Cool Buell Pics area. See attached pics... 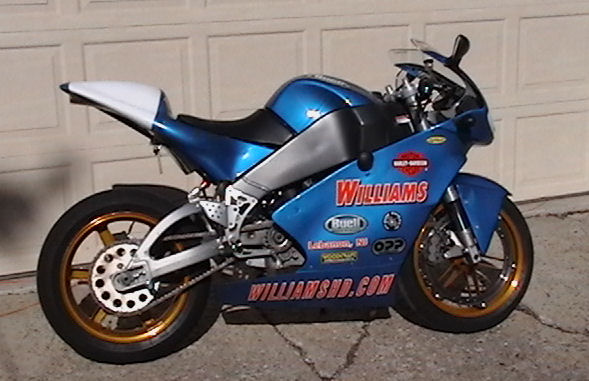 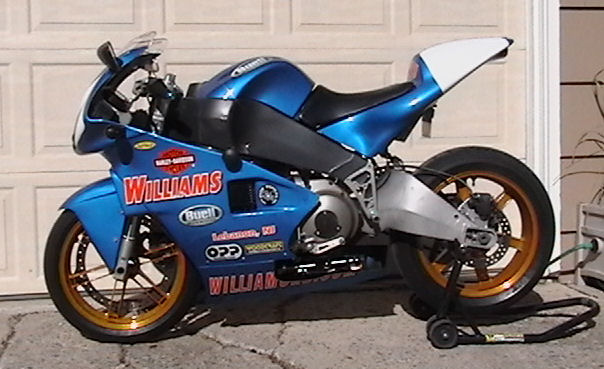  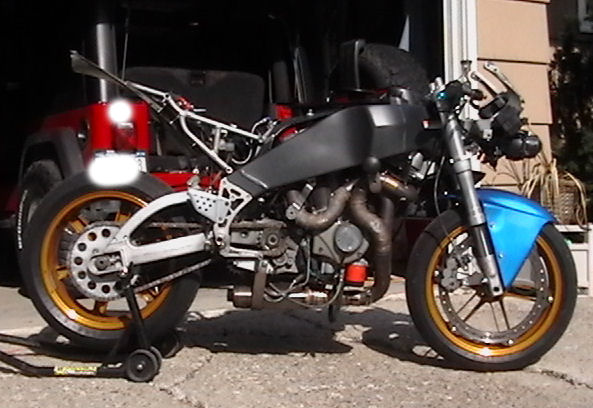 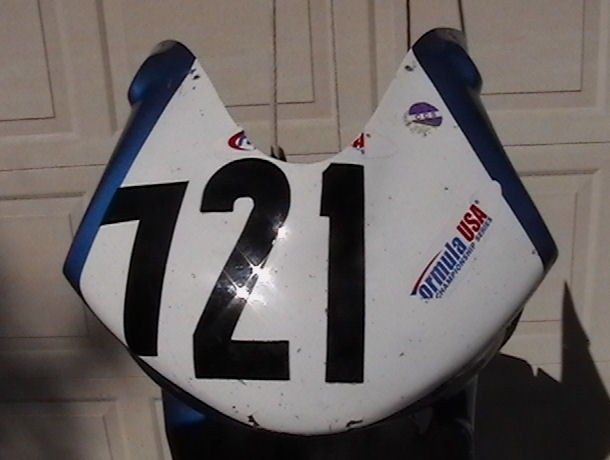 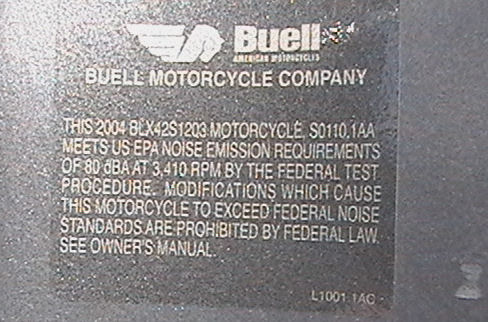 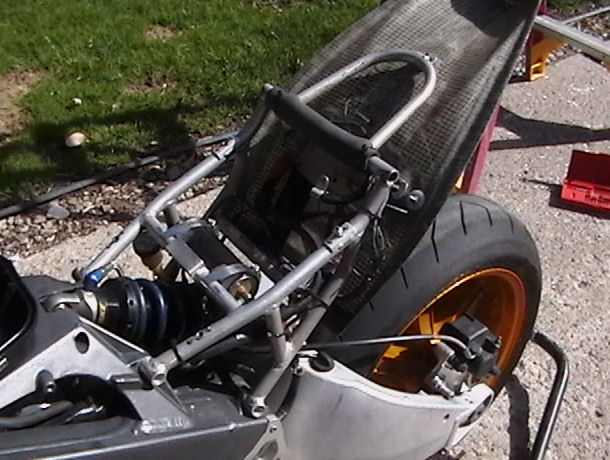  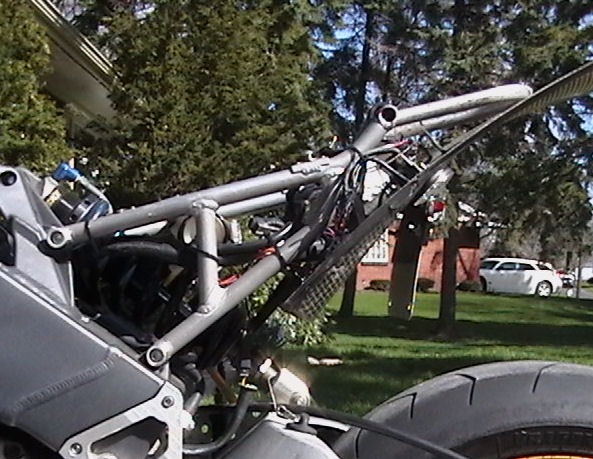 | ||
Glitch |
Dig that header! | ||
Xb1221 |
It's a Ti HPE exhaust w/ the heat tape. Otherwise your knee will be medium well in no time at all!! http://www.hpe-auspuff.de/html/buell_xb9_12_s_r.ht ml Looks like water buffalo horns. It's all multi-pieced together and held together by two stroke dirt bike exhaust springs. That way the whole pipe doesn't need to be removed to rotate the motor down and do maintenance..only the can and the two long downspouts. Sounds like a big block Chevy when it's above 3,000 rpm and the original race can is on it. Both cans from the two exhausts that came with it have "some" packing and 3" outlets. Ear plugs are mandatory with these cans!! The can on their now aims at the rear tire and has a 3" 3 baffle CC Insert in it to calm it down a bit. A quick trip to a local big box grocier and I scored some S/S scrubies that I'll use for packing to calm it some more. http://www.engineceramics.com/hardpart/ccinserts.h tm | ||
Keys |
Great photos. I'm wondering what else you've done to make the bodywork streetable. I see the front turn-signals, mirrors, license plate under the tail, and the opening for the kick-stand. What are you doing for a brake light? Or are you just using hand signals? I've got the same bodywork on it's way from a fellow Bwbr. Thanks for posting the great pics. | ||
Xb1221 |
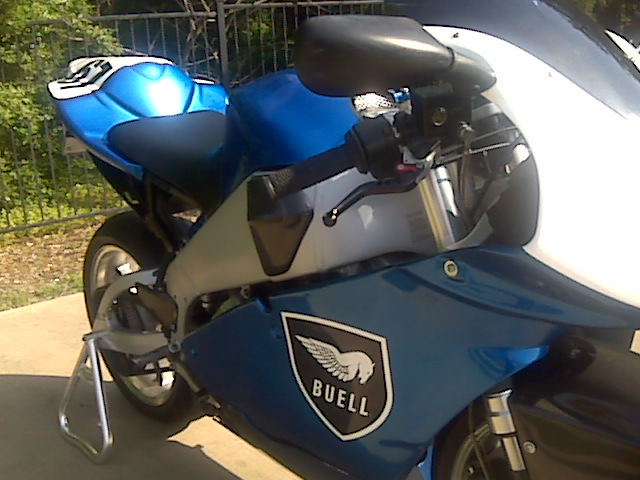
Keys, Original owner/racer put the factory wiring back on it. He added a red LED brake light bar, Hotbodies LED blinkers on the underseat Sebimoto (entire bodywork kit Sebimoto), added a single white LED license plate light and cut the headlight cut-outs. That's it. I left the stickers on it. He put the starter, stator, volt regulator and the right H-D battery back in it. I added factory front winkers and mirrors last Fall when I brought it home. Also a Brembo banjo with pressure switch was added to get the brake light working with the front Brembo master cylinder. Work left to be done. He has cut all the idiot lights off the instrument cluster (weight savings), ditched the neutral switch, clutch hand cut out switch and engine fan. I'll be shopping for these new and used this Spring. Road rash/buggered parts to be renewed are one Woodcraft foot peg and one rear stand swingarm stud on the left side from one of his track oops sliding into the kitty litter events. ER Shaw frame pucks did a great job protecting the bike. The one he slid on was in one the milk crates that came with the bike and it's less than half wore down. These mounts are actually welded to the bottom of the frame/tank. If I can ask...how much did you pay for the set of bodywork you have and is it the Sebimoto, Sharkskinz or another? There is another set of Sharkskinz track ready bodywork that came with this I may move out. | ||
Keys |
- Man, I had the same idea. I am thinking of getting the license plate bracket that has the LED brake bar on it. I did see the wires going to the underside of the tail and was very curious. I bet it looks really good. The tail piece I'm getting is a gsxr replica. I am loath to cut it so I will certainly take your solutions under advisement. I will have the sharkskins. Which to my knowledge has the same cuts as the sebimoto but the sebimoto is the better quality because it has extra reinforcement at the connections. However, I could be wrong that they are interchangeable.. I would so appreciate it if you could get me pics of the headlight cutouts. Do you think he just used a circular drill bit? Any other finishing details/refinements for the headlight openings? I am leaning toward not doing cutouts for the stock headlights and just disconnecting them. Instead putting a pair of Drag Specialties LED Stud Mount Clear Marker Lights where the turn signals are supposed to go (daylight riding only then) and just getting the 1125r mirrors with the integrated turn signals. Not sure yet.. I do hope you will keep us updated to the progress of your bike, it is a fascinating one-of-a-kind. I will send the other info and pics in a private email (since the pics aren't mine, I won't public post them). - | ||
Glitch |
Which to my knowledge has the same cuts as the sebimoto but the sebimoto is the better quality because it has extra reinforcement at the connections. I wonder if a little bit of resin and a fiberglass patch could help around the connection areas. If it's something you're worried about that is. | ||
Xb1221 |
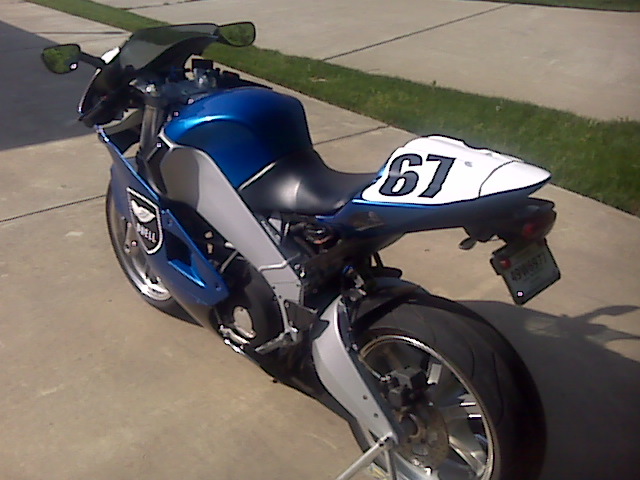
Bike came w/ a 3 piece Sharkskinz kit with the number on it. I find that piece (carbon fiber) is better molded and lighter. Though Randy had one complaint...the front race rubber rubbed on the bellypan. Area was relieved as shown in the pic. Racers donate themselves and their bikes to the track. This one is no exception and has been in the kitty litter more than once. Any marks will always be concidered well deserved scars and character lines. Rewelded right side frame slider is one example. 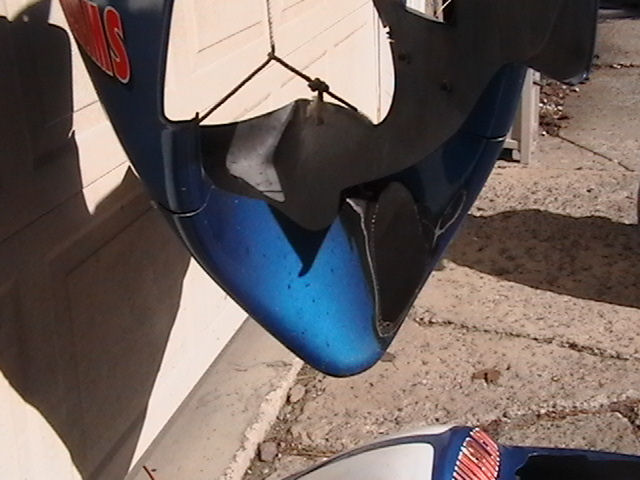 Racers don't care..... Extra scavaging for the exhaust I guess. Both bodywork kits fit on the bike the same. Two holes for the rear view mirror bolts, one hole for the blinker, 2 camlocs to the sheet metal tabs (one under ER Shaw frame sliders) on each side shown in the pics and the bellypan has 4 on each side to tighten it up. Whole/each kit can be off in under 5 minutes. 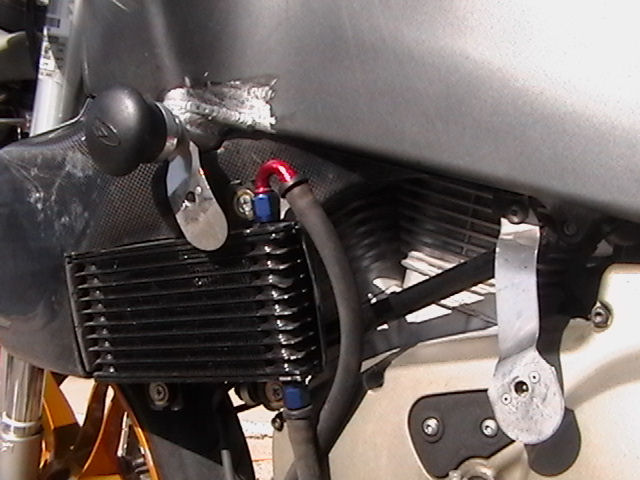 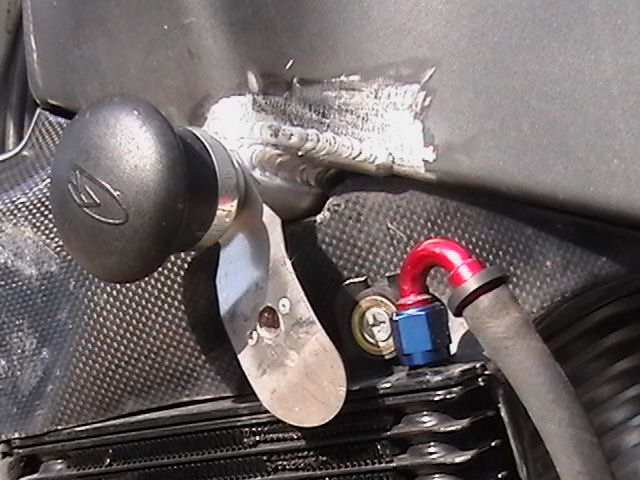 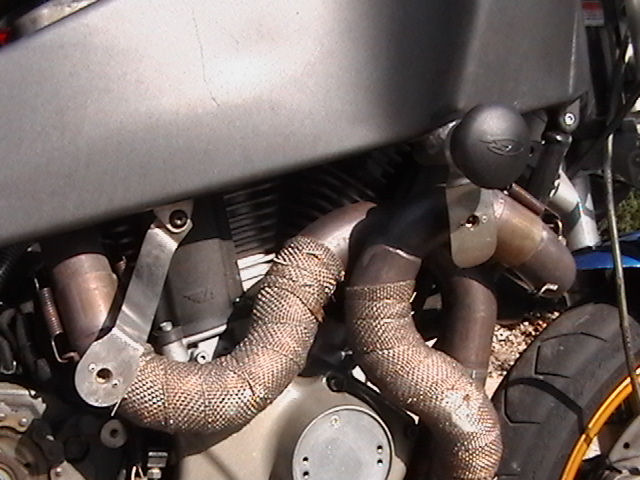 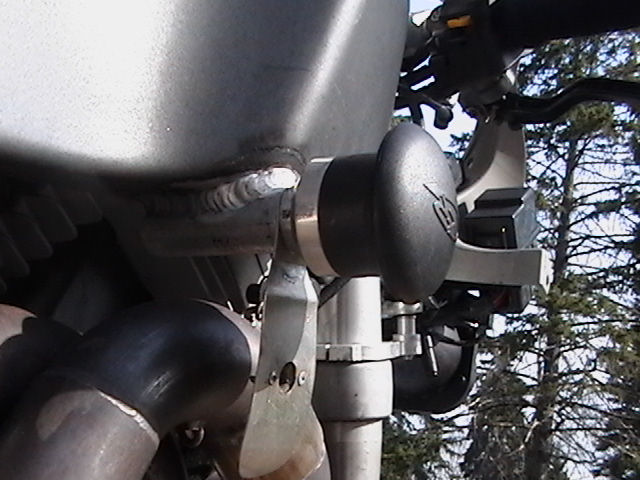 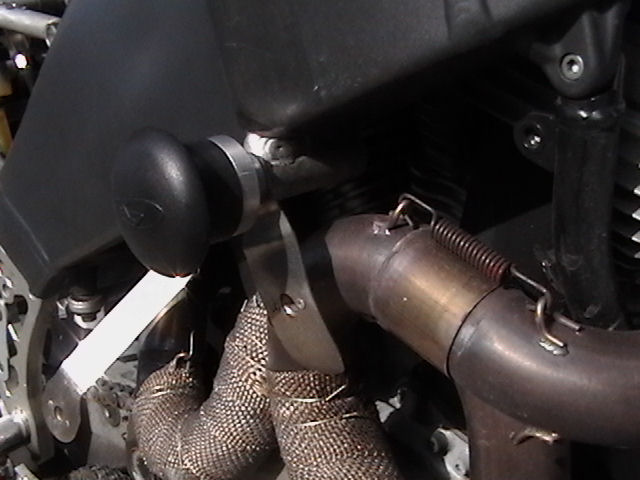 Light cutouts (racoon mask has got to go!!) up front are 3 1/4" wide and 3" high and look like a dremel w/ high speed cut off wheels was used. Notchy/obvious tangents can be seen up close. Flat black touchup is obvious. Another spring chore to wetsand off the mask!! Pics not the greatest by the glow of the outdoor lights. Fairing off the bike while spring cleanup is in progress. 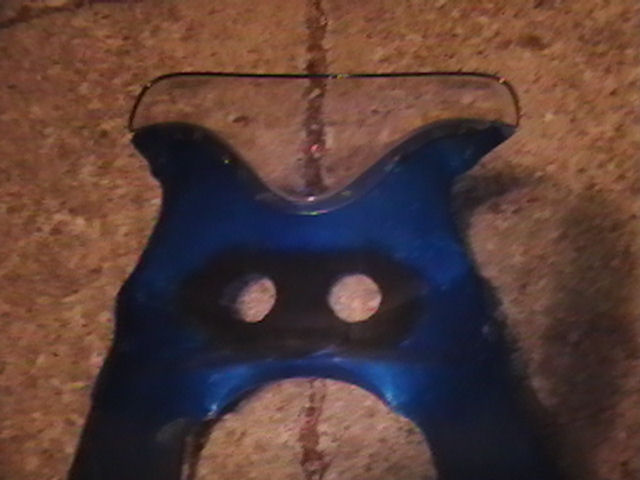 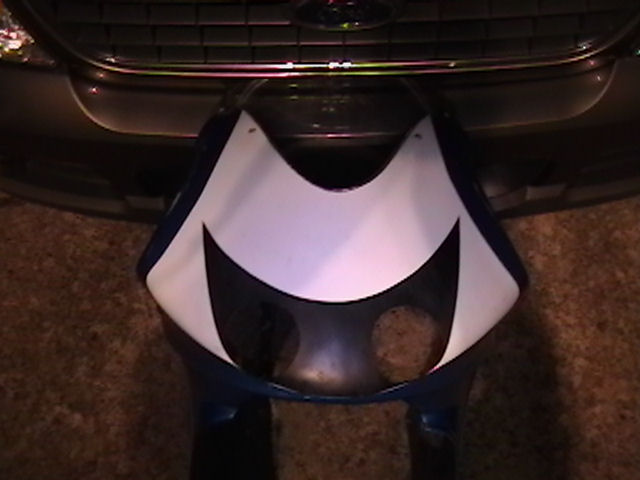 Rear tail pics also. He left the undertail unfinished, bolted the LED brake bar to the back/top of the battery tray, wired in a lone license plate white LED and you can see the little Hotbody indicators. Always wanting more visibility I didn't choose those for the front till I see what they look like. Rear ones look fine in the shadow of the tail piece day or night. Up front on the side...have to see to believe it's safe. 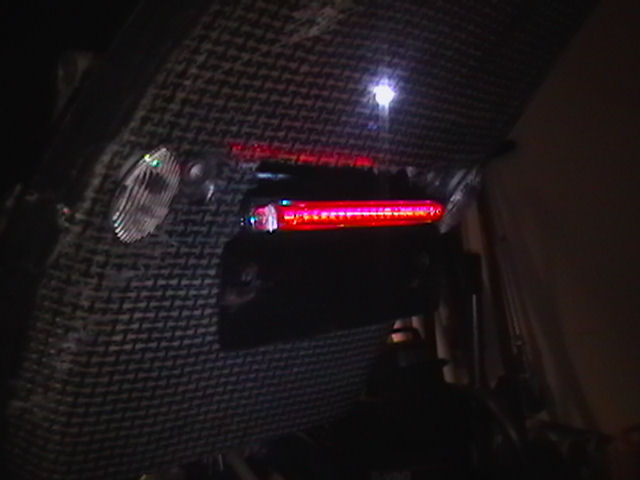 It's one of few, but not the only one. There are others being sold all the time. I have seen 5 in the past two years on Craigslist and other places. As the Series moves forward more of these will be sold all the time. Bikes like these are not "unobtanium" yet. I bought this one because it is what I would have wanted Erik to build as a factory offering. Since the first RW750 pics and John Britten's masterpiece riders like myslef have wanted something that filled that niche with v-twin torque and a full fairing to command a twisty ribbon of asphalt. The crushed Barracuda 2 project would have been as close to "that" bike as he's gotten. | ||
Keys |
- Thanks for the photos, it's very helpful. I will keep an eye for the front wheel hitting the bodywork. To my knowledge there are only two suppliers left that will supply full fairings anymore. Carbon fiber and fiber glass. I hope they intend to keep making them for awhile just in case. But the carbon fiber front fender is more widely available. I got my bodywork last night. Here are some pics. My attachment hardware is the same. You're right it's very quick to break down. I've always wanted a bike I could dress up or ride naked depending on the mood. Before  With Firebolt tail 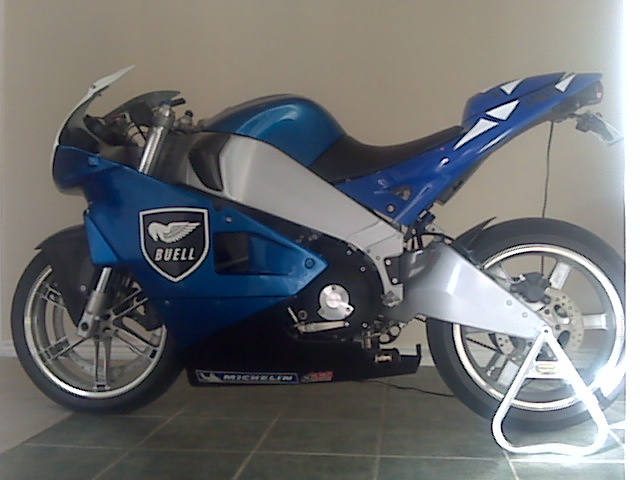 All the rest with the k5 gsxr solo tail - 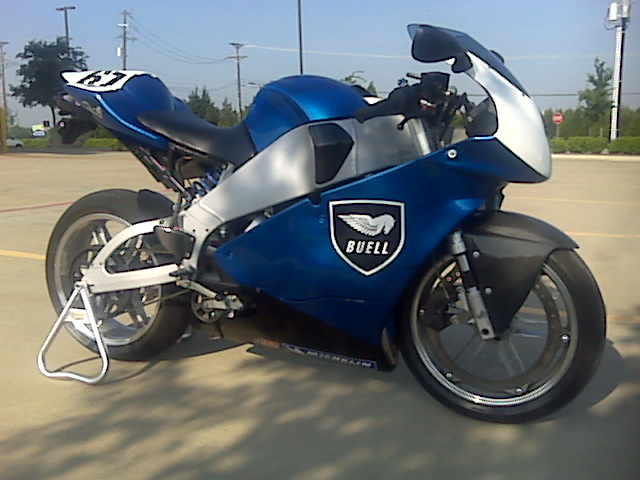 - 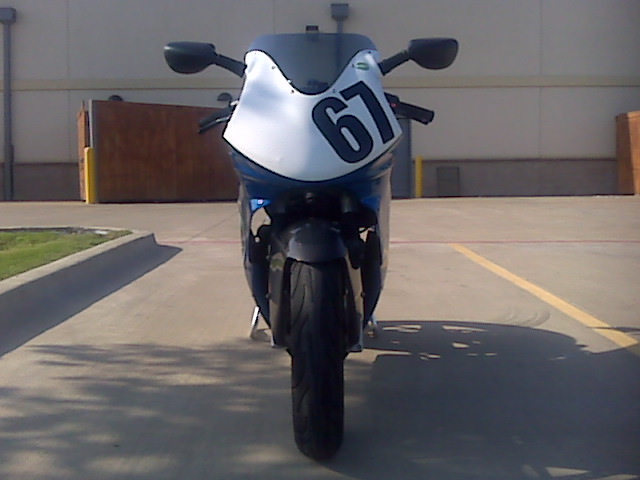 - 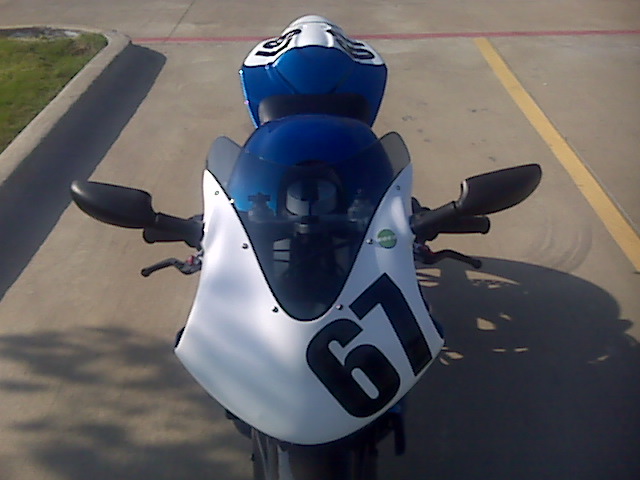 - | ||
Keys |
-  -  -  -  - | ||
Tq_freak |
Love that color Blue, good looking bike | ||
Valiant_duke |
How much work was it to get that GSXR tail on the bolt? I was thinking of doing something very similar but with a kawi tail! That is hot. Love it! if you want to give me the run down on the work involved that would be much appreciated! | ||
Xb1221 |
Yeh...I'd like to see pics w/ the tailpiece off too. K5 is from what year(s)? Very nice neat bike. It looks like you could bring a pizza home on that too! Mine's been sprayed down and soaking in Simple Green and Mr. Clean for a couple days trying to get off some of the race grime. I have a very early pic of the bike off the CCSRacing.us web site and it started out looking as nice as yours. The scoops in the fairing are for the ER Shaws and I see you haven't made room for the kick stand as yet. Dremel high speed disks cut neater lines than a saws-all and a fine tooth blade. The fairing you have seems to have more "belly" in the bellypan and the race can fits. I made some measurements on my two kits and didn't think a factory can would fit. The stock muffler would come too far forward. What header and pipe are you running and you said this was a Sharkskinz kit I believe? Watch the headpipe clearances too. Heat tape wraps may be in your near future. Especially for your right knee. Fender I have mounted needed short rubber (vacuum line) spacers between the inside of the fender and the fork mounting holes to keep it from flexing. Looks like you have those. Raw carbon is always a strong look! Now it's time to wake the motor up. ECMSpy, some motor work, cams....etc. Called the guys who built my motor yesterday and they said this race motor made 96HP (1200 cc) at the rear wheel on their dyno. Before I sell the other fairing kit and race pipe I want to dyno it with the original muffler and some Cam 2. Just putting a new battery in this year woke it up a lot! Kuddos dude...rest is just care and feeding. | ||
Keys |
- xb1221 - I had a few more detailed questions about your scoops and sebimoto trick parts in the other thread. Do you have a link to the ccs photo? I've got two layers of header tape on the stock headers (well 3 on the front one.) And the seller of the body work had some heat shield on the inside of the fairing. I have a jardine pipe. I might need to heat shield the seat - that's where I felt it. I only ever had the buell race pipe. It might fit but I'll never find out. That thing will never go back on, it was a safety issue, always snapping my front straps. If I buy a new cf jardine once a year its insurance well spent. A guy that got bent from a muffler strap failure described it as pogoing.. Yes, those rubber spacers is why you take off the front fender before you take it in to be serviced. They'll crack it. What are the ER Shaws? I won't be making a kickstand cut. I'll just take the dirtbike stand in the pic with me if I have to stop. Makes a good back protector inside my jacket armor, fits in the lining. At any rate like you said, it is quick work to revert back to street mode. Have fun on the engine work. You have alot of play in these engines. The guy who sold me the bodywork had this done to his engine. "88ci motor with millenium cylinders,stage 2 cnc heads, jims roller rockers,10.5 comp,lightweight flywheels" The K5 is just 2005 I think. I'll go take some pics of it for you guys. - | ||
Keys |
- K5 tail uninstalled 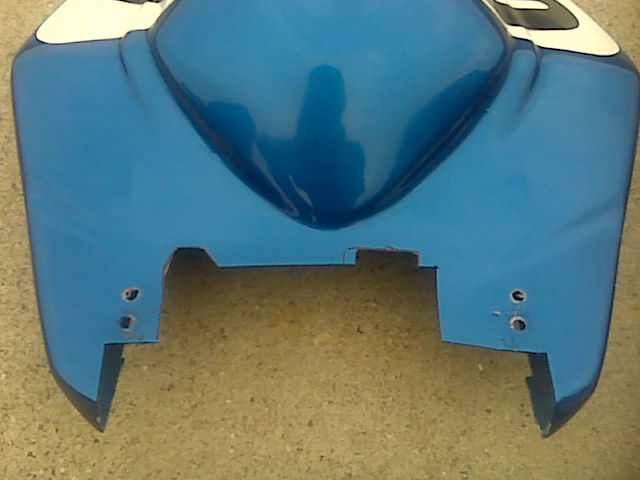 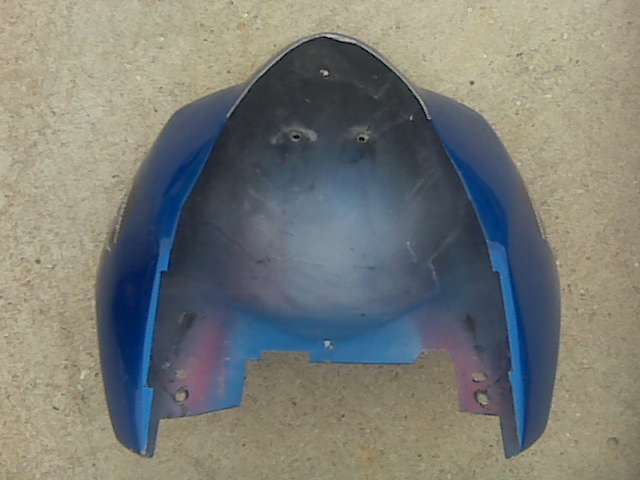  No changes to the tail required. You can run it without undertail plastic or with. I just had to route some of the wiring that was outside the trellis to inside. The tail slips over the steal frame and buttons with the seat bolts or www.americansportbike.com seat retention kit.  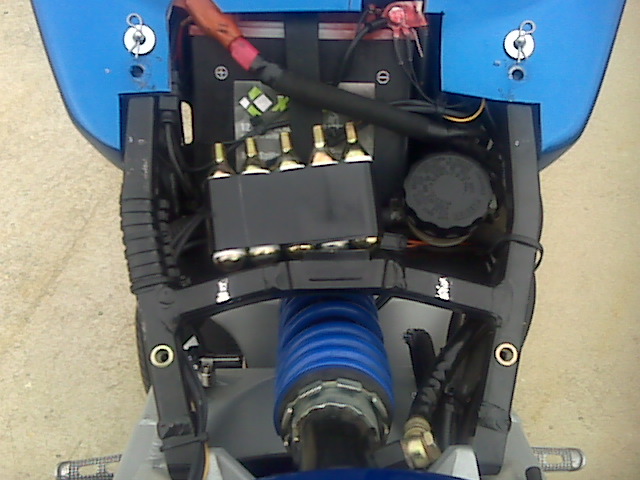 - | ||
Keys |
- One of the advantages of this tail is that if the fan has to run it doesn't blow hot air into a closed chamber under the plastic bodywork. By having an open trellis (think Barracuda) directly under the seat the fan can blow heat straight out and to the sides and below the tail. With the seat and tail installed, here is the fan. 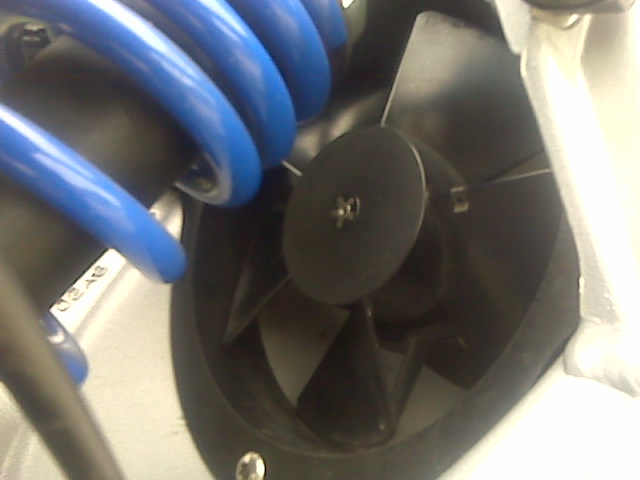 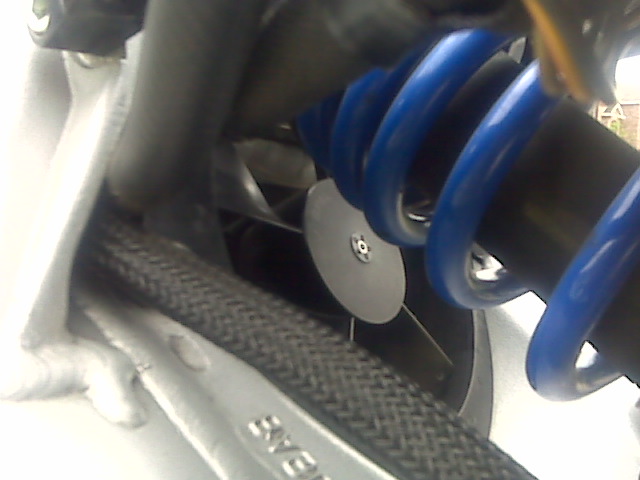  - | ||
Valiant_duke |
Ah ha, I see... I was thinking of something a little more drastic, like actually using the whole sub-frame and rear lights from a kawi. Right on, until I went back and looked at your original set of pictures again, I didnt realize that you just painted the sub-frame black and had an open "space" where the plastics didnt come and mate with the frame. | ||
Xb1221 |
No trick parts involved. Scoop that goes around the shock is the only part not on the bike right now. Must have been at one time though. Hole for the elec fuel pump can be clearly seen in the one pic. Still available on their site. 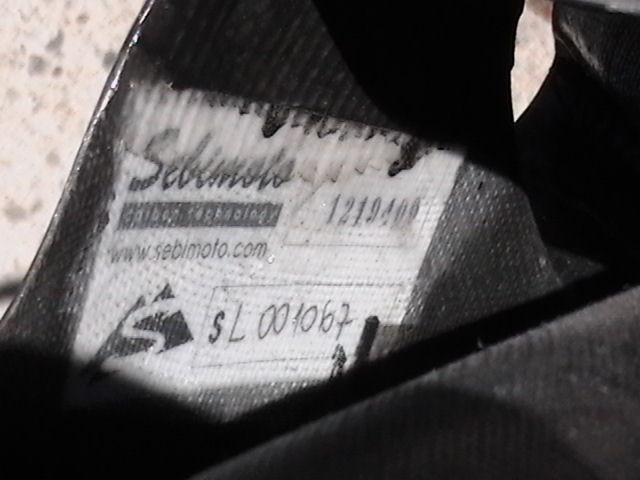 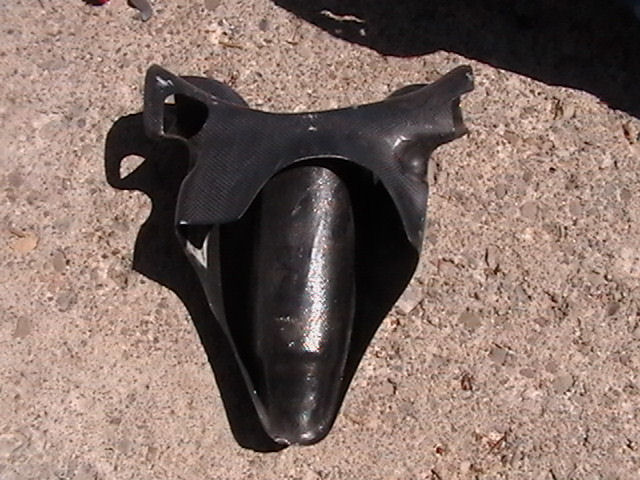 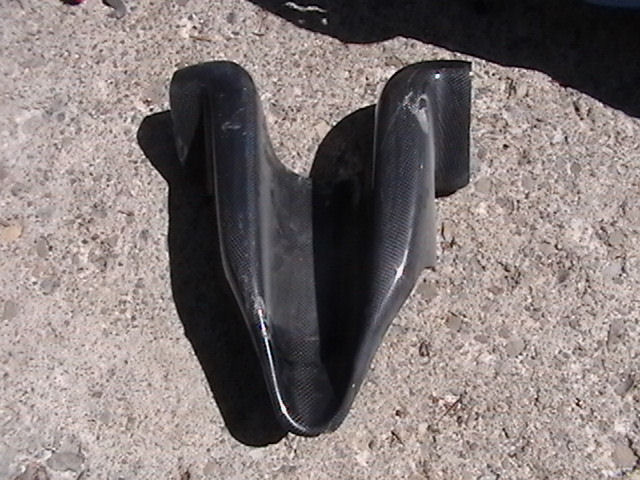 Another right side engine scoop is available on the diesel-moto site. http://www.diesel-moto.com/newproducts/xb/carbon-right-side-air-scoop.html Left side scoop working the air for the intake and oil cooler is in pics above. Carbon part from someone. Haven't looked at it hard enough to tell who made it. Do you get one with your kit? It's held on by the three oil cooler screws. Simple Green/Mr. Clean 3 day soak was a huge sucess!! Bike looks like something I'd actually own and ride. Going to source locally some stainless springs for the exhausts and pack the can w/ stainless pot scrubber pads tomorrow and see how quiet is gets. Might even find out cams it has and get the 100w H3 high beam bulb in it too. Check the aim and go play on a ribbon of asphalt not too far from here. Weekends not to far away. I can't find the link on the CCSRacing.us or the CCSforum.com site to the bike in the "baby blue sleeper"...so it's attached. 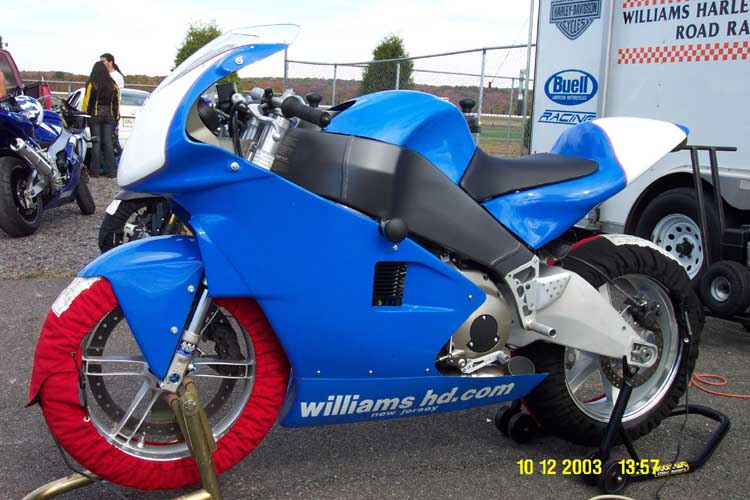 My bad on the frame sliders. ER Racing sliders. Link below. http://www.oppracing.com/products/1045-er-racing-frame-sliders-tie-downs/ The 1/2 moon in your fairing is where these went on the race bikes. Welded to the bottom of the frame. Cool part. Held the other strap to the upper camloc. See pics of mine above. Back the motor. Yup...Millenium jugs, head work, idles like the cams are radical, nice to know I have 10.5:1 compression, etc. I assume light flywheel, billet and forged everything else. I was told the cases stamped RACE USE ONLY are really factory blems cleaned up and perfected for the race teams. I have to open some things up and see what toy prizes are inside some day. | ||
Keys |
I wonder if a little bit of resin and a fiberglass patch could help around the connection areas. Glitch, second post today that I'm asking for your advice. I do have a little repair, a 1/4" crack. Do you know of a how-to url for fiberglass patching and where I should seek supplies to try this fix for the first time. Many thanks - xb1221 Thanks for the pic. The Before and After battle pics. or many many battles.. enjoy your night ride -} | ||
Glitch |
Tons of repair kits! http://tinyurl.com/2g3mnn7 With fiberglass repair help, Google is your friend.  Trust me though, it's really simple. It's one of those things that even I can do.  | ||
Keys |
The kit is on it's way. Thanks again for the help. I think I will use this repair in the future as these take alot of abuse. (I love that tiny url trick too, have to try that too) | ||
Nightripper |
just use a small drill bit and drill out both ends of the crack, take xacto knife cut or dremel cutoff wheel and grind a little slot between the 2 drilled holes and then fill the holes with jb weld, sand and paint or just take a small razor blade and clean off excess material and then touch up with small brush on car paint. Repair is stronger than before the crack |