| Author | Message | ||
Vospertw |
Let me say up front that I didn't make any adjustments - it checked in spec - so I didn't mess with the adjuster. However, did manage to get what I think were pretty good measurements on the chain which makes me feel better about the job for next time. First, I did the check by myself and wasn't sure how many times the chain would rotate compared to the rear tire. I marked the chain with a marker (I know others have done that as well) and then noted the position of my rear wheel. I used the spokes of the rim as a reference and decided that I would check the chain every "half" of a spoke interval, if that makes sense - so 6 spokes = 12 checks. As I made each check, I noted the slack on a piece of paper. I eventually saw my mark come by again after 4 1/2 spokes - which gave me 9 measurements on the chain. By writing down the slack and noting the spoke I started with, I could easily have returned to the "tightest" or "loosest" measurement if needed. I set up a tape measure with locking mechanism and positioned it near the forward edge of the inspection cover. The chain slopes forward, so using the forward edge seemed best because it gave me the most visible upward movement of the chain. I positioned the tape so I could align the bottom of the chain link with one of the "eighth-inch" marks on the tape measure. That made it easy to see how many "eighths" I was moving the chain. I would push up with my thumb and note the distance, then push down with my finger and note that slack as well. There wasn't much downward slack so it was soon apparent that if I could get 3/8" upward slack, the chain was going to be good. There's a couple of pictures to show the set-up - sorry for the close-up but you get the idea (and the tape was actually straight vertical during the check). Other tidbits: - I drained primary and oil at the same time. I put tin foil over the exhaust under each drain to keep oil off the pipe (same for filter). - Meant to take a picture, but made a funnel for the primary by cutting a 1 gallon plastic water jug so that the handle was the funnel spout - makes it easy to get the fluid into the case. - I drained on the sidestand then rechecked once straight up and down on the lift. As an FYI, I got a little more out of the primary, but the oil seemed to have drained very well on the sidestand. - I'm a big fan of tap and die sets. I had the local dealer drain the oil (another story) at 300 miles and either the dealer or the factory boned up the threads for the left side chin fairing threads. Had to run out for an SAE tap and die set - only had metric on hand. However, fasteners can now be threaded easily by hand... kind of like they're supposed to... - Oil drain plug. Yeah, the book seems to be wrong. I was shooting for 15 ft-lbs and started to get nervous with that. Can't imagine torquing it much higher. And noting that the primary drain plug is the same size with a lower torque setting in the service manual, I feel pretty good with where I'm at. This weekend will take a look at air filter, check the interactive exhaust cable, adjust the throttle cables, and whatever else is on the list. 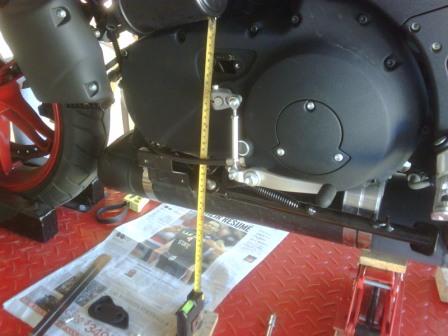 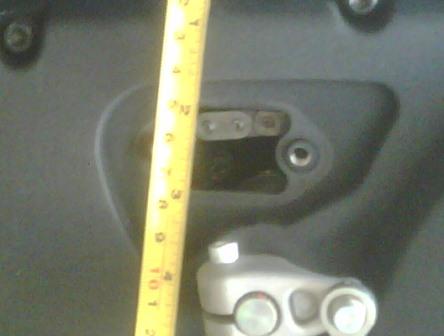 | ||
Midknyte |
Easy rule of thumb - the primary chain should move a play/slack distance equal to its own thickness when the engine is warmed up. | ||
Vospertw |
The rest of the 1000 mile checks weren't bad either. Glad I didn't have the dealer do it. As I mentioned earlier, I had the dealer change the oil at 300 miles. Now that I've had a chance to compare the oil level after they did the job, and the oil level after I carefully did the job - it's apparent that they over-filled the bike (something that seems fairly common as referenced in a recent thread). Also, the aft air box cover fasteners had been gooned up and needed to be cleaned up with a die. I guess the 10K checks will be the next challenge, but so far I'm pretty happy with the workmanship and ease of maintenance. | ||
Ourdee |
Cleaned up with a tap. | ||
Mikef5000 |
FYI, all of these fasteners came with locktite on them from the factory, so whether the threads are messed up or not, they are not going to be able to be "threaded by hand" like you mentioned. Since you're tearing into everything, might be a good idea to swap plugs to iridium. It's not a difficult task (took my 15 minutes my first time), and the iridium's will last 3-4 times longer than the factory. http://www.buellxb.com/Buell-XB-Forum/General-Moto rcycle-Chat/Spark-plug-write-up | ||
Vospertw |
Ourdee - I cleaned up the fasteners with the die; I did run a tap into the threaded hole as well. Mikef5000 - most of them were, though the fasteners at the rear of the airbox cover were not. My plan was to leave the plugs until the scheduled time to replace, but to go with iridium at that point. I've used them on most of my other bikes - except my R1100GS - it seems to like cheap old autolites the best. | ||
Saratoga |
They're very liberal with the application of loctite in some locations. The chin faring fasteners being one place. | ||
Vospertw |
It's better than having them falling out all over the road, that's for sure. | ||
Ourdee |
my bad | ||
Xenox |
Thanks for the write up Vaspertw, I especially like the chain to wheel rotation ratio. |