| Author | Message | ||
Buellmalarky |
I was told that when you buy a Buell you get a suspension set up card. I bought my 03 xb9s used so how would I go about finding that card or somewhere I can figure out how to set up my suspension? My main problem is that I'm a fairly new rider and have no idea what I like or dislike. Is there a tutorial or something out there I could I follow? I've been told that the XB should be a dream to ride once properly set up. I know one thing too, I don't like the way the Buell turns in slow turns, pushes on me bad. | ||
Sleez |
there should be standard settings listed in the owners manual for various weights, if you don't have one, they can be downloaded at buell.com | ||
Firebolteric_ma |
Suspension setting guide 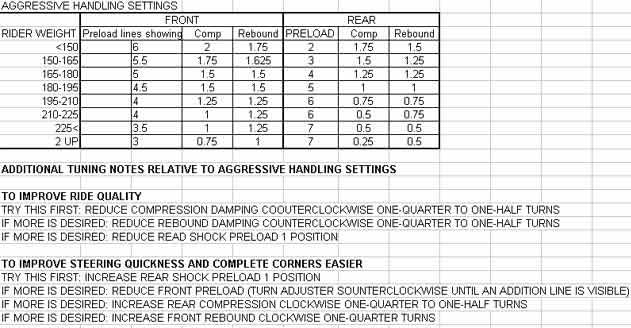 | ||
Sleez |
took this from the 05 lightning manual; some of the details may be different, but the theories are sound. i did not include the setting table, in case it was significantly different for the older XBs. Suspension Adjustments: Buell Models Each Buell motorcycle uses suspension components tailored to the vehicle's weight and function. On all models, the front and rear preload setting will need to be adjusted for the rider's weight and cargo. This adjustment should be made before the motorcycle is ridden any distance and after changing the overall vehicle weight (adding saddlebags, etc.). Your Buell dealer can assist you in setting the preload when you take delivery of your motorcycle. If the preload adjustment is correct, and you have the rebound and compression damping set at the factory recommended points, the motorcycle should handle and ride properly. Damping is set at the factory for the average solo rider under normal riding conditions. The rider may make adjustments to compensate for individual riding styles and varying road conditions. Evaluating and changing the rebound and compression damping is a very subjective process with many variables and should be approached carefully. Suspension Definitions: Buell Models Damping: Resistance to movement. Damping affects how easily the suspension can move and limits oscillations of the system once movement has begun. Compression: The suspension is compressed when the wheel moves upward. Rebound: The suspension is rebounding when it is moving back from being compressed. Vehicle Sag: The amount the rear shock and fork springs are compressed by the weight of the motorcycle. Rider Sag: The amount the rear shock and fork springs are compressed by the weight of the rider on the motorcycle. Preload: An adjustment made to the rear shock and front fork springs to limit vehicle and rider sag to a standard percentage of total suspension travel. CAUTION; Compression and rebound adjusting valves may be damaged if too much force is used at either end of the adjustment range. (00237a) Before evaluating and adjusting suspension settings, check the motorcycle's tires. Refer to Tires: 2005 Lightning Models. They must be in good condition and properly inflated. Fine Tuning Suspension: Buell Models See Factory Suspension Settings: Lightning Models. The settings are the best balance of handling, ride, and stability. Suspension can be changed to accommodate rider preferences for ride quality and handling for road conditions and load changes. NOTES: Do not continue to repeat the steps involved with the following settings beyond those which are listed. Adjust suspension to the recommendation if possible, but never force adjusters beyond the mechanical stops. WARNING; Do not operate motorcycle with loose, worn or damaged steering or suspension systems. Contact a Buell dealer for repairs. Loose, worn or damaged steering or suspension components can adversely affect stability and handling, which could result in death or serious injury. (00113a) Changes in Load Changes in the load carried requires changes in the preload setting(s). Carrying less weight than was used for setting up the suspension requires decreasing the amount of preload. Increasing the load carried requires adding more preload. WARNING; Do not exceed the motorcycle Gross Vehicle Weight Rating (GVWR). Exceeding the GVWR can affect stability and handling, which could result in death or serious injury. (00016a) GVWR is the sum of the weight of the motorcycle, accessories, and the maximum weight of the rider, passenger and cargo that can be safely carried. The GVWR is shown on the information plate, located on the frame steering head. Ride Quality Enhancement The stock settings are designed to offer sufficient chassis control, but some may choose to enhance ride comfort over rougher road conditions or for long rides. Adjusting the compression setting will reduce both high and low speed damping. Adjust suspension for rider weight. See Factory Suspension Settings: Lightning Models. Increase ride quality by reducing front and rear compression damping by turning adjuster counterclockwise 1/4-1 turn. If additional ride quality is desired, reduce front preload by turning adjuster counterclockwise until an additional line is visible and also reduce rear preload 1 ramp position. If maximum ride quality is desired, decrease front and rear rebound damping by turning adjusters counterclockwise by 1/4-1/2 turn. Enchanced Steering Quickness The response to steering input (quickness) may be enhanced by adjusting the vehicles front/rear ride height. This adjustment effectively decreases the vehicles rake angle. This is achieved by adjusting the preload to increase front sag and reduce rear sag. Adjust suspension for rider weight. See Factory Suspension Settings: Lightning Models. Reduce steering effort by increasing the rear preload one position. If more enhanced steering and cornering control is desired, reduce front preload by turning adjuster counterclockwise until an additional line is visible. If additional enhanced steering and cornering control is desired, increase rear compression damping by turning adjuster clockwise by 1/4-1/2 turn. If maximum enhanced steering and cornering control is desired, increase front rebound damping by turning adjuster clockwise 1/4 turn. Chassis Control/Handling Enhancement To provide more road surface feedback on smoother road conditions, increase compression and rebound settings. Adjust suspension for rider weight. See Factory Suspension Settings: Lightning Models. Increase chassis/handling control by increasing front and rear compression damping by turning adjuster clockwise by 1/2-1 1/2 turns. If maximum chassis control/handling control is desired, increase front and rear rebound damping by turning adjuster clockwise by 1/4-1/2 turn. Cold Weather Riding Less Than 65� F (18� C) The viscosity of the suspension fluid increases as the temperature decreases. As the fluid viscosity increases so does the damping. It is recommended to compensate for the varying fluid viscosity by readjusting the damping adjuster positions when operating outside the normal ambient temperature range of 65-95� F (18-35� C). Adjust suspension for rider weight. See Factory Suspension Settings: Lightning Models. Reduce front and rear compression damping and rebound damping by turning adjuster counterclockwise 1/4-1/2 turn. Suspension Tuning: Buell Models WARNING; Do not operate motorcycle with loose, worn or damaged steering or suspension systems. Contact a Buell dealer for repairs. Loose, worn or damaged steering or suspension components can adversely affect stability and handling, which could result in death or serious injury. (00113a) Make all suspension adjustments in small increments. Radical setting changes may cause you to skip the best adjustment, but always remember that any setting chosen is a compromise. Refer to Suspension Tuning: XB Models. Possible suspension and operating characteristics and their probable causes are listed. This table is helpful in keeping your motorcycle in good operating condition. To achieve the proper settings you will need the preload properly adjusted, the tires properly inflated and a familiar bumpy road. It is useful if the road contains a variety of different kinds of bumps from small sharp bumps such as potholes or frost heaves to large cracks. See Factory Suspension Settings: Lightning Models. Begin the process by putting all the damping settings as recommended. Ride the motorcycle over a variety of surfaces and bumps at different speeds. If the suspension is set properly, the vehicle will feel stable and comfortable. Suspension Tuning: XB Models SUSPENSION CHARACTERISTICS Bike wallows through turns. Bike feels loose or vague after bumps. Wheel tends to "pogo" or suffer continuous bouncing after passing a bump This is often noticable by watching the bike as it travels over bumps. SOLUTION; Increase rebound damping. Wheel responds to bump but doesn't return to ground quickly after bumps. This is more pronounced over a series of bumps and is often referred to as "packing down." SOLUTION; Reduce rebound damping. Bike bottoms in dips or while cornering. Bike has excessive brake dive. SOLUTION; Increase compression damping. Harsh ride, particularly over washboard surfaces. Bumps transfer through handlebars or seat. Suspension seems not to respond to bumps. Tires chatter through corners or rider is jolted over rough roads. SOLUTION; Reduce compression damping. Changes in Load Changes in the load carried requires changes in the preload setting(s). Carrying less weight than was used for setting up the suspension requires decreasing the amount of preload. Increasing the load carried requires adding more preload. Do not exceed the motorcycle Gross Vehicle Weight Rating (GVWR). Exceeding the GVWR can affect stability and handling, which could result in death or serious injury. (00016a) GVWR is the sum of the weight of the motorcycle, accessories, and the maximum weight of the rider, passenger and cargo that can be safely carried. The GVWR is shown on the information plate located on the frame steering head. Do not pull a trailer with a motorcycle. Pulling a trailer can cause tire overload, reduced braking efficiency and adversely affect stability and handling, which could result in death or serious injury. (00018b) Adjusting Preload: XB Models See Suspension Adjustments: Buell Models for more information about suspension tuning. Setting Rear Shock Preload Settings See Rear Shock Preload Adjuster Tab: XB Models. The factory setting is the #2 ramp position. The #7 position is the tallest ramp and maximum preload. For recommended spring preload, see Factory Suspension Settings: Lightning Models. Tab on shock body Minimum preload adjustment (ramp 1) Maximum preload adjustment (ramp 7) Rear Shock Preload Adjuster Tab: XB Models Setting Rear Shock Preload Remove seat. See Rear Shock Preload Adjuster: XB Models. Change the preload by turning the preload adjuster at the upper part of the shock with the SHOCK SPANNER WRENCH found in the tool kit. See Factory Suspension Settings: Lightning Models for factory settings. Rotate adjuster clockwise to increase preload. Rotate adjuster counterclockwise to decrease preload. Install seat. Setting Front Fork Preload See Front Fork Preload and Rebound Adjuster: Lightning Models. Check number of lines to be showing (3) for your load condition. Both forks should display the same number of alignment lines. Forks that are not properly aligned can lead to loss of control, which could result in death or serious injury. (00124a) Turn the adjuster (2) with a wrench to the desired setting. Rear Shock Preload Adjuster: XB Models Rebound adjuster screw Preload adjuster nut Four lines visible Front Fork Preload and Rebound Adjuster: Lightning Models Adjusting Suspension Damping: XB Models For the recommended rebound and compression damping settings for various road and riding conditions, see Factory Suspension Settings: Lightning Models. NOTE: Adjust suspension to the recommendation if possible, but never force adjusters beyond the mechanical stops. Setting Front Fork Rebound Damping See Front Fork Preload and Rebound Adjuster: Lightning Models. Using a screwdriver, turn the rebound adjuster screw (1) clockwise until it stops. This is the maximum rebound damping setting. Turn the adjuster screw counterclockwise the recommended amount specified. Setting Front Fork Compression Damping See Front Fork Compression Damping Adjuster: XB Models. Using a screwdriver, turn the compression damping adjuster clockwise until it stops. This is the maximum compression damping setting. Turn the adjuster counterclockwise the recommended amount specified. Front Fork Compression Damping Adjuster: XB Models Setting Rear Shock Rebound Damping See Rear Shock Rebound Damping Adjuster: XB Models. Using a screwdriver, turn the rebound adjuster clockwise until it stops. This is the maximum rebound damping setting. Turn the rebound adjuster counterclockwise the recommended amount specified. Setting Rear Shock Compression Damping See Rear Shock Compression Damping Adjuster: Lightning Models. Using a screwdriver, turn the compression adjuster clockwise until it stops. This is the maximum compression damping setting. Turn the compression adjuster counterclockwise the recommended amount specified. | ||
Old_man |
This is a wonderful place. All he needed, just by asking. | ||
Buellmalarky |
WOW! Thank you for the info! |