| Author | Message | ||
Ochoa0042 |
Alright, alright, alright; simma down nah, simma down nah!!! ~~~Picks~~~ Demo set 1 - failed it turns out that the paint wasnt the problem, it was the paper.... the paper was not meant to be removed, so when you try to removed the paper, the sticky side stays stuck   atleast there is a proof of concept the side ones are regular paper to see which one I liked better.... 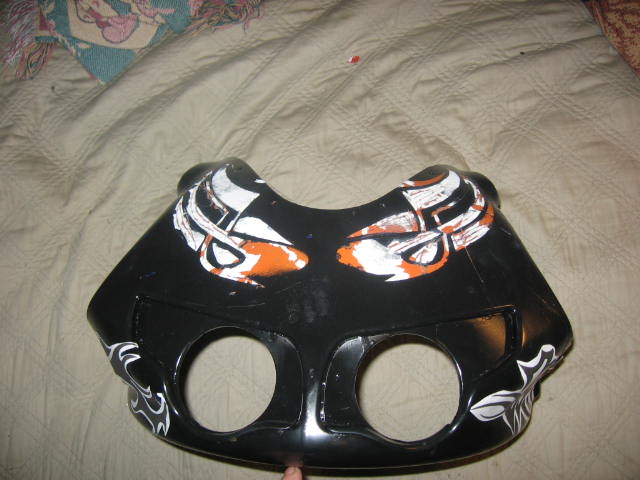 Demo set 2 - in progress sanded it down, and gave it a grey primer, and got some clothes hangers to suspend the fairing in the air hung it from the garage door 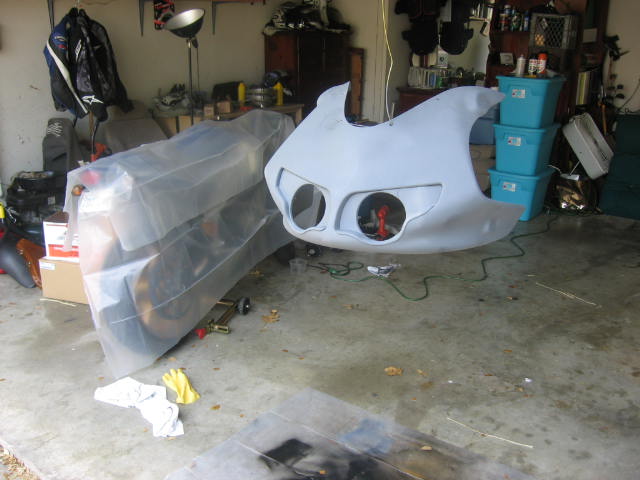 yes, shut up, the garage is a mess.... as you can see I have shielded off the bike from spray-ness 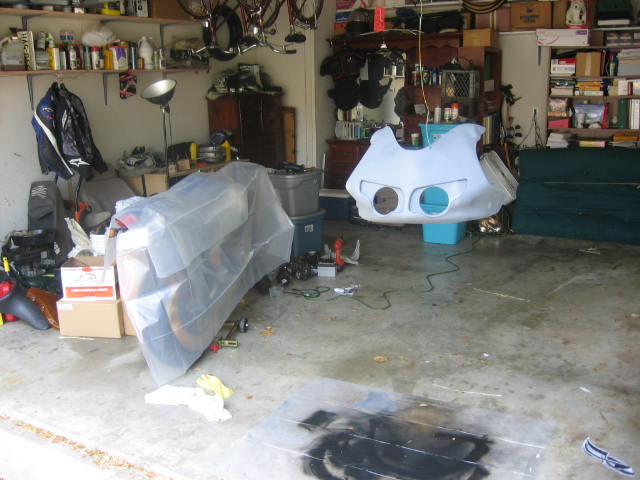 got a tri-pod-light-thingy hidden in the background of the previous picks to hold up the fairing wherever needed and then let the orange base coat bake in the sun  too bad this was the closest color I could find to match the bike took about 4coats-o-paint 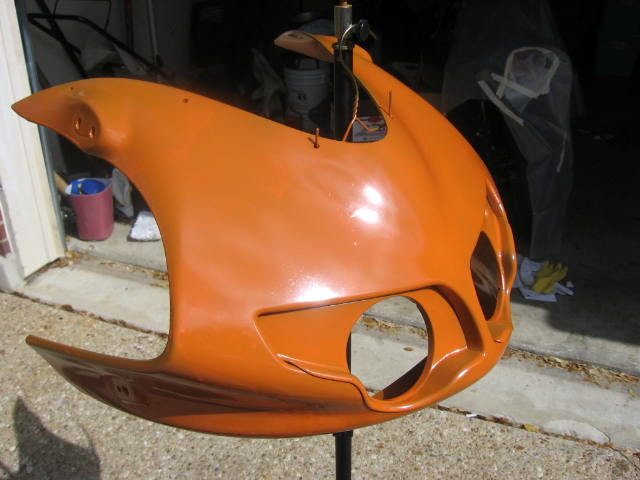 | ||
Not_purple_s2 |
A suggestion.... maybe you could incorporate some blue painters tape... maybe make a sheet of blue tape then put the decals on that and cut out the design. There's also the possibility of finding someone who can make quality vinyl decals of your design. | ||
Fastxb12r |
you should remove the headlight bezels then paint it will look much nicer IMHO.... | ||
Andymnelson |
Ft_bstrd- please follow through on that threat, this is not what I come here for. Thanks for looking out. | ||
Ducxl |
^^^^+1 Mr.Ochoa,while i applaude  your excellent efforts,i can see runs in the photos and it seems that the quality of the "rattle can" paint job is not very good  . Sorry,i really do not wish to convey insult. . Sorry,i really do not wish to convey insult. Personally,i'm a tool geek,and salivate at my next cool tool.That said,if i were you,i'd be all over the books looking for the most economical professional painting set-up. Keep up the excellent effort | ||
Ochoa0042 |
I have two types of black spray satin & gloss .... what do you guys think I should use? the level gos up from matte >to> satin >to> gloss | ||
Brazenbuck |
Ochoa, I'd use the satin. Another tip is make sure the paint cans are warm. I don't know how warm it is in your neck of the woods, but the paint will flow out the can better when the pressure is higher. | ||
Ducxl |
Say now,there's a good idea....satin.I like the effect on the so themed "bargain" big twin Harley's in Matte black finish.Good luck anyway.I use flat black rattlecans on both of my mufflers regularly | ||
Ochoa0042 |
A suggestion.... I found something that works you should remove the headlight bezels then paint it will look much nicer IMHO the ones on demo2 are cracked, so I will have to replace em anywayz ============================================= spent like 5-6hours placing the graphics on.... it was a real bitchandahalf trying to mirror them it seems like it needs a little bit more graphics here, here, & here What do you think??? 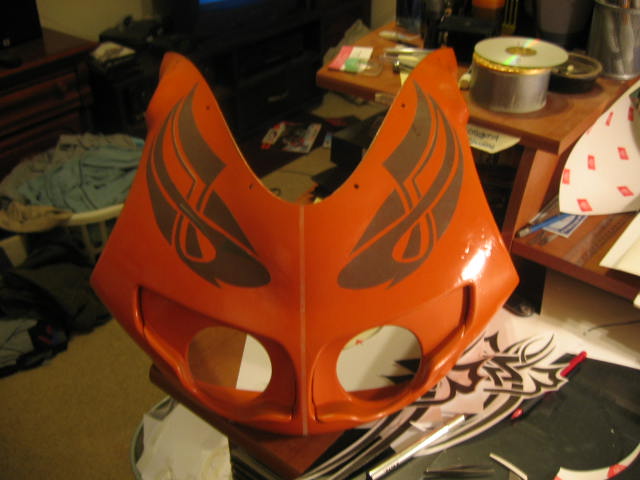 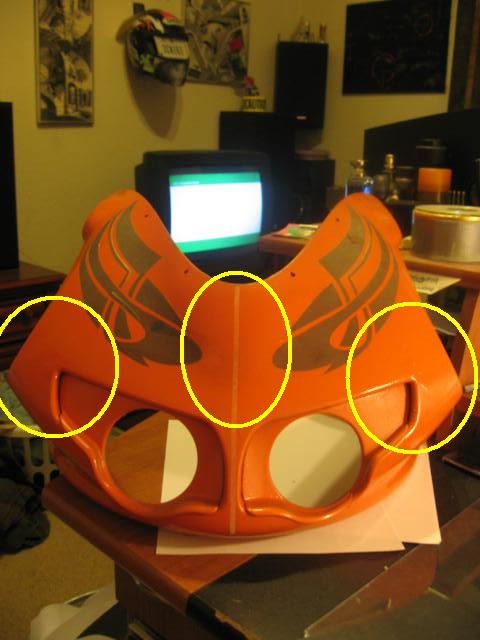  (Message edited by ochoa0042 on February 14, 2009) | ||
Tommy5144 |
you knwo what might be cool? I assume ur going to do black again for the rest....u should leave the headlight area orange stil to match the graphics. | ||
Lonexb |
leave the headlight area orange still to match the graphics. +1 | ||
Ochoa0042 |
real quick I have done the base coat, placed the graphics, the black top coat.... what is the next set of steps??? Should I.... take off the graphics, sand the whole thing so that clear coat will adhere to the fairing's paint??? ~~OR~~ take off the graphics, and spray on the clear coat without sanding the paint??? | ||
Ochoa0042 |
It was tough to get to this point.. I have another demo to work on, but I dont think I want to go through this mojo again. Way too much work for me to do it over again, and why do it when I can fix some minor issues with this demo set? Im going to see what I can do to fix the bleeding blemishes of black. Any Ideas?  ====Picks=== I waited about 15-30minutes between any actions: that being.. sanding, paint, touch up's.. using my old fashioned timer   the new paper, basically a 8.5"x11" sheet of scotch tape.. its semi-see-through  I did my best to sand the base coat down to give the black some surface to hold on without accidentally sanding off the graphics.. first coat, watching paint dry 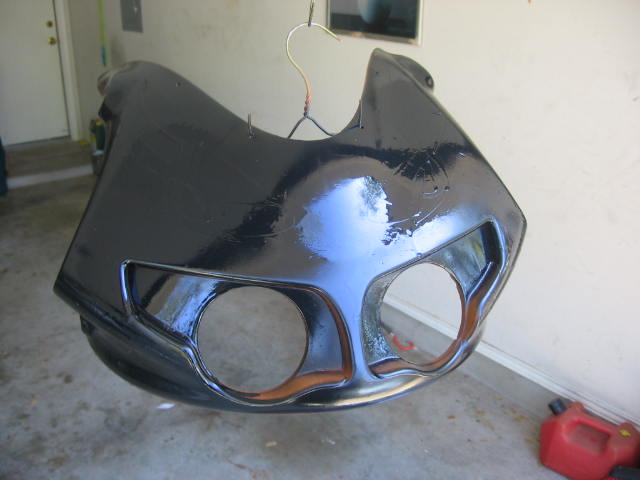 after it dries a little bit in the garage, I then stick it to bake in the sunlight.. for some reason this paint doesnt work well with being sent directy sunlight untill about 5minutes after applied  there was some oragne peel here and there, so I sanded as needed with 400grit, then 800grit.... 2nd coat  I havent put on the clear coat on yet because I have some bleeding problems.... it isnt necessarily bleeding problems, it had to do with the tape's sticky-ness.... you put it on the 1st time and its 100% sticky, take it off for a realignment and it isnt as sticky....  the side ones came out to looks the best with little problems 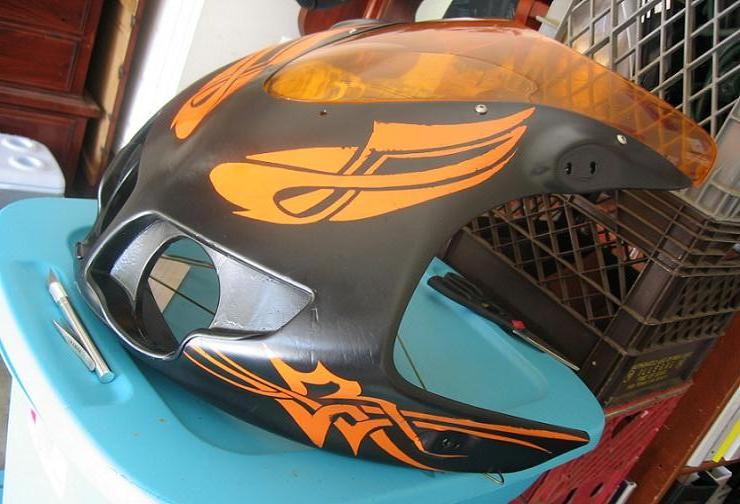 bummer  (Message edited by ochoa0042 on February 15, 2009) | ||
Fastxb12r |
I dont know how good your hands are I.E. shaky BUT what I would do is line they graphix and it will hide the edge and the bleed marks then clear.LIKE THIS...http://www.airbrushtricks.com/worklogimages/Tribal %20Flames/Tribal%20Madness%20023.jpg | ||
Tattoo72 |
Here is what I would do. This isn't what YOU have to do. This is just a suggestion. 1. Buy an inexpensive detail spray gun and a cheap compressor. 2. Go to my local auto paint supply store. Or even NAPA and buy some decent primer and paint and clearcoat. You may even want to try AutoAir colors paint. http://www.autoaircolors.com/ 3. Go to my local sign painting/making store and by some masking material, also know as transfer tape. It goes by various names such as Transfer Rite, R Tape or Auto Mask. I'd use this stuff to make my tribal designs. It is chemical resistant and won't have bleed through problems. 4. Scuff, clean, prime, and basecoat. 5. Lightly scuff, apply tribal template and paint. 6. Carefully remove template. Wipedown and clearcoat. 7. Colorsand and buff. | ||
Ochoa0042 |
I was thinking about blue pinstripes.... but that is an art that I dont have talent for, I hear its really hard to do it correctly | ||
Ochoa0042 |
found some paint to finish off the blemishes the best that I could, and then clear coated it. Over all I say it was a success, Yay!!!  thanks for the help y'all, and a special thanks to ones who kept true to the title of this thread 'spray paint tips' | ||
H2owerker |
I'd have to agree w/ Tattoo72 about the "transfer tape". I tried a couple different adhesive papers to use making designs a few years ago, and none of them worked. I settled for a design w/ edge bleed. It was just on a grease gun for work though... I wish I could give you more tips, but if you stick w/ the basics things should turn out alright. Good luck! I can't wait to see how it looks when you finish. | ||
Ochoa0042 |
Hey Moose!!! ""I use 600 grit, wash with soap, water and I use naptha to remove any oil/wax residue, then a couple coats of primer(primer is not just for metal). I've used rubbing alcohol in the past, but prefer naptha because it evaporates much faster. I let the primer dry at least 30 minutes then i'll wet sand it with 800 grit before spraying the color. I usually do three coats of clear at least and then wet sand with 2000 grit to knock down the orange peel. Use rubbing compound and polish to make it shine."" so you're making up for the spraypaints mistakes* with a heap of clear coat, then sanding the clear down to a glass smooth look?orange peel, the runs and such* It sounds good in theory, but do you have any picks of your work? And what type of rubbing compuond are you using? | ||
Sifo |
Ochoa0042, Sorry for getting in on your project late, but this is my first post around here, so better late than never. 1) Preparation is key. Any blemish you see before the color coat will be worse with a nice shiny color coat. Fill it, sand it, whatever will get rid of it. Prime, sand, repeat as necessary. Final sanding should be with 320 to around 400 grit. 2) First color coat should be quite light. Plenty of primer will still show through. Follow directions on can for further coats. You will need enough coverage to be wet sanded without sanding through the primer. Use a flexible sanding block, I like the rubber squeegees that paint stores sell. A bit of dish soap in the water makes sanding easier and faster and helps keep the paper from loading up. You only need to sand the glossy spots off. Any low spots will still be shiny (pinholes, orange peel, etc.). If you see it now you will see it later. I use 600 grit for this. 3) Masking for the next color can be the stuff of nightmares. I'm not sure the properties of the masking material you are using, but I can see a few potential problems. If the adhesive is not designed to hold up to paint solvents the paint can leak right in. If the masking material wont stretch a bit to conform to the shape of the body work it will want to pucker at the edges and lift allowing the paint to wick right under. I'm guessing you've had one or both of those problems. Edges must really get pressed down firmly to keep the paint out. Of course the adhesive must be low tack enough to release from the fresh base coat or you may pull some base coat up when unmasking. Talk to a local paint shop to see what they might carry that will work for what you are doing. A few widths of masking tape can do a lot of good work for you with some patience without breaking the bank or failing to perform as required. Spray, sand as with the first color, repeat for each color. Sometimes minor bleeding under your masking can be saved by sanding very carefully to the base color. 4) I know someone mentioned pin striping to fix up your edges. I've tried and I'm not good, but vinyl pinstripe tape may work for you. It's cheap and easy to do. Use a brand new straight razor blade to cut the tape. Just lay the blade edge on the tape at the angle you need and pull the free end up against the blade for a nice clean cut that can leave a nice sharp taper on the stripe. (Same with masking tape.) 5) Clear coat time! All the color should be wet sanded with 600 grit. Verify that your clear coat is compatible with your color coats. Test it if your not sure, I once had an entire car go wrinkle finish on me on the word of the sales rep that the clear he had would work with my color coat. I got him to pay for new paint! The extra work was all mine! Spray following directions on the can starting with a light tack coat as you did with the color coats. You will have to choose a clear coat that meets your expectations. Lacquer will require sanding and buffing, but is easy to work with and has a very hard finish that takes a great polish. Enamels take a long time to cure and rattle can enamels may never get hard enough to look good after sanding and polishing. Only testing will tell if it will meet your expectations. If you are going to sand the clear coat you can build it up enough to bury the masking lines between colors and even the edges of vinyl graphics or pin striping. You just need enough to sand it flat without sanding through. Building up a lot of paint will make it less durable on flexible body work though. Enamels can look fantastic with no sanding and polishing if you get the spray right, but you will have some orange peel and only sanding will even out the masking lines where the different color layers end. I used to race 1/24th scale slot cars and we used to use bodies from model kits like you buy at Hobby Lobby. Some of us would detail them quite nice before trashing them on the track and I found that RUST-OLEUM high gloss clear enamel provided a great looking finish with very little orange peel and it held up very well the the abuse that we gave the slot cars. Trust me you would not treat your body work that way. Scuffs would clean right off. I've got to go now but would be happy to answer any questions if it's not too late. And yes, nothing beats top notch materials with high quality spray equipment, buy you can get good looking results with rattle cans and have enough money left over to change the look every season. Experiment on small stuff and have fun with it! | ||
Ochoa0042 |
Q: Where and I find some thin thin thin automotive tape? Im having a hard time with finding graphics to suit the rest of the bike, and am deciding to do them on my own.. autozone doenst have anything thinner then 1/2inch.. and I know I've seen the west coast customs and orange county choppers and overhauling and pimp my ride with this uber thin tape.... where is this stuff at, because autozone isnt cool enough to hang with this crowd ============== Briliant Sifo - Make it a sticky Status - Redo Demo2 I have been working on the Demo 2 lately.... I've completely removed all the paint, then did it all over again, and its perfect.. strange thing is that I never sanded between anything  And it worked out well, I didnt bother with sanding because every time that I did sand.. I would always eat through to the previous coat (and-then-some sometimes) I guess I have a heavy hand carried from polishing my frame | ||
Tattoo72 |
Any automotive paint supply store will have the thin tape. | ||
Xoptimizedrsx |
go to the auto supply paint store in your area. get the fine line layout tape it made to do what you are trying. also have them mix you some paint. if they are a real auto supply they can put it into cans for you. if not they should have the fillable pump up cans that are reuseable with replacement tips. get two of these one for base coat and get the cc tips for the clear. here is a link to my video of mike bike together you can see some of the paint shots. http://www.youtube.com/watch?v=JPK6nggmy5s watch the temps and spray light it will run. dont get in a hury and watch flash times if in doubt wait an extra 5 mins between coats or it will get solvent poping. (chicken pocks) | ||
Sifo |
"Q: Where and I find some thin thin thin automotive tape?" As Tatoo and Xopti said any good automotive paint supplier. If your not sure where to find one in your area stop in at a local auto body shop and ask who they use. The thin stuff is made differently from the wide stuff too. It leaves a finer edge when you pull the tape off. "I've completely removed all the paint, then did it all over again, and its perfect.. strange thing is that I never sanded between anything And it worked out well, I didnt bother with sanding because every time that I did sand.. I would always eat through to the previous coat (and-then-some sometimes) I guess I have a heavy hand carried from polishing my frame" The problem with not sanding between colors is that the next coat will not have any texture to bite on to. Durability will suffer greatly. Wet sanding takes a lot of time to do correctly. You have to constantly dry the surface to see what's well sanded and whats still shiny. You just can't tell when it's wet. Be real careful sanding the edges, body lines, etc. As everyone finds out you sand through the paint in these spots real fast. Quite different from the brute labor that goes into polishing aluminum. Your frame looks awesome BTW! For anyone else who might be interested in tackling this sort of project, there are plenty of books that cover the subject better than I ever could in a forum. In fact I just won a bid for How to Custom Paint Your Motorcycle by JoAnn Bortles. Total cash outlay for me on Ebay was $6.62. My wife is talking about having a custom job on her sporty and I thought that since it's been 27 years since I've been in a spray booth, I'd check to see what I've missed out on over the years. I'll let you know what I think of the book when it arrives. | ||
Sifo |
if not they should have the fillable pump up cans that are reuseable with replacement tips. Xopti, I've not heard of these. Are they user fillable or do you have to go back to the paint store? Any idea who makes them? (Message edited by sifo on February 21, 2009) | ||
Hooligan620 |
Try your local hobby shop! Tamiya and 3M both make a fine line tape in several different narrow widths. It's different then making tape so it leaves a finer edge. | ||
Andymnelson |
Why does everyone keep insisting on sanding between coats? NO body shop does this. You don't need to sand as long as you wait the proper amount of time between coats. It is not an issue of the coats adhering to each other if they are applied with the correct amount of time in between in order for them to "flash" properly. Only reason to sand would be to remove imperfections in the paint. | ||
Bads1 |
Why does everyone keep insisting on sanding between coats? NO body shop does this. Good custom painters do.When your dealing with artwork,you work in layers. My bike was done in this fashion. | ||
Andymnelson |
Good custom painters do not use rattle cans. And again, the reason for it has nothing to do with adhesion, bur imperfection removal. Rattle can jobs do not require it. | ||
Sifo |
"Why does everyone keep insisting on sanding between coats?" Good question. No need to sand between coats that are sprayed shortly after the flash time. You should scuff the surface for the next color though. The reason for this is that you will have to let the base coat dry so that you can mask off your graphics. Now you are looking at a cured glossy surface that will not bond well with the next coat of paint without sanding. Keep in mind that all of this discussion is dealing with pretty basic painting with solid colors. Things get more complicated when you start with candys, pearls, etc., but that's a discussion beyond rattle can painting. |