| Author | Message | ||
Slaughter |
So she's all set with TWO wide-band sensors that can hook directly into Antelope Valley H-D/Buell's Dyno. We had to give it 5 heat/cool cycles to break her in so we're just firing her up, reading the temperatures going up to 210(C), shutting down, cooling to 150(C) and starting up. (nice to have a cooperative dealer who takes an INTEREST in the project!) Bike set up: 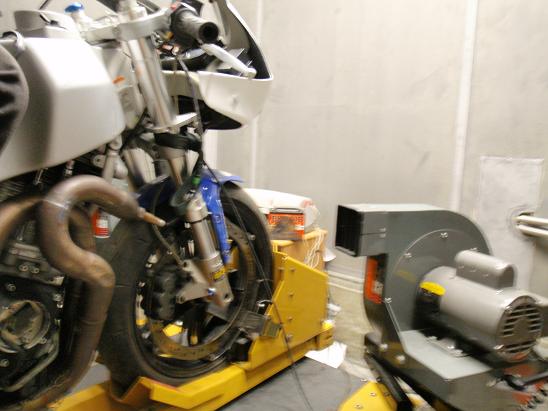 Laptop "at the ready" 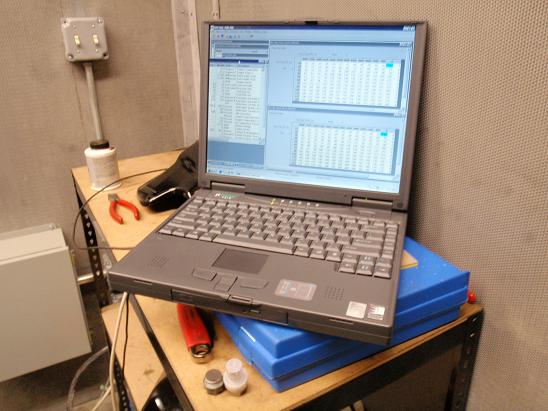 Don Thutt ran the bike, I monitored the computer during break-in and watched temps (and listened for any "funny noises" 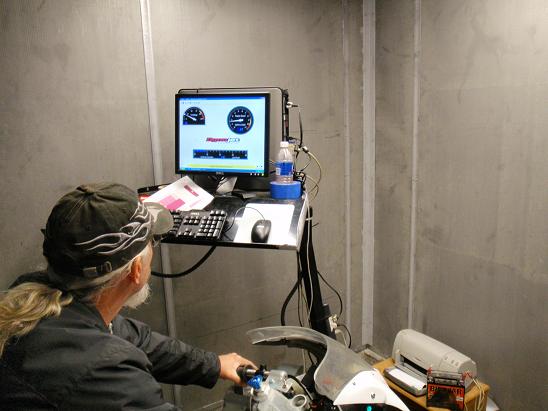 (Message edited by slaughter on December 20, 2008) | ||
Slaughter |
So after about 3 hours of intense fiddling and fooling around, the poor folks working in the shop asked us to PLEASE let them go home for the day (we get the dyno at the end of their day) So we're shut down but ready for a pretty purposeful hour or two of detailed tuning the next day. No pics during the actual tuning because we're both working pretty intensely. Dyno tuning aint trivial... fun, yes - but time consuming! For the FIRST TIME now in 4 seasons of racing - I have a motor that has NO HOLES in the powerband and has GOOD air/fuel in BOTH jugs!!! We take the sensors out, thread in the port plugs (using HIGH TEMPERATURE ANTI-SIEZE!!!!) and get the old bodywork rattle-can white painted and head out to Willow Springs for Inside Pass (New bodywork will be in - ordered from Pete at Grandstand Designs) Yeah - the old beater Toyota just keeps running... and running... and running... so we're NOT going to spend $20K on a track hauler when our $500 Toyota gets us there once a month... and we live 15 miles from Willow Springs. 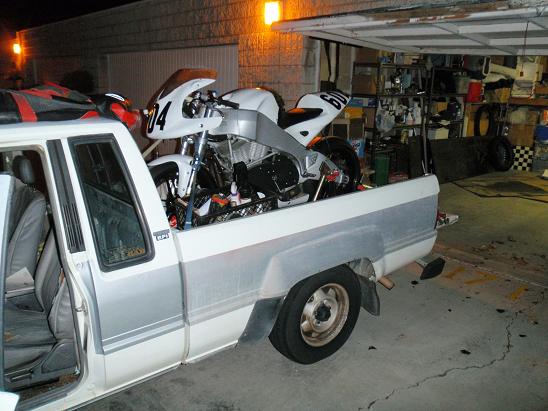 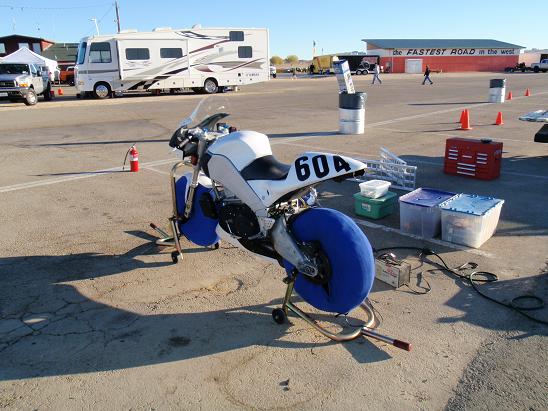 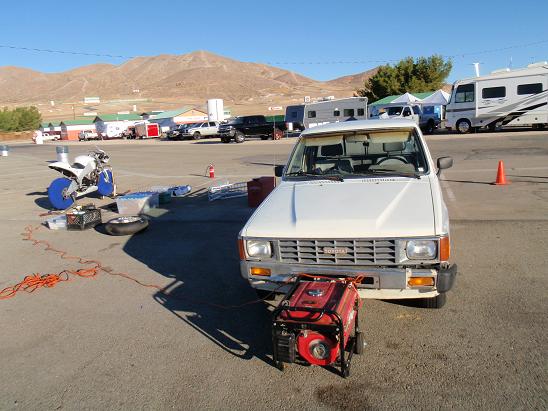 After session 5, I put the bike on the stand and am going to put on the warmers but notice oil in the bellypan and oil coming from the front cooler lines... bummer - but simple stuff. Done for the day, we hang out with the others there for Inside Pass and watch the Buellers trying out the new machinery but there's not enough time left for me to go out to play. We pack it in for the day... next weekend is RACE weekend, she'll be ready! (Message edited by slaughter on December 20, 2008) | ||
Slaughter |
Friday - practice day for WSMC race weekend... oil lines all good to go. Whatta BITCHEN MORNING!!! The bike was running the sweetest it EVER had. I just took it out the first session to get the feel of it and in the following few sessions, started working on the suspension when the track warmed up and I could put on a little speed. Really, after setting the sag on both ends at the shop, I only needed to tweak the low speed compression on the rear a little... and the bike felt really settled by the fourth session Traxxion Dynamics had done their homework. Suspension came to me directly from their shock dynamometer - so their stock high/low speed damping settings for the shock and the damping settings for the forks were almost dead-on... but I'm still taking notes... Morning was GREAT... bike handling predictably so it's time for the "science project." FUEL CONSUMPTION. I decide to put in EXACTLY 5 litres of fuel for each session and plan to pull back in the pits after 9 laps... and re-fill with EXACTLY 5 litres. After a few sessions, I'd start to see if that was going to be too much or too little fuel (not wanting to carry any more fuel weight than needed) 5th session, in turn 8, I start losing power and think "OUTTA FUEL" so I stick out my leg, raise my hand and pull off the racing line. Fortunately, the track exit is also at the exit of turn 9 (turn 8/9 is just a tightening up at the exit of 8) and figure when I stand the bike up to exit, it'll come back on the power when it starts picking up fuel again... ... uh oh... NO POWER. ...slowing down a bit... no power yet... downshift a couple gears... ...motor barely running now FAWCK - I can hear some "funny noises" and shut down and start pushing back to the pits. NOW WHAT???!!! (Message edited by slaughter on December 20, 2008) | ||
Hogs |
That thing must sound Bad Ass, With that Beson Exhaust on there..LoL got the same pipe set up myself( with the springs Newer unit),Btw If anyone ya know wd. be interested in the exhaust I wd. sell it for my cost.. All the best with the Bike...! Damn just read your Post, Hope its nothing ya can`t fixed quick and cheap. (Message edited by hogs on December 20, 2008) | ||
Slaughter |
Back at the pits, Sunny is looking at me staring at the bike with a "deer in the headlights" look. I am thinking that I had a pushrod loosen (I'm running semi-solids) and Sunny and I have had that happen before (and Sunny has learned to adjust the pushrods on a hot engine as a result - she's such a cool crew chief!!) We fire it up and YEP - sounds like a pushrod so shut it down INSTANTLY and tell her we're done for the day. I strip down, call Don to tell him whazzup and that we'll be fiddling with it some that evening. Weellll.... it wasn't that easy and when I pulled the pushrod covers off, the rear exhaust pushrod was loose but it hadn't UN-SCREWED itself to loosen - it was as tight as when we setup the motor so it means... stuck valve REAL BUMMER - especially considering the damage that valve/piston collisions can cause ... ... so it's pull the heads off time and check see what happened. (still looking through a LOAD of pics) - when things are easy, you get LOTS of pics, when things are really busy or aren't going well, you don't have photography as a high priority. DANG DANG and DOUBLE DANG!!! Pulling the pipes off, we can SEE a cracked exhaust valve guide and I'm kinda fearful that we might see that we had metal chunks go down the wrong hole and NOT out the tailpipe. ... so the heads are coming off... DANG (Message edited by slaughter on December 20, 2008) | ||
Slaughter |
Back at Don's shop - and UP on the stand again... it's coffee time, ready for whatever comes. All the negative thoughts going through my mind: "I can't freaking AFFORD another piston/cylinder/head" I hope HOPE it's simple... 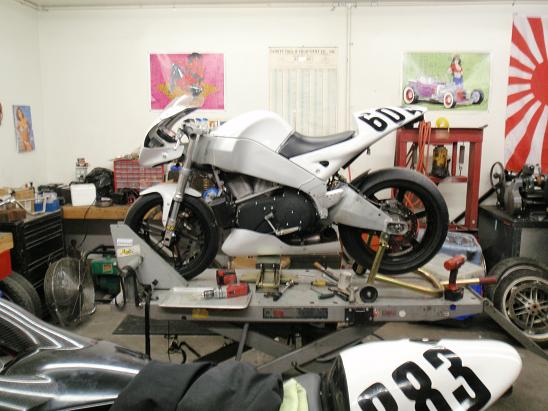 | ||
Slaughter |
We start pulling it apart. Pull the pipes and start pulling the heads to check for damage. The rear head shows the cracked valve guide which FORTUNATELY blew out the tailpipe and not DOWN THE BORE!!! 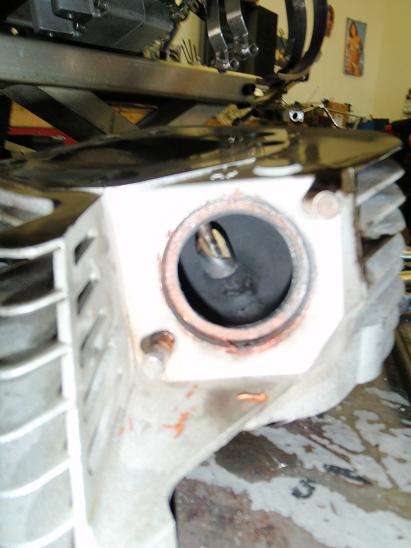 | ||
Slaughter |
So looking at the rear head and piston I am GREATLY relieved that the valve just BARELY tapped the piston and that was just enough to bend the valve, crack the guide but NOT damage the piston. Pics aren't really clear with the $20 Radio Shack "shop camera" - but the piston crown will sand/polish nicely but I'm going to have to replace the valves and valve guides. CAN'T take chances. Why did the exhaust valve and piston come together you might ask? The heads were built from scratch after the wreck had destroyed the last heads. We had set the heads before to clear the pistons by about 0.015 by claying them in. THIS TIME... I was in a hurry to put everything back together... famous last words: "everything will fit just fine, let's just put it back together" Well... NEW crank/flywheel/rods/pistons/heads/valves. I shoulda KNOWN better than to hurry. Shoulda/coulda/woulda... NEVER PUT A MOTOR TOGETHER WITHOUT CLAYING-IN the valve/piston clearance!!! So, it's back to the ordering books to get some valves, get some more manganese/bronze bushings made and at least there is time to get it right and NOT RUSH!!! December this year, they're NOT racing at Willow Springs - just too close to Christmas. I've got some BITCHEN bodywork from Pete at Grandstand Designs that will be painted up and we'll have a nice looking bike and it'll be race ready in time for the 3rd Sunday in January. It's been a long road AGAIN putting her back together without using the VISA. It's easy to lose track of expenses when borrowing to pay for everything... takes a bit longer when you're paying CASH for everything but it's worth it having a bike that YOU OWN. I got more than a little tired of being "sponsored by VISA" for so many years. ...the saga continues... painting starts after the holidays and re-assembly of the heads and re-installation is stupidly simple for these motors. It's off to the Holidays for Sunny and me (Message edited by slaughter on December 20, 2008) | ||
Slaughter |
So looking at the rear head and piston I am GREATLY relieved that the valve just BARELY tapped the piston and that was just enough to bend the valve, crack the guide but NOT damage the piston. 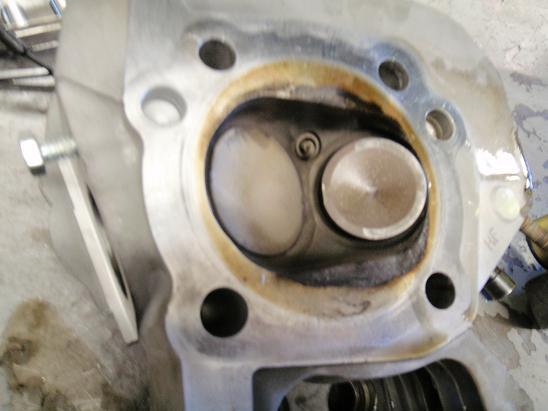 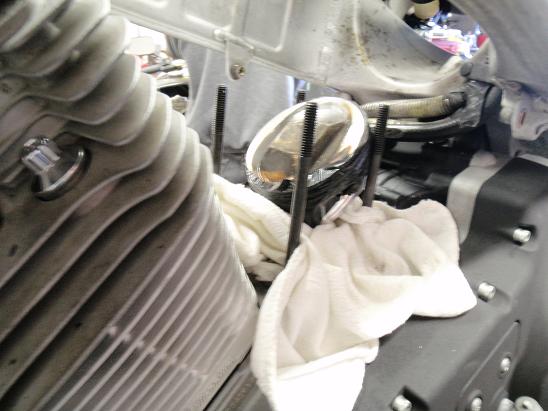 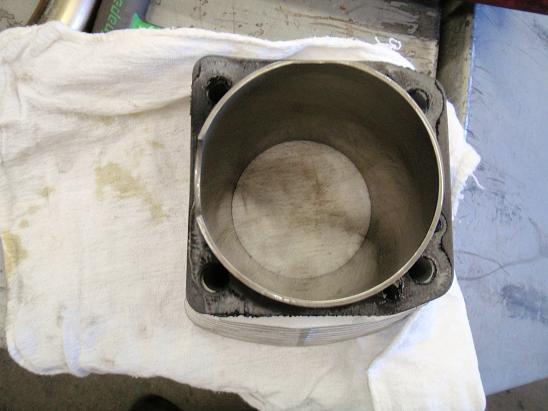 Pics aren't really clear with the $20 Radio Shack "shop camera" - but the piston crown will sand/polish nicely but I'm going to have to replace the valves and valve guides. CAN'T take chances. Why did the exhaust valve and piston come together you might ask? The heads were built from scratch after the wreck had destroyed the last heads when the engine/chassis was torn apart. We had set the heads to clear the pistons by about 0.015 by claying them in - but that was 3 years ago... THIS TIME... I was in a hurry to put everything back together... famous last words: "everything will fit just fine, let's just put it back together" Well... NEW crank/flywheel/rods/pistons/heads/valves. I shoulda KNOWN better than to hurry. Shoulda/coulda/woulda... NEVER PUT A MOTOR TOGETHER WITHOUT CLAYING-IN the valve/piston clearance!!! So, it's back to the ordering books to get some valves, get some more manganese/bronze bushings made and at least there is time to get it right and NOT RUSH!!! December this year, they're NOT racing at Willow Springs - just too close to Christmas. I've got some BITCHEN bodywork from Pete at Grandstand Designs that will be painted up and we'll have a nice looking bike and it'll be race ready in time for the 3rd Sunday in January. It's been a long road AGAIN putting her back together without using the VISA. It's easy to lose track of expenses when borrowing to pay for everything... takes a bit longer when you're paying CASH for everything but it's worth it having a bike that YOU OWN. I got more than a little tired of being "sponsored by VISA" for so many years. ...the saga continues... painting starts after the holidays and re-assembly of the heads and re-installation is stupidly simple for these motors. It's off to the Holidays for Sunny and me (Message edited by slaughter on December 20, 2008) | ||
Hogs |
Well Steve, Good have been a Hell Of Alot Worst as we know... All the best getting that Beast bolted back up...! | ||
Hogs |
Steve, When you say " 0.015 by claying them in " Who am I to ? your Work, But I had thought that .015 is really on the tight side for clearance, Do you mean from Valve to Piston on TDC? ( With the clay of course ) I wd have thought at least .030 or even .060 wd. be Safe... I know we push the limits LoL But Perhaps your clearances are A ok.. Like I said I`m No TecH by a long shot???? Just Curious... | ||
Slaughter |
Yeah - that was measured gap at TDC the last time I put the motor together (but I'm working from memory here in my livingroom, it MAY have been a bigger gap) - regardless, I was rushing this time and didn't even measure them after making so many changes. Last time around, Earl Kellerman put them all together and clayed them in. My memory said he was using 0.015 as a gap but your numbers are DEFINITELY more "sane." I gotta go check into it some more. It WAS too close when you consider all the tolerances stacked up... and you realize that they actually HIT. Gotta clay them this time - and I gotta check recommended clearances. I'm running 585 cams so knew that I was close - but got 2 seasons out of the old heads but was just rushing too much this time around so can't really say HOW CLOSE I was. When you think of the whirling bits of machinery and how much the connecting rods stretch after heating up and whirling at 8,000 RPM, it's NO WONDER that I smacked the pistons. Stupid, stupid, stupid. | ||
Slaughter |
You're absolutely right on that gap. Just doing some calculations, a hot connecting rod can "grow" as much as 0.050 with temperature - of course the cylinder ALSO grows with temperature but regardless, that 0.015 clearance was INCORRECT - (that's what I get for working from memory) Good call! Went to the garage and got my notebook. I had written down 0.015 GASKET needed... NOT a gap. Final gap WAS 0.100!!! Who knows what I had this time out. In a couple weeks when it's all going together, I'll clay it in and record again. | ||
Hogs |
YEah, I think 0.060 Valve to piston wd. be a safe bet  Just wonder all that may know out here, is that Plastic Gauge better to use than the clay??? Being more rigid for a better reading? (Message edited by hogs on December 20, 2008) | ||
Slaughter |
Dunno... Plastigage would still need some clay or something to hold it in place... and that'd be some HEAVY plastigage for a 0.1 gap | ||
Hogs |
YEah you are right good for smaller specs. like rods and bearings, Clay is the way to go... | ||
Bombardier |
How did the numbers stack up on the dyno runs? | ||
Slaughter |
On the dyno... not too bad. We didn't really do a good pull for measured HP an torque because we were using Vik Rosales' old street tire (almost down to the cords) - and it would slip on the rollers at high HP and Torque. Good enough for tuning but HP and Tq were kinda iffy at the high end with the slipping. She makes at least 103 hp and ABOUT 78 ft.lb torque. This motor is built to run on pump gas and develop mid-to-upper range power and be capable of doing a 6-hour race (if asked) so I don't expect it'll ever show more than about 105-ish HP. 78 ft.lb is plenty acceptable - peak tq is up about 7800 RPM but really is pretty flat from about 5000+ When I looked at the RRW measured torques of the new litrebikes, they're in about that same ballpark (but at MUCH HIGHER RPM - hence their higher HP) I'll do a couple pulls when the new valves go in after the holidays. Remeber, this is the short stroke/big-bore engine - 1169cc (XB9 originally) - rev limit set at 8000 - NOT an XB12 My preference is the short stroke/higher RPM - but that's just what I'm used to. | ||
Xbpete |
Steve, the read is exceptional... great data and shots togo with.. Something cool to read with -5 degrees and a foot of fresh white,, Appreciate the sharing and story Best of luck this year, Pete | ||
Ceejay |
Nice stuff Slaughter! I'm building mine(track/maybe race bike-not motor yet) up this winter so I may have some q's your way... | ||
Slaughter |
Ask away. I've learned a LOT along the way. | ||
Knickers |
Hi Steve, Are those collapsible pushrod tubes you're using or are those old tuber style parts? If its the latter, what are you using for bases? I've got the rear head off right now to fix a cut pushrod tube o-ring and I don't like the idea of having to pull the head to fix this kind of simple leak with the xb covers so I'm looking for other options. I missed a couple races when they pulled my tech sticker for this leak (tech saw the smoke). Kurt | ||
Slaughter |
Those are Zippers collapsible pushrod covers and bases. I'd recommend KEEPING STOCK lifters/pushrods to save you the hassles of having to adjust pushrods. | ||
Hurricaneleah |
Hey Steve, good luck with your engine re-build! Sounds like you are close for sure. On measuring clearances, I have had the best luck using soft solder wire instead of clay. Works great for squish measurement. Never tried valve to pocket, but i don't see why it wouldn't work...just be gentle with it the first time... Good luck and get that baby back together and on the track! | ||
Slaughter |
Well... painting the fairing/seat/airbox/fender all done. Gotta get the heads mounted up soon as the new valves arrive... prolly around first week in January, I''ll have it all back together. Stay tuned. Calls made, plans underway. | ||
Slaughter |
Kurt, I always keep an extra set of o-rings and seals for the pushrod covers. Cheap insurance. I have accumulated a LOT of spare stuff that follows me to the track in boxes. (Usually, it goes on OTHER people's bikes though) | ||
Wolfridgerider |
(Usually, it goes on OTHER people's bikes though) LOL Its one good way to make sure you don't need it. The first time you didn't drag it along with ya.... you know the deal.... | ||
Slaughter |
The first time you didn't drag it along with ya.... you know the deal.... As you well know! | ||
Slaughter |
Baby steps.... Just ordered the valves today, tomorrow will decide if I need to re-do the front head or just re-valve the rear... and THIS TIME, clay-in the freaking VALVE/PISTON CLEARANCES!!! (well DUUUHHHH!) Should be a week to 10 days and I'll have heads ready for re-install and then I'll mount up the bodywork. (Just posting again so the thread doesn't archive on me) Maybe I'll take a couple snapshots of the painted bodywork as it sits... I get bored in between productive working spurts! | ||
Hogs |
 I hear ya when ya say " and THIS TIME, clay-in the freaking VALVE/PISTON CLEARANCES!!! (well DUUUHHHH!) " Yeah A little more than 15/thousand wd. be nice :-) All the best with the rebuild.... BTW if ya don`t mind can I email ya about some parts you are using? Thanks |