| Author | Message | ||
Crjunkie1 |
I just spotted Kruizen's 'ultimate stator fix' post. Apparently, IF I'm understanding Eric correctly, I'd also need a new stator cover to completely change over to the 08 setup? Ouch, that's gonna leave a mark... | ||
651lance |
Ok hers are the retail pricing on the rotors: 2008 Y0533.1AM i$837 and the 2009/10 Y0533.2AM $748.. Again don't shot the messenger.  | ||
Crjunkie1 |
Thanks for checking on it Lance. I really appreciate your time. To be honest about it, I'd have to wash way too many dishes to justify that expense. (if you know what I mean) I'll probably just pull mine and send it out for local machining. Who knows, maybe by the time I decide to take that plunge, EBR MIGHT be back in the saddle. Something to hope for... | ||
Flybysr1 |
I bought this bike cause it doesn't charge. I assumed I would be changing out the stator, the voltage regulator and get the rotor modified. I was planning to drill the rotor as Hildstrom shows. Since I now see how things are inside the cover. The EBR method makes more sense to now but still like Hildstrom's idea. I opened it up today as the pic shows. The stator doesn't look like it's cooked. Planning to open the VR now and do some testing. I wonder if I fix the VR and do some kinda rotor mod, I won't need to buy a stator. Totally PO's me the stator connector won't pass between the gas tank and engine.  | ||
Mhpalin |
That stator looks brand new though could be a short just to the left of the 08 stamp. | ||
Flybysr1 |
Does the 08 stamp mean it's a 08 version? Serial number indicates late 09 build. | ||
Mhpalin |
No that is the date it was made 46 week 08 the one that was in my 09 cr 49/08  That one might have been rebuilt That one might have been rebuilt (Message edited by mhpalin on January 17, 2016) | ||
Crjunkie1 |
Hey Flyby, That either appears to be a recent replacement stator, or, heat has definitely NOT been an issue with your particular bike! That one is in beautiful shape! Did you happen to test the legs or phases for output before disassembly? Mhpalin, take a careful look at that photo again. I believe (I could be wrong) that what appears to be a 'short' or burn mark on the wiring in that area is actually the inner wire guide edge and the angle of the photo is somewhat misleading. It appears to be just fine to me. | ||
Mhpalin |
On the post to the left of the 08 stamp there is a discoloration it's the only crossover that is discolored could be alright though wouldn't hurt to check it out other wise the thing is mint | ||
Flybysr1 |
I didn't even check the voltage. I assumed the worst. I was told it sat at a Harley dealer for a year and half based on warranty disagreement regarding the stator. Then it sat in a shed more than a year. I got it this spring with 2011 license plate on it. Looking at now I think it has the Harley fix and a new stator. | ||
Crjunkie1 |
Rick, Have you tried (with the system opened up but fully connected) to ohm out each leg at the connector where the harness attaches to the V/R. If all three legs look approx. equal up through that point in the wiring, I'd be looking more closely at the V/R itself. That assumes that any fuses, bad/loose grounds, bad pin connections, hidden harness damage, etc. have all been checked and ruled out first. Of course, checking each leg for voltage output with the bike up and running would be much more conclusive. It's quite possible that the V/R IS shot. It is a stock V/R, right? Oh, and one more thing... Does that have the 'Harley fix' harness added? If so, you probably want to get rid of that. That stator sure appears to be in good condition but, I suppose looks can be deceiving. Let us know what you found to correct the problem and good luck with it. Tracy | ||
Flybysr1 |
I think the stator is brand new. It does have the Harley fix. I'm preparing to remove the rotor and have the oil hole added to protect the new stator. The VR looks original. Now that it's apart I'll check the VR later. I'd like to get a close up picture of a modified rotor. I think I can find a local shop to do the work. Thanks for the response...awesome community here. | ||
Dennis_c |
don't ask how mine looks like that the hole is where EBR put it the small hole is #69 on the rotor side 1/4" on the crank shaft side . You can drill it your self You have to buy a chuck to hold that small of a bit.I have I have about 25K still working good   | ||
Reepicheep |
Cool! Tap it, and use the right sized carb jet, then you can dial it in.  | ||
Flybysr1 |
Dennis- You are a genius! Great idea! | ||
Flybysr1 |
So the one tooth is already removed? Is there a specified angle to the hole? | ||
Reepicheep |
I think that tooth is already missing, but I don't have an 1125. I'd also guess the angle is important, and you want to end up coming out a little lower than Dennis did. He only lost a small part of one thread, so no big deal, but it would be more elegant if it came out right below there. The factory hole, from what I saw, was MUCH smaller... and that is an oil feed line from the the crank... so I have no idea what the right sized hole should be and what the implications of the wrong side hole would be and what's it's impact would be on oil pressure at various points in the motor, and what the implications of that lower pressure would be... But $900 on what might be a $3000 bike is a lot of money. Rolling the dice a little isn't totally crazy. | ||
Dennis_c |
To big of a hole you starve the upper end of the motor. If I remember right the 1/4" hole is 1/4" back to center line of hole the #69 bit size came out in the center of the small radius. I called EBR they gave me the small hole size. My stator went in my new motor I bought from EBR they are the ones that drilled it not deep enough to start with. When I took it apart I saw the hole did not go through all the way the steel poped up I thought the small hole was like a pilot bit so I finish drilling it out to 1/4". Then I found out the 1/4" was way to big so I taped the hole to 5/16 got a allen head set screw drilled #69 hole in set screw did not run the tap all the way through I did not want it to work lose and fall in the stator with of locktite to be safe. The 1/4" hole went about 1/2 to 2/3 the way through. You will have to buy a chuck to fit that small of a bit buy more than one bit I used two take nice and slow. A 1/6" bit looks huge compared to #69. That is a flat spot there is no tooth there. (Message edited by dennis c on January 18, 2016) | ||
Dennis_c |
Reepicheep That's where EBR put the hole I though EBR f%#^ up then I made it biger when the hole did not go 100% the way through it went 99.9% through. Right in the center of the small rounded spot. | ||
Flybysr1 |
I looked up #69 drill, it's .75 mm it will be easier for me to have it Electro Discharge Machined EDM locally using your photos to guide me. Thanks Dennis. I got your PM but I'm doing the thing with Matt...thanks. | ||
Reepicheep |
Thanks for all the research and detail Dennis. I was dredging through ancient memories of a Suzuki 50cc quad I had for the kids, and recalled a jet that was like your mod. http://tboltusa.com/store/mikuni-vm-26-pilot-jet-2 5-p-2548.html http://www.cmsnl.com/honda-z50jp-monkey-baja-japan _model14631/jet-main-58_991011870580/#.Vp5BZPkrI-U (not the right jet or a buy recommendation, just images so you can see what I am thinking). So just as another way to approach this problem if you don't want to go the EDM route, maybe there is a common off the shelf $5 carb jet you could buy, that is also an outside diameter that would be easier to drill and tap for (meaning you can do it with benchtop parts and not EDM). While in "figure it out" mode, you could even easily adjust it to get the best cooling versus oil pressure by just swapping jets. I'm picturing some thermocouple instrumentation monitoring temperatures under different operating conditions. Once the first person manages to adjust it, everyone else can then just buy that jet. | ||
Flybysr1 |
I removed the rotor and considered attempting to drill the oil hole with a brass fuel jet insert in my garage. This morning I called a few local shops. I dropped it off during lunch today, should be done soon and cheap. | ||
Bubba_ |
Looking at the TwinMotorcycle upgraded rotor - it sure looks like they used a jet insert of some type. - i'd be interested to hear how Flyby comes out ; what specs he ordered for his modification, cost, etc | ||
Flybysr1 |
I sent them close up pictures of a EBR modified rotor. I'll report back with pix and cost when it's done. | ||
Bubba_ |
thanks | ||
Jc1125r |
The Twin Motorcycles rotor oil jet does not look like the picture above. It is a tapered hole on the bottom with a very small hole extending through the rotor. Nothing that looks like the insert shown above. Here is a picture of the one from Twin Motorcycles from the crank view.  | ||
Flybysr1 |
http://www.twinmotorcycles.nl/artikelen.asp?cid=20 &aid=820 I this link Easyrider shows a picture of a modified rotor being installed. It looks like it has insert. It looks like it could be different material. | ||
Jc1125r |
I just did the rotor modification to mine through Twin Motorcycles, there was no insert. There was the tapered portion on the crank side and then a very fine hole through the rotor, no insert | ||
Jc1125r |
Here are a couple of better pictures. These are what mine looked like when I received my rotor back from Twin Motorcycles 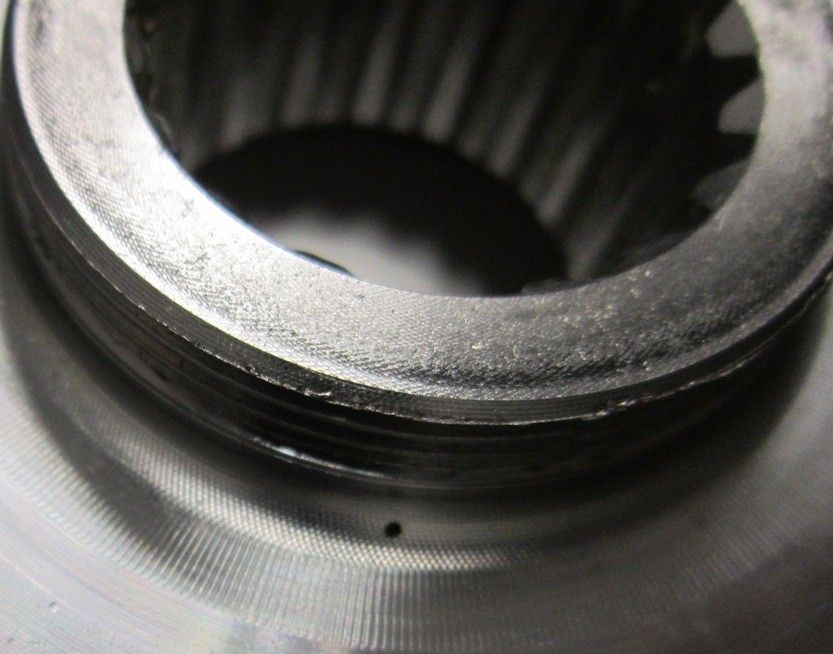 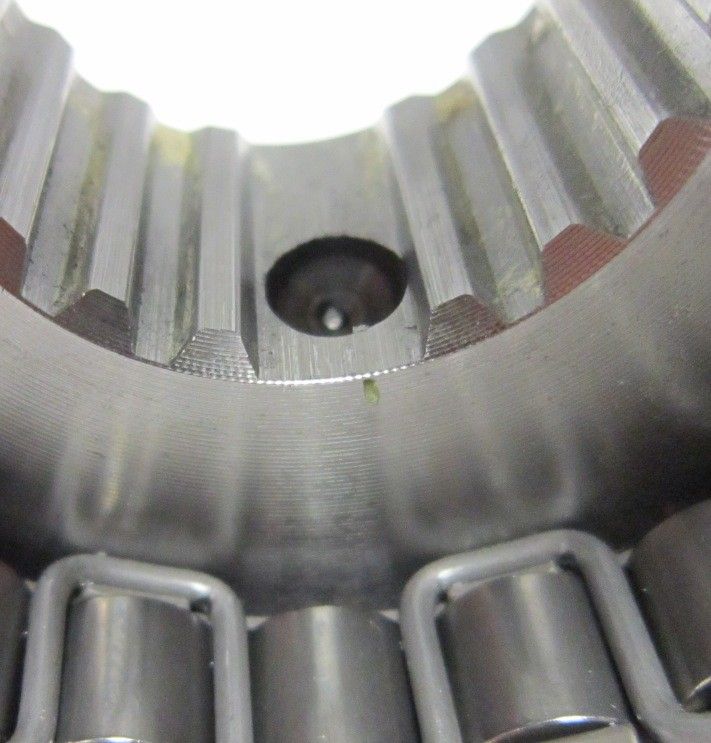 Pictures borrowed from another post | ||
Bubba_ |
thats interesting here's the pic:  |