| Author | Message | ||
Oldog |
specifically for the 1125 R its time to change the fork oil please leave a note here that you PMed me I will happily pay freight both ways | ||
Matteson |
Two s hooks a small ratchet strap and a vice is how I do all my forks. I can send you a picture of the setup. Its pretty simple | ||
Dennis_c |
Me to pictures please | ||
Nillaice |
and a piece of PVC pipe will drive the fork seals in. some have said electrical tape will do it, but i couldn't make it work for me when i tried it. between the couplers, connectors and different schedule thickness of PVC available at your local hardware store; you can drive in almost any size for seal with PVC | ||
Oldog |
Two s hooks a small ratchet strap and a vice is how I do all my forks. I seem to remember some one did that some where } please post it up if you would.. (Message edited by oldog on September 08, 2014) | ||
Tbowdre |
This can be a challenge the first time but its really a pretty simple assembly Loosen top triple clamp pinch bolt. Loosen fork cap. Remove fork from bike. fully unscrew fork cap and once you lift the fork cap you can see that you need to compress the spacer and spring to expose the damper rod that screws into the fork cap holding the assembly together. To expose the nut/damper rod you need to pull down the spring spacer. if you place 2 S hooks (I used cut and bent pieces of a small chain) into the holes in the spacer then connect and run a ratchet strap down under the fork you can use the strap to pull down the spacer compressing the spring�.. exposing the lock nut and cap Back off the lock nut (14mm open end wrench for nut and 17mm open end wrench for cap), unscrew the cap and remove. The long rebound rod will come with it. Carefully release tension on ratchet strap and dump/remove spacer, spring and most of the oil into a pan or bucket. Also be cautious because the top tube can now become separated from the bottom fork leg. If the top tube and bottom leg become separated its no big deal just be very carful sliding them back together because you might damage the oil seal. Service manual can be helpful with this procedure Lots of homeade jobs to look at if you google fork spring ratchet strap compressor http://i58.photobucket.com/albums/g278/jcy123/IMAG 0142.jpg http://www.badweatherbikers.com/buell/messages/406 2/548472.jpg | ||
Fresnobuell |
Jim, I did this a few weekends ago. If I can do it, anyone can do it. The hardest part was securing the fork upright since I don't have a vice large enough. I ended up using clamps and clamping the fork to and a piece of plywood extended from my workbench. Not ideal but it worked. | ||
Matteson |
Tools https://imageshack.com/i/5jigc0j Driver https://imageshack.com/i/npu4exj 117mm depth for oil height. Copper tube.https://imageshack.com/i/15aykpj Fork oil height tool. https://imageshack.com/i/gvqk9mj I used a small piece of metal and drilled/tapped holes and ran a couple of bolts in them. The spring spacers has holes in it to recieve a tool. Compressor. https://imageshack.com/i/mupvzmj (Message edited by MAtteson on September 08, 2014) | ||
Matteson |
I hope that gives a guy a couple ideas. I have done other guys forks in the area with these tools I have made. Beats paying $200 to an indy shop. | ||
Oldog |
Thanks All, I have done complete over haul of the X1 fork which does not have the pre-load adjuster the shop manual was skimmed earlier, its a little sketchy I was hoping that some one had the compressor tool vs a strap I will look in to the tool and the strap. (Message edited by oldog on September 08, 2014) | ||
Thefleshrocket |
The only non-standard tool you should need is a fork spring compressor. I bought this one from Traxxion. http://www.traxxion.com/ForkSpringCompressorKit.as px | ||
Fresnobuell |
My solution with no vise: 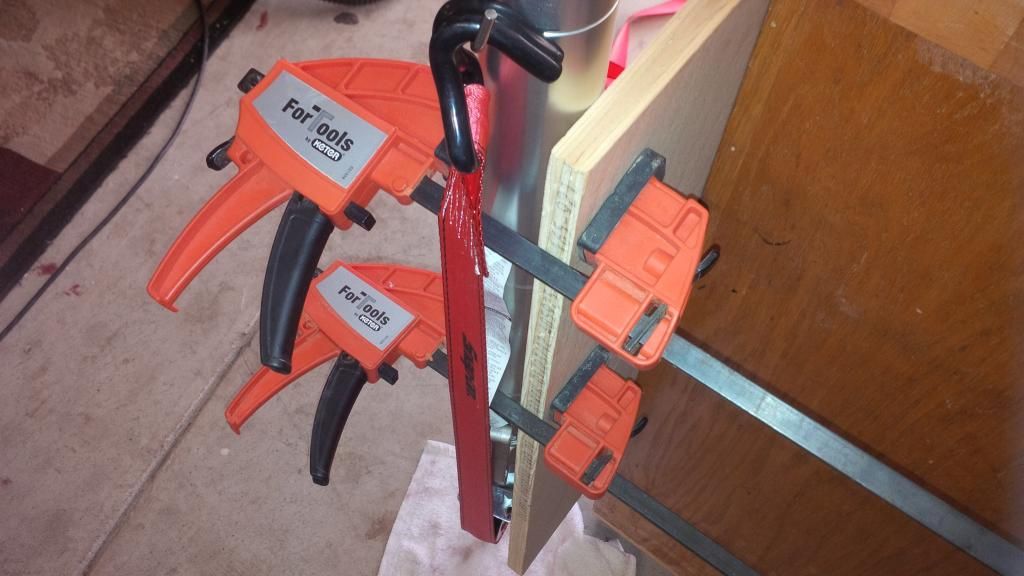 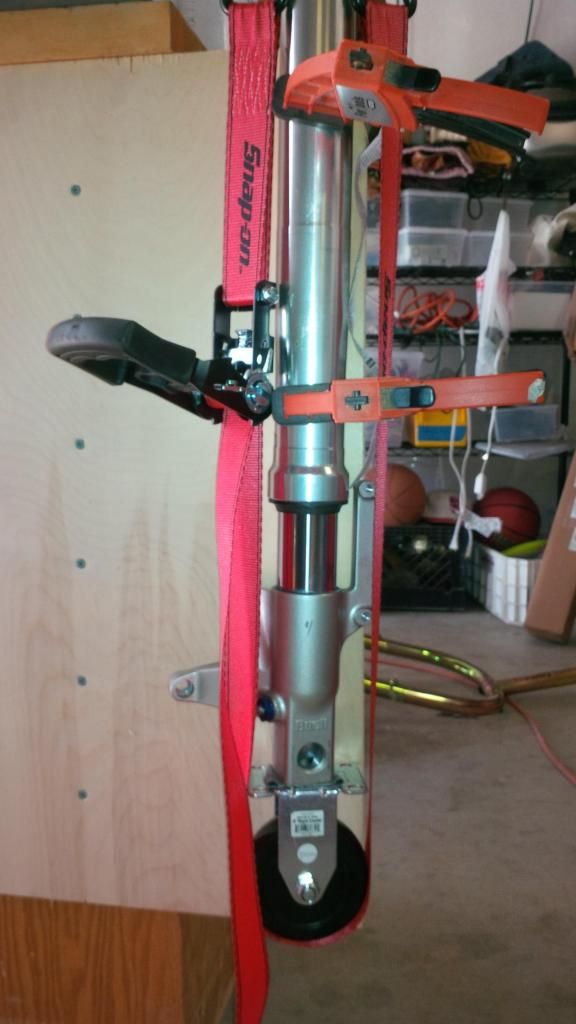 | ||
Rodrob |
I used a caster and ratchet strap as a compressor, the dowel above and a 1-1/4" PVC slip coupling is a perfect seal driver. Here is a thread with pics - http://www.badweatherbikers.com/buell/messages/290 431/559809.html?1272601481 | ||
Fresnobuell |
Also, if you are only doing the fork oil, you could simply pop the cap and drain the oil carefully into a container (and I mean carefully because the oil will spill from both the top of the fork and the top of the damper rod), then fill the same amount of clean oil back into the fork. This would not require any disassembly of the fork, other than popping the top. You obviously couldn't do the seals however. | ||
Oldog |
Just oil this time, I like the caster idea. The irony is that the telescopic tool is simple to build, why is it 150$? Materials 1" .120 wall SQ tubing less than 4' 3/4" .082 wall SQ tubing less than 4' all thread rod (3/8-16)x 3' nuts washers piece of channel 3~4" wide 5/16" thick x 3" long... and a weldor & welder build able in about 2 hours | ||
Fresnobuell |
Specialty tool built for a tiny market. How about parts in general for our bikes? $300 Master Cylinders, $200 levers, $75 for six bolts and hardware for our perimeter disc brakes..BUT when you look at the R&D, the quality of the workmanship in addition to the fact that only a few will be sold, it sometimes seems CHEAP. | ||
Fresnobuell |
I totally stole the idea from Rob. My only slip up on the first fork re-assembly was not threading the dowel into the damper rod BEFORE inserting the spring. Of course, at that point I had measured the oil to perfection so I didn't want to pull the spring (didn't have the extra oil to startover), but I couldn't get the dowel threaded because the damper rod had sunk down into the spring. Forgot what the solution was, but the best thing is to screw the dowel nice and tight into the damper rod, then add spring and spacers, etc. Other than that it really went as planned. | ||
Oldog |
How about parts in general for our bikes? $300 Master Cylinders, $200 levers, $75 for six bolts and hardware for our perimeter disc brakes..BUT when you look at the R&D, the quality of the workmanship in addition to the fact that only a few will be sold, Just a thought... That spring compressor should be usable on almost every USD showa built. the price seems a bit stiff, ( 100$ seems reasonable ) BUT Hey I just spent 60$ for a small box of 10 mm steel discs of various sizes. the parts for Buells seem to be comparable to other MC manufacturers parts in most cases.. the material cost on the spring compressor is less than 30$ at retail price } I don't know who came up with the caster idea but its neat!, What dowel are you refering to? (Message edited by oldog on September 10, 2014) | ||
Nikoff90 |
I made this up with some scraps I had laying around don't know what the official one is like. Took about 30min.  tool tool | ||
Fresnobuell |
There is a fancy tool that you can buy for about $40 or you can improvise with a 7/16" wooden dowel and some electrical tape to thread into the damping rod. What happens is the damping rod will tend to sink back into the cartridge (and spring) during re-assembly. The dowel simply is used to pull the rod up as the spring is compressed so you can get the damping rod threaded into the fork cap. the dowel also allows you to stack/align the spacer and any other bits that might have to go on top of the spring. When you have the damping rod fully extended, you can compress the spring as little as possible to get the fork back together. With the Showa kit I just installed, I only had to compress the spring about 1.5 to 2 inches or so with a fully extended damping rod. Easy. I did learn the hard way as the first go around i tried to keep compressing the spring (I didn't realize the damping rod had sunk down) and the spring got bent over to one side (limitations of the homemade spring compressor where clearly evident) and the plastic spacer where the S-clips and tie down attached started to tear. NOt good. (Message edited by fresnobuell on September 10, 2014) |