G oog le Buell 1125R Forum | Login/out | Topics | Search | Custodians | Register | Edit Profile


Buell Forum » 1125R Superbike Board » Archive through March 11, 2014 » Low Fuel Light. « Previous Next »

  Thread Last Poster Posts Pages Last Post
Archive through January 30, 2014Oldog30 01-30-14  08:41 am
Archive through December 24, 2013Shawns30 12-24-13  09:30 pm
         

Author Message
Top of pagePrevious messageNext messageBottom of page Link to this message

Cataract2
Posted on Thursday, January 30, 2014 - 10:09 am:   Edit Post Delete Post View Post/Check IP Print Post    Move Post (Custodian/Admin Only) Ban Poster IP (Custodian/Admin only)

Old, there is a small 1/4" fine thread hole in the base of the pump. When you remove the snap ring (I listed the size snap ring pliers you need in this thread) you can just thread in a bolt of the size I listed and with a pair of pliers grab hold and pull. The pump will come out. Don't even need the tool listed for it.

Zeus, if you have any questions just ask them here.
Top of pagePrevious messageNext messageBottom of page Link to this message

1313
Posted on Saturday, March 08, 2014 - 12:32 pm:   Edit Post Delete Post View Post/Check IP Print Post    Move Post (Custodian/Admin Only) Ban Poster IP (Custodian/Admin only)

That small hole in the pump is NOT fine thread.

1/4 - 20 all the way...

DAMHIK,
1313
Top of pagePrevious messageNext messageBottom of page Link to this message

Zac4mac
Posted on Sunday, March 09, 2014 - 01:28 pm:   Edit Post Delete Post View Post/Check IP Print Post    Move Post (Custodian/Admin Only) Ban Poster IP (Custodian/Admin only)

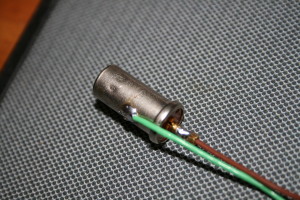
Another "BTW", I revisited my spare ass'y and the thermistor body is tinned, not aluminum.
Should be extremely easy to solder.

Z
Top of pagePrevious messageNext messageBottom of page Link to this message

Oldog
Posted on Monday, March 10, 2014 - 03:00 pm:   Edit Post Delete Post View Post/Check IP Print Post    Move Post (Custodian/Admin Only) Ban Poster IP (Custodian/Admin only)

On reassembling the pump try some STP on the orings to help ease assembly issues,

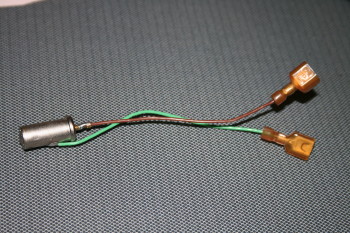
I checked 1313's nib pump the resistor was almost out of spec I would suggest check when wired spec to be sure, also if you purchase the sensor the pump wiring harness has s small female disconnect and the sensor needs a male.
Top of pagePrevious messageNext messageBottom of page Link to this message

Youk
Posted on Sunday, August 24, 2014 - 11:09 am:   Edit Post Delete Post View Post/Check IP Print Post    Move Post (Custodian/Admin Only) Ban Poster IP (Custodian/Admin only)

Guys, I just wanted anyone else attempting this repair to know it is not a difficult job. I waited till I needed a rear tire to do the repair, since the rear wheel is off, it is very easy to remove the swingarm, and get to the pump. I just followed the repair manual. I was able to easily solder the ground wire to the new sensor, I also soldered the wire from the original to the hot side of the sensor because the mating plug on the replacement sensor is a female spade, and the 1125 used a male spade. I used standard electrical solder, and a 33W pencil style iron. I would not do this with a hotter iron, I was concerned about causing damage to the sensor, or igniting fuel residue.

Solder Connections


New sensor ready to install.


(Message edited by Youk on August 24, 2014)
« Previous Next »

Add Your Message Here
Post:
Bold text Italics Underline Create a hyperlink Insert a clipart image

Username: Posting Information:
This is a public posting area. Enter your username and password if you have an account. Otherwise, enter your full name as your username and leave the password blank. Your e-mail address is optional.
Password:
E-mail:
Options: Post as "Anonymous" (Valid reason required. Abusers will be exposed. If unsure, ask.)
Enable HTML code in message
Automatically activate URLs in message
Action:

Topics | Last Day | Tree View | Search | User List | Help/Instructions | Rules | Program Credits Administration