| Author | Message | ||
Yugi |
Crankshaft locking tool is in stock at EBR, $65 http://www.erikbuellracing.com/store/parts-accesso ries/powertrain/crankshaft-locking-tool.html | ||
Yugi |
Updated checklist: From H-D dealer: Stator cover gasket: R0008.1AM GASKET $11.96 From EBR: The rotor: Y0533.1B6 $425 - $250 core deposit = $175 http://www.erikbuellracing.com/store/parts-accessories/powertrain/2009-2010-charging-system-rotor-modification.html Crankshaft locking tool: B-48858-A $65 http://www.erikbuellracing.com/store/parts-accessories/powertrain/crankshaft-locking-tool.html Rotor nut: CD0032.1B6 $17.75 http://www.erikbuellracing.com/store/parts-accesso ries/powertrain/charging-system-rotor-nut.html From Harbor Freight: 300 ft-lb torque wrench $78 http://www.harborfreight.com/3-4-quarter-inch-drive-click-stop-torque-wrench-808.html 32mm socket $4.50 http://www.harborfreight.com/hand-tools/sockets-ratchets/32mm-x-12-drive-deep-wall-socket-67791.html adapter from 3/4" to 1/2" $4.50 http://www.harborfreight.com/hand-tools/sockets-ratchets/3-piece-impact-socket-adapter-set-67936.html Heat gun $30 http://www.harborfreight.com/professional-heat-gun-with-digital-temperature-settings-97114.html From Amazon: Permatex 24026 High Temperature Threadlocker Red, .20 fl. oz. 6 ml Tube $7.79 http://www.amazon.com/Permatex-24026-High-Temperature-Threadlocker/dp/B000HBICQG/ref=sr_1_5?s=automo tive&ie=UTF8&qid=1337369835&sr=1-5 Loctite 648 $11.76 http://www.mrocenter.com/p/2158767?affiliateid=1 (Message edited by yugi on May 18, 2012) | ||
Timebandit |
good to hear about the crank locker, and the smaller tube of threadlocker. if you're interested in cutting down the number of merchants you have to deal with, you can get the gasket from EBR. it's just not in the pick list on their web site. you need to talk to someone there when you order. i'd like to hear how the Harbor Freight tools work out for you. I've read horrible reviews of their torque wrenches being way out of calibration, and my personal experience with their impact sockets was horrible -- they were made out of very soft steel and deformed the first time I used them on my chevy truck, and the torque was limited to 200 Nm. i ended up ruining the 22mm deep socket by the time i had removed/reinstalled 24 lug nuts to rotate my tires, and i had to return the deformed impact sockets as defective. I wasn't at all happy about that because it was a 30-mile drive each way. If you don't have a Harbor Freight nearby, another source for the 32mm deep impact socket is Menards. they carry the "Allen" wrench brand which cost about $12 or $14. It held up just fine to 400 Nm. my preference was to apply heat to the rotor nut using a point source, applying heat directly to the corners of the rotor nut, rather than using a diffuse source like a heat gun. i used a pencil-tipped MAPP gas torch on each corner of the lug nut so I wouldn't heat the rotor or the crankshaft and cause them to expand, which could make the rotor more difficult to remove. excessive heat is very bad for magnetized metals like rotors. if you get them too hot you will impair the magnetic strength. i wanted to be sure that the next guy who got my trade-in rotor was going to get one that would have full output. I've read about H-D requiring quite a few rotors to be replaced under warranty. that's interesting, as over heating a rotor is about the only way you can really damage it while being careful. (Message edited by timebandit on May 18, 2012) | ||
Yugi |
No other store nearby has such kind of socket or torque wrench. I checked at O'Reilly, Pep Boys, AutoZone, Sears and OSH. Harbor Freight is just 3 miles away from me. I use their tools often, and they are fine. (Message edited by yugi on May 18, 2012) | ||
Timebandit |
Yes indeed -- some of these tools, like the 32mm socket and the torque wrench, are hard to find. I was surprised by how poorly outfitted Sears was for the big 6-point sockets & torque wrenches. The auto stores weren't any better. Grainger was close but too expensive. That's why ended up trying HF. Now I just catch the Snap-On truck when it's in my neighborhood on Monday afternoons. I can't bring myself to drive to HF any more -- their prices have increased a LOT in the past year while their tools have stayed the same. | ||
Bartone |
I bought the Pitsburgh PRO 32mm deep impact socket from HF and it worked out fine. Didnt see any deforming when I was applying the 300 lb of torque. I was pretty damn scared that it would snap (Message edited by bartone on May 22, 2012) | ||
Yugi |
I received a modified rotor from EBR, and it includes sprag clutch and sprag clutch housing. Looks like a used modified rotor to me. Should I send them the one including sprag clutch back? | ||
Bartone |
weird.... it shouldn't include that.. at least mine didnt. but might as well send yours back if the one they sent you is in good condition. | ||
Baf |
Mine was just the rotor - weird that you got the whole thing. Does it have a serial # etched in it? I just put mine on. My homemade locking tool didn't work so well - drilled a hole in a bolt but didn't weld it to the rod (I used a jack to hold it in place). I could only get around 200 ft pounds of torque on the nut before the locking tool popped out (the hole in the crankshaft isn't as deep as I thought). Oh well, used a small pinpoint torch to heat the nut, and worked it off slowly with an air impact wrench. I ended up impacting the rotor nut back on as well - not the greatest idea, but it worked out fine. Luckily I had an impact here that was rated for 300 ft pounds in forward, so I used that. I would have bought the tool from EBR, but it came back in stock mere hours after I ordered a new rotor nut and CF shields from them.  My bike was fine on the 08-style rear pitbull for the job (though, as mentioned, I couldn't keep the crankshaft locked to apply the necessary torque via breaker bar). And if you remove the pod cover, the breaker bar doesn't hit anything (at least mine didn't). As far as tools, I used a small torch, the air impact wrench, my makeshift crankshaft locking tool, and a 32mm deepwell impact socket (from napa, held up totally fine). I'm glad I ordered a spare ignition cover gasket, because the one on the bike was very brittle, and broke into 3 pieces just taking the cover off. I used permatex 27200 on the rotor nut, and loctite 271 on the sprag clutch bolts. I had already bought the 271, and couldn't find any 648 locally, so I used what I had. Hopefully I don't need to take those bolts out; though you can heat the threads locally on the back of the sprag clutch without exposing the rotor to too much heat I would think. (Message edited by baf on May 27, 2012) | ||
Yugi |
Baf, There was no serial number on mine. Used Permatex 27200, which I bought from Amazon. 10ml bottle was almost empty, but it had enough to put it on the threads. | ||
Baf |
Ah, so maybe you did get an exchanged one then. You used the whole bottle on the nut? I've got plenty left in my 10ml bottle, I put it on the threads of the crankshaft where the nut threads in, and on the face of the nut. | ||
Yugi |
I think that it evaporated from the bottle, as it was almost empty. | ||
Nikponcherello |
So, I just ordered the stator and nut from EBR and the gasket from the local Hardley dealer. I'm going to attempt this without a manual because I don't have one and I'm cheap. How dumb is this? Or does anyone have one electronically to sell? Or scan the appropriate pages for this thread? Seems like a lot of people would benefit. | ||
Bartone |
well.. Its not that hard and there is probably enough information in this thread or others to find out pretty much what you have to do. - disconnect battery - drain oil (might as well replace oil filter & check oil screen) - remove stock exhaust - disconnect the lower hose from the oil cooler (to make room to remove the stator cover) - remove stator cover (try not to tear the gasket so you can reuse) - if you tear the gasket, remove and replace but make sure you get all of the old gasket off - lock the crank shaft with the tool (see pictures in previous pages to find correct position) - remove rotor nut and throw away - pull rotor out (may need a pulling tool as I did but most didnt) - take off the sprang clutch (forgot the name?) off the back of the old rotor and put on the new (remove old loctite off screws and replace with 648). - put new rotor and making sure you align the missing tooth and the starter gear should slide right in (if not spin it) - apply loctite 272 on crankshaft on where the new rotor nut will go. - torque the rotor nut 250 ftlb and back it out a bit, torque 250 again and back it out, and then torque 295 ftlb. - reassemble this is off the top of my head so i might be a bit off. - | ||
Nikponcherello |
Thanks! | ||
Nikponcherello |
So, I'm still trying to find the diameter of the crank holding tool. Anyone have it? | ||
Bartone |
remember, it needs to be a hardened steel rod. someone was selling the tool for $50 recently. Not sure if it sold already or not | ||
Nikponcherello |
Thanks again Bartone. It seems there are a bunch of people selling them for cheaper than original price but I'd still like to have one made locally. I need the dimension to do it though. | ||
Nikponcherello |
Why would shear modulus would have anything to do with what material should be used? On the topic of make your own. Force divided by are right for stress? Then compare to strength. Why do I care about modulus? | ||
Baf |
Someone posted pictures earlier in this thread. I think it was 3/8", but someone mentioned 1/4". I bought both, and ended up using 1/4, only because that's all the room I had in the bolt I drilled out to protect the case threads. Also, it doesn't sit in the crankshaft very far at all. I was expecting it to sit up in where it could lock well. I would recommend just buying the tool; I posted my experiences with DIY, but I didn't weld the drilled bolt to my locking rod, and I couldn't get the tool to hold the crankshaft for the full amount of torque without jumping off the tool. | ||
Nikponcherello |
Baf, Thank you. I saw the pic but it's with a tape measure and hard to tell exactly. I appreciate the advice on buying the tool. A lot of people have recommended the tool over a crappy DIY cobble job. I hear that. But I have a guy with a machine shop who might make me one just for fun. So i could get one just as good the tool for the price of a six pack. I'm surprised that with all of the people who have them, no one will take the 5 minutes to measure the diameter and post it. | ||
Timebandit |
when putting on the rotor nut, that's two complete revolutions backwards after the initial torque application that's required to activate the loctite. | ||
Nikponcherello |
Anyone? Tool diameter? Please. Bueller, Bueller, Bueller... Get it Buell, and the movie, with the teacher, and the motorcycle, and the.. oh, I'm sorry. Just horrible, I amuse myself anyway... | ||
Timebandit |
Nik, there are people who have talked about tool diameter. I remember seeing the threads where it was mentioned, and where people specified exactly what diameter rods they used in their DIY tools. But I'm not sure if anyone ever posted a pic with a caliper on it (if that's what you're looking for). | ||
Nikponcherello |
I'm not looking for a picture with a caliper. Just the number is fine. There's a picture that I found with a tape measure on it, but I can't tell anything accurate from that pic. I've searched for a couple hours looking for a number and the only thing I found was that 1/4" seems to work but it's probably a little sloppy. I don't really care as much about the DIY diameters that people have guessed at and made work as much as I'd like to know what was the diameter that was engineered to fit properly by EBR on the proper tool. Thanks for the response. | ||
Timebandit |
that's part of the problem with DIY. usually, if you want to create a knock-off of a proprietary design, you have to pony-up the $$$ to buy one copy of the real thing to do it. it's pretty hard to find a set of blueprints for copying someone else's tool. in my case i just bought the tool for $60 or so. i have a next door neighbor with a lathe and i had considered having him knock off a spare for me, but as i did a little homework, i found that once i had sourced all of the proper parts to make a really nice, non-ghetto copy, i'd have enough money in good parts to make it worth the labor expense to just buy another Kent-Moore tool from EBR. the economy of scale for one tool wasn't very good. we had originally thought about making maybe a dozen of copies if the K-M product were to become permanently unavailable, but now that EBR is selling them again, I'd rather not go bootlegging someone else's design. I'm sure there are guys who have lathes and better access to parts than I have, who would find it pretty easy and cost effective to do this sort of thing. maybe your're one of them. I don't think that you'll have a lot of problem with the "sloppy" 1/4" measurement. we know the bike is metric, and 1/4" is darned close to 6mm. if you have doubts regarding tightness of fit, there's no reason to hold out and wait for someone to tell you the answer ... If I were in your shoes and I didn't have a K-M tool to measure, I'd just try fitting different diameter rods into the crankshaft hole to see what works best. i'm thinking you shouldn't have any problem finding the right answer experimentally. good luck. (Message edited by timebandit on June 13, 2012) | ||
Nikponcherello |
Thanks timebandit. I don't have the bike apart yet and the parts are in the mail. I wanted to get the tool started now. Since it's a freebie job it could take a week and also I don't have the means in my garage or even any stock on hand to test fit. Out of curiosity, and I mean no disrespect if you don't want to divulge, but why don't you want to post up the measurement of the tool? Or, would someone be willing to post the measurement of the hole in the crankshaft. | ||
Timebandit |
my tool is out on loan. sorry. | ||
Nikponcherello |
"my tool is out on loan. sorry." You're a good man. I'll just tell him to do it with 0.25 inch and see how that goes if I don't hear different. | ||
Timebandit |
I was looking through photos in my Buell folder, and I thought I'd post this in case it helps anyone. Getting the ignition cover off and on while making sure that you don't let the stator hit the rotor magnet is a lot easier if you use the H-D alignment dowels. I think they're pretty expensive for what they are, in addition to being difficult to source from some H-D dealerships. So I DIY'd a set out of some 80mm M6 hex cap screws that I bought at Menards. Here's what the H-D part looks like:  Here is my DIY-equivalent. I just bought some M6 hex cap screws at Menards, and rounded-off the hex caps on a lathe. I didn't bother to slot them for a screwdriver; I just put them in finger tight. If you don't have a lathe you could accomplish the same thing with hand tools. 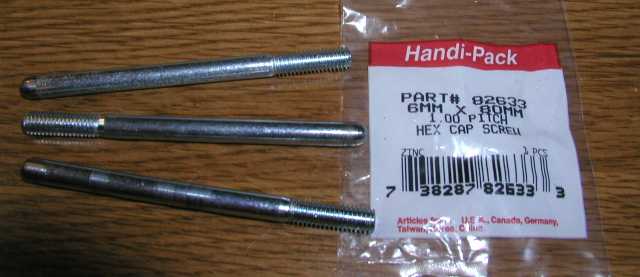 Here is a pic of where you're supposed to locate them. The guide dowels are referenced by the number "2" in the picture. 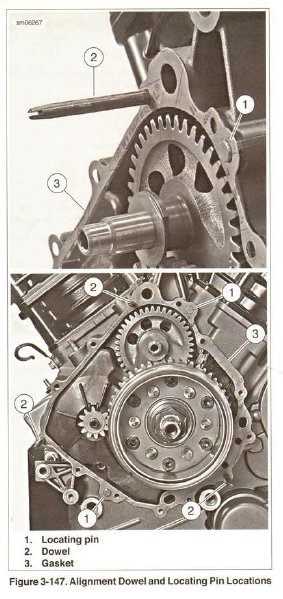 I know this isn't rocket science, but I just though I'd post this info in case it helps anyone. |