| Author |
Message |
    
Reepicheep
| | Posted on Thursday, June 14, 2012 - 06:08 pm: | 


|
We used to do that with the tubers back when they had the paper gaskets on the primary. Right bother to try and line those all up without folding something...
We used dowel rods sharpened in a pencil sharpener. That worked great as well. |
Timebandit
| | Posted on Friday, June 15, 2012 - 07:08 pm: |
|
Nik, the crank locking tool is 19/64 diameter. |
Zac4mac
| | Posted on Saturday, June 16, 2012 - 11:06 pm: |
|
quick conversion says 7.54mm for 19/64"
Z
<edit> added a decimal place.
(Message edited by zac4mac on June 16, 2012) |
Rogue4
| | Posted on Sunday, June 17, 2012 - 01:20 am: |
|
If anyone needs a crankshaft locking tool from EBR, let me know. I have a new spare laying around. |
Nikponcherello
| | Posted on Wednesday, July 04, 2012 - 11:34 pm: |
|
I'm being a post-••••• recently but I just got the job done last night and I want to help any others out there. I'm sure there will be plenty more.
I'll add my notes to Bartone's original list. I�m adding what I think is helpful for not needing the manual and for non-mechanics like me. It took my about 15 hours to complete the whole job, stator and rotor along with doing small maintenance things as I went along (like oil change, cleaning things, etc)
- lift bike to workable height. Doing this job on the floor would suck due to the crank locking location, muffler removal, and oil screen cleaning. Stabilize the bike in some way as there will be significant loads on it during the high torqueing.
- disconnect battery
- drain oil (might as well replace oil filter & check oil screen) CHECKING OIL SCREEN WAS A HUGE TIP!! MY WAS CAKED FULL OF STATOR EPOXY AND CRACKED STATOR PLASTIC!!!!
- remove stock exhaust (should come off easy once you loosen the rearset bracket.)
- (If doing the stator change also) remove entire airbox.
- disconnect the lower hose from the oil cooler (to make room to remove the stator cover) do this by removing the clip, not by unscrewing the 22mm fitting (my mistake)
- remove stator cover (try not to tear the gasket so you can reuse) It comes off kinda hard due to the magnets in the rotor.
- if you tear the gasket, remove and replace but make sure you get all of the old gasket off
- lock the crank shaft with the tool (see pictures in previous pages to find correct position) The tool goes in just in front of the oil screen. Both of which are directly on the bottom of the bike under the exhaust.
- remove rotor nut and throw away. I threw mine away but not sure I would again. It was fine. I heated it with a small propane bottle torch. Came off relatively easily. Loosen the 6 sprag clutch bolts while the rotor is in place on the splines.
- pull rotor out (may need a pulling tool as I did but most didn�t)
- take off the sprang clutch (forgot the name?) off the back of the old rotor and put on the new (remove old loctite off screws and replace with 648).
- put new rotor on and make sure you align the missing tooth and the starter gear should slide right in (if not spin it)
- apply loctite 272 on crankshaft on where the new rotor nut will go.
- torque the rotor nut 250 ft-lb and back it out a 2 turns, torque 250 again and back it out, and then torque 295 ftlb.
- If you�re doing the stator also:
- Disassemble the old stator connector.
- Attach (tape) a fish wire to the stator wires.
- Grease it and pull it through.
- Remove the 3 bolts holding the stator on and the 2 screws holding the stator wire guard in place.
- Pull stator out. Mine pulled very hard due to the wires being glued to the cover.
- Replace with new stator. I used blue Loctite on all bolts/screws and high temp permatex on the stator wire grommet.
- Pull wires back through using the fish wire. Grease it again. Cuss Harley Davidson for being a bunch of DBs at this step.
- reassemble everything.
I didn�t do anything special to keep the gasket in place. I was just aware of it, coaxed it into place and was aware that the magnets would pull everything together so I was very careful to ensure I didn�t brinell any bearings.
If I haven't already mentioned. I hate HD. This Buell was supposed to be my transition from Jap bikes into an HD cruizer. NEVER will I buy an HD, Ever. |
Baf
| | Posted on Wednesday, July 04, 2012 - 11:40 pm: |
|
As far as the rotor nut, I spoke with EBR on it, and they told me that while they advise replacing it, in reality, it's fine for reuse a couple of times, unless it has loosened up on its own. |
Dannybuell
| | Posted on Thursday, July 05, 2012 - 10:57 am: |
|
Nikponcherello ~ My S1 has so much low end grunt, it is perfect for urban riding.
HD riding in a pack is fun because the bikes have roughly the same torque characteristics.
My 1125 is happiest buzzing around on country roads. |
Parrick
| | Posted on Wednesday, August 08, 2012 - 10:02 am: |
|
Nikponcherello,
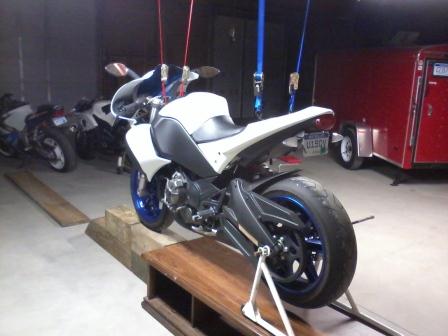
Love the coffee table bike lift! Reminds me of my college days!
Good tip on loosening the sprag clutch bolts while the rotor is in place! If you try to put the rotor in a vise to loosen these bolts you run the risk of messing up the raised lobes on the perimeter of the rotor. If those lobes get dinged up or rounded it will mess up the signal that the crank position sensor sends to the ECU. |
Parrick
| | Posted on Wednesday, August 08, 2012 - 11:40 am: |
|
Observations, Comments & Additions:
1) I was able to get the rotor nut off without applying heat. I used a good sized breaker bar but it didn't take too much effort. I also reused the same nut. It was fine. I used a pick to clean all the old threadlocker out of the threads.
2) The stator cover gasket is available from EBR on the website. For some reason they don't list it on the 1125 parts list and the website has it labeled as an 1190RS part. This is what I used and I could not see any difference between this one & the original.
http://www.erikbuellracing.com/store/parts-accesso ries/powertrain/stator-cover-gasket.html
3) I used Loctite 680 on all the threads. I couldn't find 648 locally but a local supplier (Edco Tools, Columbus, OH) had a good supply of 680 in small .02 fl.oz. bottles. It took 3 of these bottles for the whole job. 680 has a higher shear strength & viscosity & better gap fill but 300 degree max temp vs 350 for the 648. The specs are pretty close between the two but I actually think the 680 might be a better option for this application due to the gap fill & viscosity. 648 is generally specified for close-fitting parts like a press fit. I don't consider threaded parts to be particularly close-fitting. Just my opinion. I cant figure out why Buell recommends a retaining compound for threaded parts rather than a regular threadlocker anyway.
4) I would add a couple of things to the buy list. First an 8mm x 1.25 tap for cleaning out the sprag clutch threads.
Second, a dab of gasket maker for the back of the rubber grommet where the stator wires exit the stator cover. My manual specifies a HD "grey" sealant for this application. I went to 3 dealers to find some of the HD stuff & when I did it was old and doughy. They obviously never use it in their shop. I used Permatex (NAPA) Ultra Copper High Temp RTV Silicone Gasket Maker.
5) BUY THE CRANKSHAFT LOCKING TOOL!!!!
Do you really want to risk having to split your engine to retrieve the sheared-off tip of a screwdriver or other makeshift tool? After cranking on that huge torque wrench to hit the 300 ft/lb spec I wouldn't even consider using anything else.
Yugi,
Why is the Permatex red threadlocker on the buy list? Is that just an option for those that can't find the 648? |
Yugi
| | Posted on Thursday, August 09, 2012 - 01:19 pm: |
|
quote:Yugi,
Why is the Permatex red threadlocker on the buy list? Is that just an option for those that can't find the 648?
Permatex high temperature is for the rotor nut. It's rated to 38mm and to 450F.
(Message edited by yugi on August 09, 2012) |
Parrick
| | Posted on Friday, August 10, 2012 - 07:20 am: |
|
Ah, I see now. Somehow I missed the whole first page of the thread. |
|