| Author | Message | ||
Rogue_biker |
I finally got to checking my valves myself at 24k miles. However, I am unsure whether to replace the shims now or not. One of the exhaust valves is right at the minimum measurement of .279mm/.011in. The other exhaust valve is at .254mm/.010in. The minimum is .27mm/.01inch and maximum is .34mm for the exhaust valves. Replace shim now or wait until the next inspection at 36k miles? This is my first time doing this so I have no previous experience to go on. | ||
Dnlink |
You already did the hard part, your in there. Replacing the shims is a piece of cake and they are like $3 a piece. I would do it. | ||
Dennis_c |
V Rod shims are the same part # as Buell. Put a rag around the valve springs don't ask me how I know to do that. | ||
Pmjolly |
I am literally about to walk out to my garage and check my valves after I post this. I already have my bike apart. Are people aiming for the middle of the range when setting the valve clearance, or are they going for a larger gap to increase the safety margin when they wear? I was thinking I should aim for dead center of the range in case I am off a little with my measurements. | ||
Mhpalin |
I have been doing this for 20 years and I always try for the middle and always change them when they are at min spec. Mike | ||
Zac4mac |
Bingo Mike I checked mine at 12-13k, tight in-spec. 25k most were outside tight so I replaced 6 and shuffled 2 to get all mid-loose in-spec. I assume they will all wear in tight as mine did. Zack | ||
Rogue_biker |
Okay it looks like I have to replace 7 out of 8 valves then. I just checked the front cylinder and all were at minimum. Thanks all. | ||
Phlegm |
All of mine were in spec, but on the tight side. I went with replacing them all, so that next inspection I possibly won't have to replace any. Also the shims are cheap, so might as well do all 8. | ||
Rogue_biker |
Follow up question: So from my findings, I want to go up to the middle spec. For example, if the lash is .25mm and I want to go to .30mm, then I need to get shims that are .05mm? Logic being .25mm+.05mm=.3mm. Is this correct? Sorry for the dumb questions. Thanks all. | ||
Two_seasons |
After all is buttoned up, make sure you change oil, filter, and pull the screen in the sump too to check for debris. | ||
Mhpalin |
You would have to get a shim .05 smaller then the one you have. Mike | ||
Pmjolly |
Yup, you have to take each shim out, carefully noting which valve it went to, and measure it to know what size you need to replace it with. You will need a micrometer. You can get one fairly cheap at most tool stores. The valve clearance gets tighter as everything wears. The shims are basically filling in a gap between the valve stem and the follower. To increase the valve clearance, you need thinner shims. My shims are all going to have to be replaced. I have 12,000 miles. Two of the valves are out of spec tight, and the rest are right at the limit of spec on the tight end. I'm headed back out to measure my shims. I hope I don't pull a Zack! I don't feel like performing a search inside my engine for a shim that went down a hole. | ||
Rogue_biker |
Thanks. Yes I just answered my own question and figured I have to remove each shim, which is why Buell provides the Valve Lash Calculation worksheet. Thanks all. | ||
Pmjolly |
Well, I have all the shims out, and measured. I can now go pick up the shims I need on Monday when the Harley dealer opens. It was a bit tricky getting the rear valve cover out, but not too bad. The trick will be putting it back in with the gasket in place. It wants to come out of the grooves in the valve cover. All in all, this has been a time consuming, but easy project. | ||
Rogue_biker |
Okay. What is the trick to remove the those plastic follower spacers? I can rotate them up but the Service Manual shows a picture of a screw driver on it but nothing else. WTF am I doing wrong? I'm trying to pry the plastic spacers out but they won't come off! What's the secret? I am getting overly frustrated with this, seemingly simple job that is just a PITA time consuming act. I'm beginning to believe the only way to save time and make the job easier is to lift the freakin' frame out as everything seems to be in the way when trying to work on the valves with the frame on top and the front wheel on, etc.! | ||
Zac4mac |
They snap in/out, shaped like a "C" and clip to the shaft they slide on. They are plastic, I haven't broken any yet and I've been in there twice. | ||
Zac4mac |
 Oops they don't slide, the followers do. You can see the shaft and the followers, the spacer is removed. | ||
Mhpalin |
Yea they are a pain but it"s way better then having to take the cams out like on my v-strom Mike | ||
Pmjolly |
Yup, those were a pain on the front cylinder working blind on the intake valves, with the frame blocking my view. You have to spin them so that the open end of the part clamped around the little shaft is facing sideways, towards the cams. You then pry with a screwdriver between the nearest cam and one end of the plastic spacer, while holding the opposite end of the plastic spacer in place. It's tight, but will pop off. First, do one you can see. I had to find a shorter screwdriver to get the one under the frame. Be VERY careful taking out the shims. Don't drop them down a hole in the engine. You'll be tearing into the engine if you do. Not fun. I used one of those little magnets on the end of a rod. I was still VERY cautious while taking them out. | ||
Redcrrider |
The trick is to pry up on one side of the spacer. | ||
Dnlink |
getting the rear valve cover back on with the gasket in place is tricky. I cleaned mine really well and used little bit of gasket cement. Kind of looks like rubber cement. Let it dry awhile and carefully put the valve cover back in place. For me it was the most aggervating part of the job. | ||
Rogue_biker |
Sorry guys. It was dark, the Service manual had a picture with few words, I was tired... Thanks PmJolly. Your description made it clear to me and I got the spacers out fairly easily. I got all the shims out, measured, calculated, and now just have to head to the nearest Buell dealer to buy new shims. 7 out of 8 valves needed adjustment. Those shims were incredibly small and very slippery! Holy smokes! I can see it dropping down into the cam drive well as a nightmare! I will have to do this next weekend and finish the job then. I swear that my next bike will have screw and locknut adjusters, or at least have the cylinders easier to access. I almost bought a Firebolt last night as I was so frustrated! | ||
Two_seasons |
When you go to remove/install the shims, put a dab of grease on your finger/whatever tool you might be using and also on the shim. Obviously, you'll have to dry off the shim currently in the engine as best you can. If you have shop rags, stuff them in every nook and cranny to avoid this...  | ||
Zac4mac |
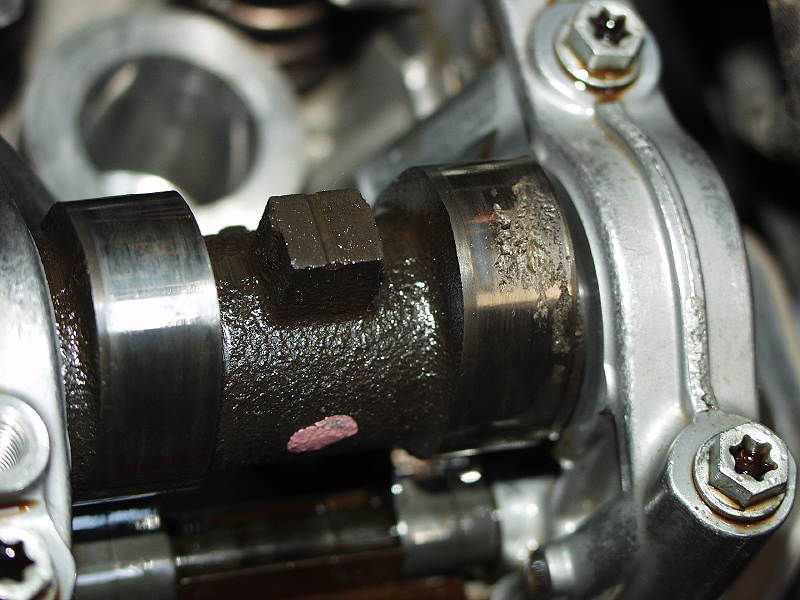
The good side is, if you DO drop a shim, you don't have to split the motor. Each side has a large cover over the cam drive chain/gears/etc. It would still be a lot of stuff to remove. I found my wayward shim with some arthroscopic viewing tools and magnets on rods. Here is where my shim was, cover removed on a customer bike at the dealership I worked at.  Here's the tools I used 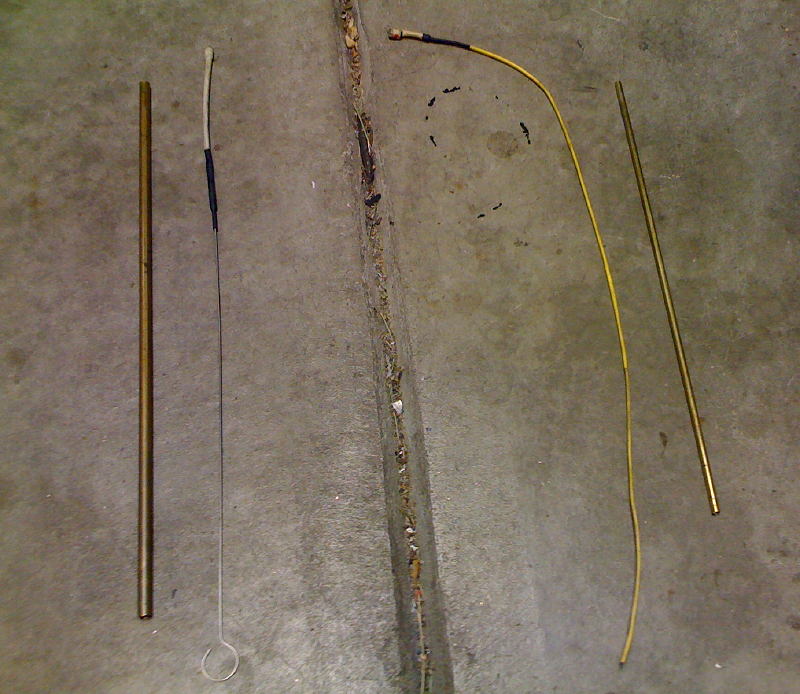 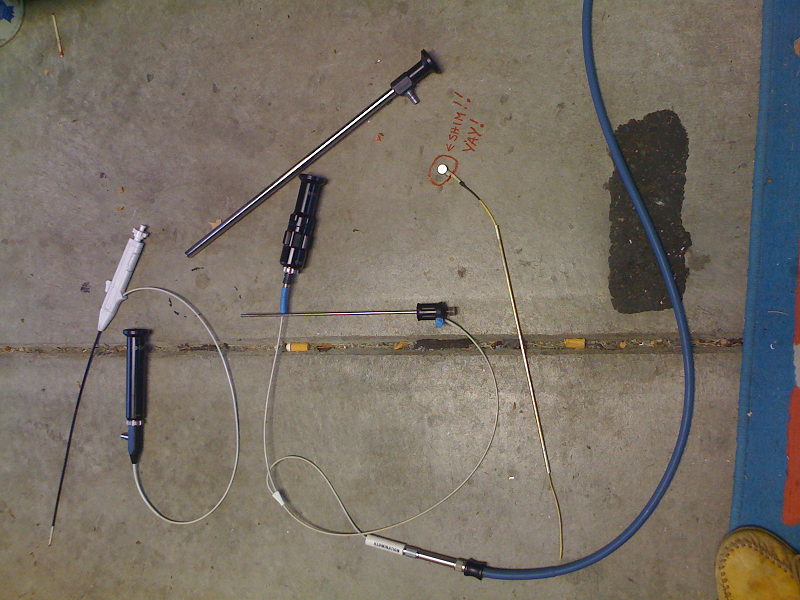 Stuff rags in all the holes.... Zack | ||
Rogue_biker |
Zack, thanks for the warning. Yes I did read about your shim-adventure and it put a great deal of worry in my movements as I removed and replaced the shims back (I put them back for now) I will use the rag-in-the-holes precaution when I replace those shims next week. I feel much better now (I was stressing last night) having this experience under my belt. The act of checking valve lash and replacing the shims is easy. Getting to that point was a royal PITA. I'm glad I did this myself. Now it makes me wonder...considering the amount of work and time this takes, I'm thinking lots of bikes (whatever brand) never gets their valves checked and shims properly replaced. Owner will never know right? | ||
Redcrrider |
Buy a telescoping magnet tool at your local auto parts store. They are only a few dollars and will pull that shim out without worry of dropping it. You could still drop it when putting it back, but it's much less likely. | ||
Zac4mac |
The magnet tool I show above on the left, has a magnet on a stick that slides inside a brass tube. I used it to install the shims. Hold the shim with the magnet at the end of the tube, when it's in place, hold the tube and pull the magnet back. Shim drops right in. Z | ||
Redcrrider |
I used a magnet tool that is basically a very strong magnet on the end of a telescoping antenna, you know the type they used to use on old walkie talkies. It snatches the shim out with a quickness. Very similar to this one, which is probably overkill for such a tiny shim. http://www.amazon.com/SE-Black-Telescopic-Magnet-P ick-up/dp/B002W24B04/ref=pd_cp_hi_3 | ||
Zac4mac |
I have a fridge covered with Neodymium/Samarium - Cobalt magnets, whole bunch of different size/shapes. Highest density permanent magnets there are... That's what I used to make my tools. The one for installing puts the target exactly where you want it and leaves it exactly where you want it. The pick-up tool is on a piece of spring steel bent in a curve. Its tube makes it straight out if pulled in and curves around corners when slid out. All parts you can find at a hobby shop - brass tubing, heat shrink and magnets, not sure of the spring steel... Zack | ||
Rogue_biker |
I seem to remember someone in here mentioning the shims for the 1125R is the same as for the V-Rod. Is this true? If so, I can go to any H-D dealer and tell them I have an "08 V-Rod" and I need these size shims? |