| Author | Message | ||
Bitbear |
Okay, let's say you waste your bottom end. How expensive would it be to have the dealer rebuild -- is it a huge repair? I like to work on my bikes but I'd probably leave that job to the dealer; some of my service is done at St. Paul Harley-Davidson. Also, is there some way to upgrade he crank and bearings so they can handle more pounding? | ||
Bitbear |
By the way... Watching the new tach carefully and running it up just over 6000 rpm, I can now say unequivocally that the needle is rock solid, no bouncing. | ||
Jmynes |
The long awaited pic of the Dakota Digital Tach. 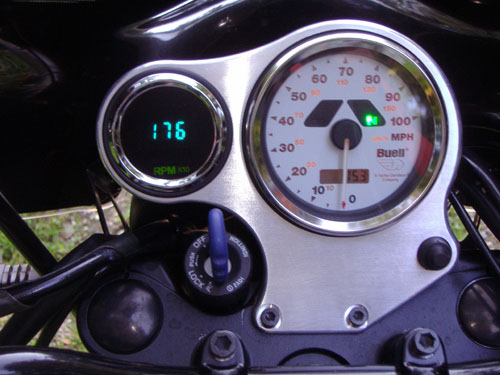 | ||
Gearheaderiko |
Splitting the cases can be costly since the transmission comes apart with the cases. I think EZ has had it done. You can upgrade the crank bearings to the 2003 year, but otherwise they are XB bearings. So since they are already twin bearings, they should last forever! One reason the Blast is so hop-up friendly, its already got a good bottom end and any additional mods would be based on the twin stuff. | ||
Bitbear |
Jim, I think it looks good. Although not classic analog, it looks just fine. I'm guessing the mental calculus involved in reading is the greatest disadvantage. By the way, The J&P online catalog has changed descriptions and pages for the tach I bought. But I have found it again and it is J & P part no. 560-080 For single fire, White. Here's the catalog description: "48mm Mini Speedo's and Tachs Many bike builders put in a lot of effort to give their bike a unique and personal appearance. Many times they are limited in their choice of precision built speedos and tachs. These mini gauges have a diameter as little as 48mm with a tip ring of 52mm...Does not require the use of single fire tach adapters" | ||
Mmelvis |
Jmynes that looks like a very nice setup | ||
Jmynes |
Aw, shucks. You guys are just too nice. I still like the looks of Bitbear's better. | ||
Gearheaderiko |
For those interested, a couple of the 2 and 1 gauge dashes are on e-bay right now! | ||
Xgecko |
great start a bidding war  | ||
Xgecko |
Dash arrived on Saturday and the Tach yesterday...I had a feeling it would arrive yesterday so I brought heatshrink and wire home from work. First order of business was to remove everything so I could work (my wife thought it was overkill)getting it all apart was a PITA but after that it all went pretty smoothly. I took my tach input off the coil as was mentioned here. Finding a place for the lighting was annoying but I finally just spliced into the headlight which was much easier than I was expecting. By the time I was finished it was late so all I had time to do was start it up and make sure it all worked. This morning I rode into work checking my tach often but finding that my RPM's stayed between 3-4K for most of my riding. I figured this but it's nice to see it confirmed. I love the look and just having a Tach (finally). Now I just need to decide on a new headlight/fairing (thinking Acerbis Cyclops but I haven't decided...yet) I need to thank Bitbear for finding this tach and Gearheaderiko for the wiring help. | ||
Bitbear |
Congratulations! Can you put photos up? BTW -- How did you secure the tach to the dash? Friction hold to the supplied dash gasket? Wrap the tach a bit to bring the diameter up a tad? | ||
Xgecko |
I used some tubing with a zip tie through it snugged up to the plate on the backside...I'll post photos when the rain stops | ||
Jonbrown2989 |
hey is there a place where you can buy dashes for the blast w/ a tach hole precut into it? or is there anyone who would want to maybe for a price? if so please PM me thanks JonBrown | ||
Mabueller |
Do an eBay search for Blast dash. There is a person who sells them. | ||
Mabueller |
See the picture of the dash sold on eBay a 11 posts above your question. | ||
Ezblast |
Quote on another Forum : - was told by Scott from Revolution Performance that the Twin Tech Ignition will work on my bike, and that its rpm limit is adjustable, and it also has adjustable curves. we'll see. My note and question: Well - if you put an extra hole about just over 180 degrees in the timing cup you could run it in twin mode and then use a twin tach - which are much easier and cheaper to find - think you could find a stock number on that tach - that is useful info! GT - JBOTDS! EZ  | ||
Buellistic |
Ezblast: The part number for the TACH. on my 97S3T is 67329-94Y(early 1997) ... The later 1997 Tach. is 67329--97Y ... You will find that they are Sporster TACH's. with a BUELL face plate and BUELL part number ... In BLASTing LaFayette (Message edited by buellistic on July 04, 2007) | ||
Gearheaderiko |
You can use a twin timing cup 32402-83($6). If you just cut the hole 180 out you'll probably spark at valve overlap, so the easiest way would be a stock twin cup. There are 'kits' that are sold for people who convert their twins to single fire ignition so the tach will still work. | ||
Jimrich |
Installing a Tachometer on a Blast  Note: These instructions were gathered from the good folks at Westach and several posts here in on BadWeb, thanks to everyone. This is very easy installation, and will get you a good looking tachometer setup. Please know these instructions are for informational purposes only, I am not a trained mechanic, electrician, or professional of any sort. There are a million ways to tackle this task; this is the one I choose. I am not responsible for any use or misuse of this information. Following these instructions can cause serious injury or death  . You should have a Blast Service Manual for your model year, and if you do, you saw the humor in that last statement. Things change with time so if my instructions stray from what Westach or your service manual says STOP and ask questions before you get in a jam. This assumes you have a stock Blast with the standard ignition module, if you have a custom or the SE module you may want to use a different method. . You should have a Blast Service Manual for your model year, and if you do, you saw the humor in that last statement. Things change with time so if my instructions stray from what Westach or your service manual says STOP and ask questions before you get in a jam. This assumes you have a stock Blast with the standard ignition module, if you have a custom or the SE module you may want to use a different method. Shopping List: Note: When ordering your tachometer please be sure to tell them how to paint your needle, also ask that they do not install the mounting screws in the back of the tach, they are too long for the cup and I had to cut mine off. ** Tachometer: Westach - 2CTAU8-2Z-NCW, Light Kit 186, $214.48 (inc shipping) ** Mounting Kit: PartsAmerica.com – AUM2204 $32.83 (inc shipping) ** 20 Gauge Single Conductor Wire about 3’ of Green, 3’ of Red, and 3’ of Black ** Soldering Gun & Solder ** Wire Stripper ** 20 Gauge Wire Clamps (the red ones) ** Black electrical Tape ** Small Black wire ties ** A drill press or a drill with a really steady hand ** 1/8” drill bit ** Vice grips ** Bolt Cutter or Grinder The Tachometer:  1) Unpack all your stuff. The Tachometer comes with a wiring kit, a light bulb, some white tubes, and colored light bulb covers. The mounting kit should have the cup, a rubber grommet, a variety of screws, and a mounting bracket. 2) Warm up your soldering gun. 3) The wiring harness has a green, red, and black wire with bullet connectors with plastic shields at one end and stripped wire at the other. Let first install the light kit. Start by taking the large “A” tube, breaking it from the thin mold strip. Next slide the light bulb down the tube from top to bottom, firmly but carefully push the light bulb into place. The instructions ask to place an adhesive on the bulb to keep it in place. IMOH bulbs blow, let’s not make this permanent. Tie a knot with the two black wires; that will keep the bulb in and allow you to change it if necessary.  4) Next following the light kit instructions remove the black stopper from the bulb channel and carefully push the bulb and tube into the channel. 5) Remove the clear plastic shield from the bullet connectors, and solder one black wire from the light to the red wire bullet clamp, and the other to the black bullet clamp wire (be sure no to get any solder inside the bullet clamp itself) Once the solder cools replace the clear plastic shield.  6) Using the green wire for your signal (#2 in the Westach instructions), black for your ground (#5), and red for your 12VDC (#4) place all wires onto your tachometer.  The Bike Wiring: There are 3 wire connections that the Tachometer needs, all three can be found just off the coil, all in one place. But, IMHO the tachometer functions more normally if you use a light power source instead of the coil. The coil power will only come on when the kill switch is off, this means once you turn your engine off the tachometer looses power. When it does it stays at whatever the last RPM’s were. Using a light source, the tachometer is at 0 when you kill your engine, and looses power when you turn your key. I choose not to use the accessory because it is on a 7.5 amp fuse; I figured to avoid blowing fuses use a 15 amp source. 1) Remove your bikes seat, and remove the negative cable from your battery. DON’T FORGET THIS STEP! 2) Follow your service manual instructions on how to remove the gas tank, and air filter port cover 3) Follow your service manual instructions on how to remove the dashboard/speedometer and how to remove your speedometer from the dashboard 4) Follow your service manual instructions on how to remove your wind screen. 5) Locate the coil/ignition socket connector along the frame of your bike on the clutch side of your bike  6) Be sure to check your manuals ignition wiring diagram to insure the wire colors have not changed. From here you are going to tap 2 wires. For my 05 it was the Pink (Signal), and the Black (Ground). With the soldering gun burn threw the pink and black wire shielding about 1/8 of an inch. With a small nail or the probes on your volt meter separate the exposed wires to form a hole. 7) Doing the Pink first take the 3’ of green 20 gauge wire and strip about a half inch. Loop the exposed wire threw the hole, twist and solder together. Using the black tape rap the exposed wire area. 8) Do the same for the Black wire using the 3’ of black wire. 9) Run the two wires through the existing black wire ties on the frame up through to the instrument panel.  (Ignore red wire, I tapped my coil 12VDC for a future project for a GPS!) 10) For the power we will use the light power wire which can be easily tapped from the left hand control wires. Follow the control wire to the connector and disconnect. Pull the rubber shielding back to expose the wires within. Take the blue wire WARNING: the 05 service manual states this wire is brown. Using the pin out number instead of the color cords, as well as testing with a volt meter proved it wrong, it is in fact blue. If there is any doubt volt meter test , and follow the same procedure above to expose a small amount of wire, split and solder (Red wire this time), finish with a wrap in black tape, run the new red wire through the rubber shielding and push rubber shielding back into place.  11) Re-attach control cable run new red wire with the green and black wires from the coil connection. 12) Replace your gas tank The Dashboard Modification : 1) You should have already followed your service manual instructions on how to remove the dashboard/speedometer and how to remove your speedometer from the dashboard. Your dashboard should look like this (Do not drill holes yet!):  2) The parts we will be using from the mounting cup are labeled below:  3) Using a pair of vice grips take out the bends that are at each of the ends clamp. Then bend each end as close to the screw hole as possible flat so they will fit on your dashboard. Make sure the cup still fits into the clamp; trial fit the clamp, cup and tachometer against your dashboard bend if necessary. 4) Using a marker place a dot on the bottom half of your dashboard, then drill a 1/8” hole. Try to get the first hole as far down the dash as possible to avoid clutch cable space issues. (DO NOT DRILL BOTH HOLES UNTIL YOU HAVE THE FIRST ONE DRILLED AND TRIAL FITTED!) 5) Using one of the screws in the picture above screw the clamp to your dashboard. Trial fit your tachometer the key is to get a tight fit, with the cup and tachometer in place mark for your last hole, then drill. 6) The two screws that come with the mounting kit are going to have to be cut by about 1/8” to avoid scratching the speedometer when everything is reassembled. I used a pair of bolt cutters.  7) Before permanently assembling wrap a single pass of electrical tape around both the tachometer and the cup.  8) Reassemble the dashboard with new tachometer. Keep the top screw loose to make final adjustments once you get your dash installed on your bike  Final Install: 1) Replace the dashboard assembly on your bike, 2) Cut the excess wiring, and with the wire clamps clamp the tachometer wires to your source wires, then tape everything up.  3) Make the final adjustments to your tachometer and tighten the top screw. 4) Replace your windscreen, and your negative cable on your battery. 5) Turn you key, the tachometer should light up and go to zero. 6) Fire up your bike. You will notice a small delay, they it should report your RPM’s Congrats! Thanks to everyone who posted on this subject and let me know if there is anything I missed, I would like to keep good accurate instructions up to date. Note: In closing I would like to have done a couple of things differently. 1) make the tachometer more removable with a wiring harness, 2) had Westach color the red line for me, 3) had Westach add a stop post at zero, 4) had Westach not install the mounting screws, 5) Run from system power source with dedicated in-line fuse, 6) get a longer clutch cable. (Message edited by jimrich on September 16, 2007) | ||
Ezblast |
 | ||
Totolandman |
Jimrich, Thanks a million for this detailed set of instructions. I have a 05 P3 Blast and will be installing a J&P cycles tach. I was fortunate to get a billet dash from a member of this forum so that will simplify the mounting for me. The wiring instructions will help me out tremendously! Regards, totolandman | ||
Bitbear |
Toto: I think you'll find it is easier than you might think. The advantage of the J&P tach is that there is no delay and readings are rock solid. Someone noted, I think, that they had received a bad one which surprised me; they are made in Germany and mine has worked perfectly since the day I installed it last summer. Good luck! | ||
Gearheaderiko |
Really nice write up and pics Jimrich. | ||
Totolandman |
Hey anyone out there that can help it would be greatly appreciated. I have the Screaming Eagle ignition installed at the same time the J&P cycles single fire tach was installed and the shop called today and said the ignition was working fine but the tach was not working at all! Is the wiring of the tach different when having the SE ignition vs. the stock ignition? Anyone that can help with this issue it would be greatly appreciated. I hate having the billet dash and the tach mounted and for it not to be functioning. Regards, Robert aka totolandman | ||
Gearheaderiko |
Wiring is almost the same except the trigger is off the brown wire coming from the SE module. The brown wire is used exclusively for a tach. Hopefully they read the SE instructions and didnt just swap pins in the Deutsch connector. | ||
Xgecko |
Dashboards are up for sale on Ebay again. I'm not affiliated with him but this is the same guy I got mine from | ||
Imadreadhead |
yup i already bought one | ||
Berkshire |
"Is there any way to use a tach off one of the newer tube frame buells such as a M2? Or does the 2 cylinders thing not make it possible?" Seems like a tach from a twin could be made to work by adding an extra notch to the timing cup and setting your SE ignition module to "twin" mode (or using an OEM twin module). If the extra notch were 180 deg. opposite from the stock notch, then the "wasted" spark would occur toward the end of the exhaust stroke, before the intake valve starts to open. For early intake-opening cams, maybe advance the extra spark just a little more, or use a tuber timing cup? This would also apply to ANY 12 volt tach that works with a twin, but specifically I've noticed that the X1's have nice looking gauges, and the speedo looks like it *might* be technologically compatible with the Blast ...nah - I bet the 16" wheels & 80-tooth sprocket make speedo swaps impossible, unless a black box (like the '00 recall box) is used. hmmm... I wonder if the recall box can be reprogrammed?? (Message edited by Berkshire on March 04, 2008) | ||
Ezblast |
Concur with 9/10ths of above - it has been done. EZ | ||
Imadreadhead |
So i bought this tach off of ebay http://cgi.ebay.com/ebaymotors/Custom-Motorcycle-M ini-Tachometer-Harley-Davidson-Tach_W0QQcmdZViewIt emQQcategoryZ50461QQihZ020QQitemZ300207131008QQrdZ 1QQsspagenameZWDVW Got it all pretty and installed and went for a test ride and it will not go over 3,000rpm it acts like 3,000rpm is redline... is this because it isnt working with a single fire ignition even tho it says for single fire ignitions Do you think if i bought this single fire tach adapter it would work? http://cgi.ebay.com/ebaymotors/Electronic-Ignition -Single-Fire-Tach-Adapter-motorcycle_W0QQcmdZViewI temQQ_trksidZp1638Q2em118Q2el1247QQcategoryZ35594Q QihZ009QQitemZ190159663713QQrdZ1QQsspagenameZWD1V or should i just suck it up and buy a J & P tach |