G oog le BadWeB | Login/out | Topics | Search | Custodians | Register | Edit Profile

Buell Forum » Big, Bad & Dirty (Buell XB12X Ulysses Adventure Board) » Archive through June 25, 2014 » Exhaust valve actuator « Previous Next »

Author Message
Top of pagePrevious messageNext messageBottom of page Link to this message

Electraglider_1997
Posted on Wednesday, June 11, 2014 - 10:36 am:   Edit Post Delete Post View Post/Check IP Print Post    Move Post (Custodian/Admin Only) Ban Poster IP (Custodian/Admin only)

I actually was able to fix a ruined exhaust valve actuator, the motorized device that sits above the air cleaner. Fortunately we have both a 2006 Uly and a 2007 Uly so I had a normally functioning valve actuator to compare to the bad one. I took them both apart and found the bad unit to have worn off the plastic nib that holds the coiled spring mechanism in it's pre-loaded position.
To fix it I just pre-loaded the coil springed part into the position it is supposed to be in and screwed a very small half inch long screw into the plastic piece so the head of the screw now replaces the worn off plastic nib. The screw head holds the plastic piece in its pre-loaded position. Then reinstalled and find it works perfectly. It is no wonder that this mechanism was upgraded in later models.
This mechanism costs $193 to replace so my little fix saved me a bundle.
If any of you have any interest in this fix then just say so and I'll take photos and post here.
Top of pagePrevious messageNext messageBottom of page Link to this message

Buewulf
Posted on Wednesday, June 11, 2014 - 11:14 am:   Edit Post Delete Post View Post/Check IP Print Post    Move Post (Custodian/Admin Only) Ban Poster IP (Custodian/Admin only)

Of course you should post photos! Good job on the fix.
Top of pagePrevious messageNext messageBottom of page Link to this message

Rayycc1
Posted on Wednesday, June 11, 2014 - 09:22 pm:   Edit Post Delete Post View Post/Check IP Print Post    Move Post (Custodian/Admin Only) Ban Poster IP (Custodian/Admin only)

I would like pics as well ...Nice fix
Top of pagePrevious messageNext messageBottom of page Link to this message

Electraglider_1997
Posted on Sunday, June 15, 2014 - 02:33 pm:   Edit Post Delete Post View Post/Check IP Print Post    Move Post (Custodian/Admin Only) Ban Poster IP (Custodian/Admin only)

Finally got some photo's of my particular fix for what ailed my servo.

Remove 3 larger screws with T20 torx driver.
Then flip unit over and remove the 7 small torx screws with a T15 torx driver.


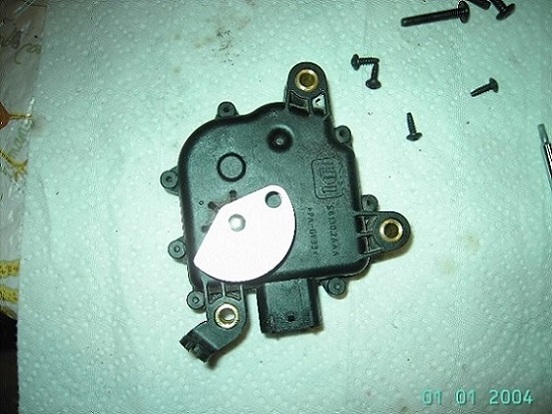
The coiled spring device located above the circuit board to the right of the motor has to be preloaded with tension and should be held in place by 1/2 gear as shown. The black circular plastic part over the metal coiled spring has a plastic piece that catches on the 1/2 gear and that is what holds the preloaded tension of the coiled spring. Mine wouldn't hold so I preloaded the coil spring and then screwed a 1/2" brass screw into the black plastic piece to hold against the 1/2 gear. You can see the brass screw in the bottom 2 photo's. The top photo shows the attitude the eccentric cable ramp should be in with the proper preloaded coil spring. The preload is on the coil spring is only about a 1/4 turn of the spring. The screw was positioned right where the worn off piece was on the black plastic circular part. Works like new.


(Message edited by electraglider_1997 on June 15, 2014)
Top of pagePrevious messageNext messageBottom of page Link to this message

Griffmeister
Posted on Sunday, June 15, 2014 - 11:13 pm:   Edit Post Delete Post View Post/Check IP Print Post    Move Post (Custodian/Admin Only) Ban Poster IP (Custodian/Admin only)

Whoa, back to the future. You were able to fix your '06 Uly on New Years day 2004?
Top of pagePrevious messageNext messageBottom of page Link to this message

Electraglider_1997
Posted on Monday, June 16, 2014 - 09:13 am:   Edit Post Delete Post View Post/Check IP Print Post    Move Post (Custodian/Admin Only) Ban Poster IP (Custodian/Admin only)

Every time the battery conks out on that camera, which is quite often, the time stamp resets to the manufacturing date of the camera. I can reset it but have given up on that.
Top of pagePrevious messageNext messageBottom of page Link to this message

Buewulf
Posted on Tuesday, June 17, 2014 - 05:19 pm:   Edit Post Delete Post View Post/Check IP Print Post    Move Post (Custodian/Admin Only) Ban Poster IP (Custodian/Admin only)

Thanks for taking the time to post EG.
Top of pagePrevious messageNext messageBottom of page Link to this message

Marcola
Posted on Saturday, July 28, 2018 - 06:59 pm:   Edit Post Delete Post View Post/Check IP Print Post    Move Post (Custodian/Admin Only) Ban Poster IP (Custodian/Admin only)

Very nice, I have used you system to repair my Actuator. It Works! Thanks
« Previous Next »

Add Your Message Here
Post:
Bold text Italics Underline Create a hyperlink Insert a clipart image

Username: Posting Information:
This is a private posting area. Only registered users and custodians may post messages here.
Password:
Options: Post as "Anonymous" (Valid reason required. Abusers will be exposed. If unsure, ask.)
Enable HTML code in message
Automatically activate URLs in message
Action:

Topics | Last Day | Tree View | Search | User List | Help/Instructions | Rules | Program Credits Administration