| Author | Message | ||
Trevd |
Pretty sure I know the answer to this, but want to make sure before I put it all together... The little springs that were part of the old mounting kit are no longer needed right? Thanks, Trevor | ||
Etennuly |
If you got the new installation kit it needs to be installed with all of those parts. None of the old parts were needed on mine including the springs. It seems like I asked that question when I got mine a few years back.  If I recall there was some vagueness in the instructions. If I recall there was some vagueness in the instructions. | ||
Ratbuell |
 | ||
Trevd |
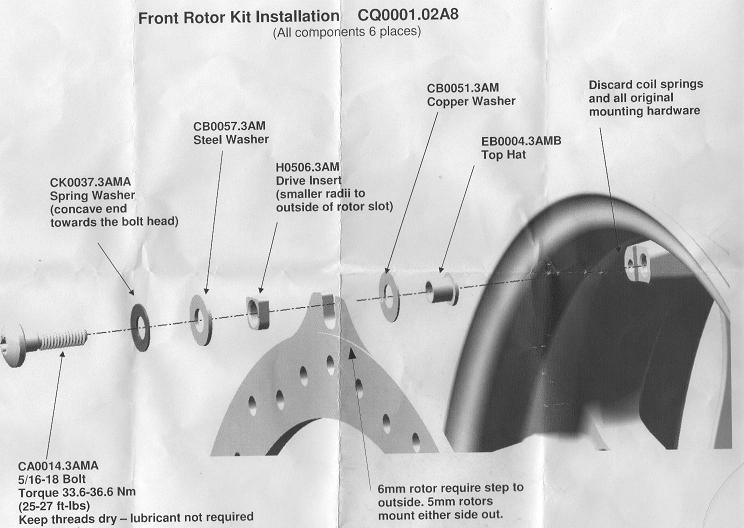
Yes, the instructions I got with the mounting kit were kind of vague and the written parts were very tiny for my aging eyes. Tough to read, and it said nothing about the original mounting hardware, although I couldn't see it in the picture so I correctly assumed it was not needed. Ratbuell, thanks for posting that pic... THAT is easy to understand. The page I got with my mounting kit was a view like that but it showed the entire wheel, with a corresponding lack of detail. One concern that I have now after seeing your instructions though is that the torque specs on mine show as 16-18 ft-lbs and 21-24.8 NM. Your instructions obviously show 25-27 ft-lbs. I wonder which is correct? Also just noticed that the part number for the bolt is different... Maybe that's why the torque specs are different? My kit was purchased about a year ago but i'm just installing it now. When did you get those instructions Ratbuell? | ||
Trevd |
Here is the instruction sheet that I got. Remember, I got this kit a year ago - actually almost exactly a year ago. Ordered on May 20, 2013. 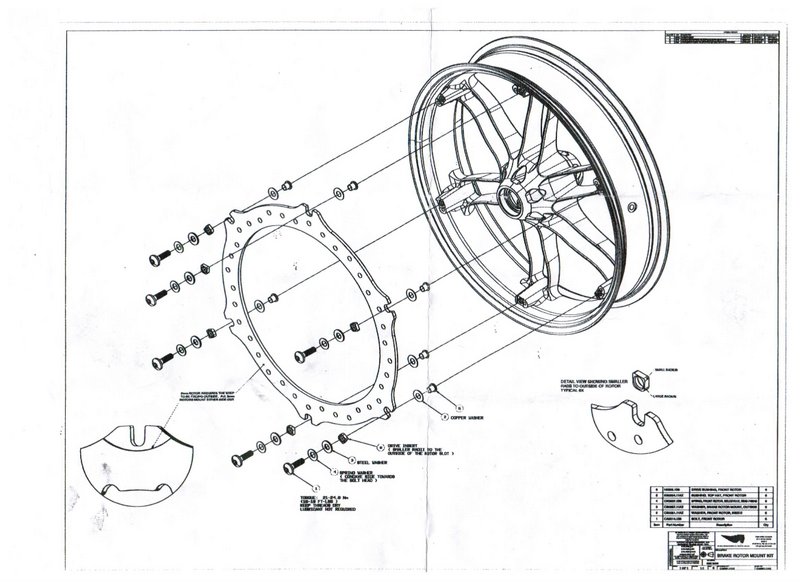 | ||
Ratbuell |
Well, the file date for the .pdf is 3/6/11 - that's when I scanned it, I'm going to guess (  ) I got the kit sometime before that. ) I got the kit sometime before that. Not a long time...I scanned it within days or weeks, not months/years... | ||
Ratbuell |
I'd point someone at EBR to this thread, and see which they say is correct. My guess is, the spec with your bolts is correct for your bolts. But...that's just a W.A.G.  | ||
Trevd |
I emailed EBR this morning to ask them about it. I'll report back with what they say. But I suspect you're right - the bolts may have changed, which then changed the torque specs. A perhaps bigger issue that I have is that after changing the rotor, the pads, and replacing the brake fluid to get rid of the pulsing that I've had for a couple of years.... I still have pulsing in the front brake! Not as much, and a different kind of pulsing, but definitely there. To be fair I only rode the bike about 35 miles today, but mostly around town so there was a lot of braking going on. Maybe more break-in is needed to get a good read on how it will eventually be. It's actually a bit frustrating... could it be that my new 5mm disc is warped? I may end up asking whoever at EBR responds to my email about it. Trevor | ||
Etennuly |
My instructions were like yours, quite vague. I doubt it is warped. Did you reuse your old brake pads? Did you do a proper burn in of the pads and rotor? Have you checked the steering head bearings? A re-torqing there can help also. | ||
Ratbuell |
Proper burn-in of the pads is critical. HAMMER the brakes - repeatedly - from 50 to 0 until you can smell them. When I say "hammer"...keep it just this side of a stoppie. Could be neck bearings. Could be fork adjustment or fluid level giving a "pogo" that is mistaken for pulsing. | ||
Trevd |
New pads.... What's a proper burn in? I just put them on and rode as per normal. Didn't think you had to burn in new pads anymore. I'll check the steering head bearings tomorrow and see if that helps. | ||
Trevd |
Ratbuell, Fluid level where? In the forks, or front brake cylinder? I think I may have put too much fluid in my brake reservoir... it was leaking out a bit from the reservoir yesterday while riding. What fork adjustment are you referring to? Steering head bearings: Never done it before, so just to be clear, I need to remove the handlebars to get to the top capnut, right? Then, as per the manual, remove the steering stem pinch fasterner, loosen that capnut, remove the lower triple clamp pinch fasteners, then torque the capnut and put everything back with proper torque? I'll also beat the hell out of the brakes for a bit and see if that helps. I was actually under the impression that one had to be gentle with new brakes for a while... | ||
Trevd |
Regarding the torque values for the rotor bolts - I got this response from EBR this morning: "The correct torque for the bolts is 16-18 ft-lbs, as referenced from the current instruction sheet. This instruction sheet was updated about 2 years ago to reflect the current torque value." So that is that. | ||
Etennuly |
The break in technique the seems to work well goes something like this with differing variations: run to twenty mph slam the front brake to maximum safe stop, run to thirty mph slam it again, then to forty and slam it again, then to fifty and again to sixty. this should leave you with a smoking blue rotor and a nice hot brake smell. Just be careful to not lock the front or do a big stoppie. That should have it broke in. Sounds like you read the SM on torquing the steering neck bearings. It needs to be done with the front tire slightly lifted. You will probably feel that it can turn side to side in a loose floppy manor. It should have a little resistance. That should work. | ||
Uly_man |
Did you "clean off" the disc with brake cleaner before you fitted it because if you did not you may have contaminated the pads with the makers protective coating IE Oil. What has been said in this post about "breaking in" a new disc and pad set is not only what a maker would NOT say how to do it but is also down right dangerous. I trust that it could just be a case of "banter" though? | ||
Trevd |
Uly_man, I did clean off the disc with brake cleaner before using the new disc. Today, I re-torque the steering bearings, being very careful, and according to the manual. Took me about 1.5 hours. There is now a little resistance when turning the wheel side to side with the wheel off the ground. While riding, it also seems like I can feel more engine vibration in the bars, so I suspect it was a bit loose before. My Uly likes to wheelie a bit at times, so it's probably understandable. BUT, that has not fixed my problem of pulsing at the lever! After torquing the bearing, I took a little ride around the block, same pulsing that I was feeling yesterday, maybe even worse, or maybe it just seemed worse because of my disappointment! So then I took it for a ride to a quiet road, and did a break-in procedure similar to what Etennuly describes above. The rotor didn't get blue, but it was definitely hot, and I was smelling the brake smell. Not much of a change if any... maybe a bit better at higher speeds, but still pulsing pretty good at low speeds as I'm coming to a stop. I'm still wondering if my disc is warped. When I first installed it, with the new pads and disc in place, before lowering the bike off the jack I spun the wheel, and noticed that the pads were rubbing only on 1 part of the disc. I spun the wheel several times, and no pad contact for most of it, but then it would contact at the same area with each rotation. I just attributed it to the pads maybe not being set evenly. But then tonight, after getting home from my ride, I jacked up the bike, and spun the front wheel. Now the pads are dragging a bit for the entire disc, as expected, but there is one area where the wheel definitely slows down faster. Same area each time I rotate the wheel. How does one check a disc to see if it's warped? Any other ideas? It's pretty crappy because I'm heading to Vermont this weekend for a ride and wanted to finally get rid of my pulsing front brake before going. Now, I wish I had left the old one on - the pulse of that one was at least more gradual and gentle than this new one. This new one seems more jarring. | ||
Trevd |
So, tonight I went out to the garage, jacked the bike up, loosened the front axle, tightened it up again to proper torque, and sat there spinning the front wheel, listening to the "thunk, thunk, thunk" of the disc hitting the pads at the same spot for every rotation. Then I took a video of it. http://youtu.be/CsR1xmGZ3s4 Any ideas? | ||
Motorbike |
Wow, that sounds bad! It must really make a racket when you ride it. I have the same EBR 5mm Finned Rotor with the EBR Mount Kit as well on my 08 XT and it works great. Very smooth and quiet, huge improvement over stock. Are you sure you have all the washers and disk mounting parts in the correct place as shown in the diagram? Go around to the other side of the wheel and look up in there by the caliper while slowly spinning the wheel. Even when all parts are fitted properly, the clearance between the mounting parts and the caliper/pads is minimal. I'm guessing you will see something amiss or nicked from making metal to metal contact. If I were you, I would pull the rotor back off and sort out all the parts again and re-install. Make sure you do not have any of the washers mixed up or doubled up. It is critical that you do not mix up the copper washer with the steel washer and also that you install the spring washer so the concave is toward the bolt head, not the wheel. Also make sure the small radius on the little square blocks is oriented as shown in diagram. Re-torque all six bolts properly and I'll bet it will work great. If the rotor is not mounted exactly right on the wheel, that would explain the pulsing. Hopefully the rotor is not damaged already. PS You did remove the springs from the original rotor mounts, did you not? | ||
Etennuly |
I would also remove it to check that all of the parts were there. You can lay it on a pane of glass, like a storm door window to check for warping. My rotor was dead on smooth from the moment it I installed it and broke it in. The original rotor was really bad on my bike. What brake pads did you go with? | ||
Trevd |
To be fair, I think it sounds worse in the video because I hadn't yet applied the brake after re-torquing the front axle. After I applied the brake a few times it sounds a lot better - more like just dragging in that one area. It's been like this from the moment I put it on... And yes, I did remove the springs from the original rotor mounts. I'm also pretty certain that I installed the washers and other pieces properly and in the right order, but I did have a 3 year old boy helping me, so who knows. Maybe I got distracted trying to make sure he didn't pull the jacked up bike onto himself. I just went out and took a good look at each bolt and with the wheel on the bike they all look good to me - same pattern for each of them as far as what part is where. Also, Looked closely at both sides of the disc - no damage visible from metal to metal contact that I can see. I would like to remove the disc and verify everything, but aren't those bolts supposed to be "one use only"? Or if I apply a little loctite will they be good to go for a 2nd torquing? I've got brand new Lyndall gold pads on there. Same as my previous ones which I was happy with, and which actually had a lot of life left in them but I replaced them to get a good mating between new pad and new rotor. I've got an email out to EBR to see if they can help me. | ||
Etennuly |
Well you have some of the best street pads that I have been running. Maybe it got damaged in shipping? | ||
Trevd |
I don't think there was any damage during shipping. I still have the box it came in and it looks pristine. Now that I've applied the brakes a few times to put the pads in contact with the disc, when I rotate the wheel there is definite dragging over a much bigger area than what is shown in the video. While spinning the wheel, I can feel the drag for about 1/3 of the disc. A space encompassing 2 of the bolts. I think the clunk in the video shows the highest (or lowest) point. Does anyone know how to do a run out measurement with a dial indicator? The fellow at EBR that responded to my email wants me to test if the wheel is true. Also, does anyone know if these rotor bolts are one use only, ie. need to get new ones to re-install the disc? And why would it be bad to re-use them? How about the rest of the hardware? I'm wanting to verify that I installed everything correctly, but am afraid of the "one use only" thing. | ||
Etennuly |
I have re-used mine several times so far. From an engineering warranty stand point stainless bolts are fussier about being stretched too many times as happens when they are torqued. If you do not over torque them you should be fine. For a run out measurement all you need to do is block the bike up with the front tire off the ground, stand a stationary block of something(wood block or cement block) close to the wheel, then take something as simple as a pencil as a pointer on your stationary block to the edge of the wheel, spin the wheel. If it is bent you will see it move in and out from your stationary pointer. If the wheel runs straight and true it will remain at the same distance from your pointer all of the way around the rim, if you see it moving away from the pointer and back to it, it is bent. Then you can work with some measuring device to see how much 'run out' there might be. It does not matter if you have a fancy digital measuring block and indicator, if the rim runs straight and true. You can literally see any run out of over a few thousandths of an inch from a pencil. If you can see it move in and out more than a few thousandths that could indicate a bent rim. Once you indicate how true the rim is you can use your 'measuring tool' on the rotor to see if it is bent or misaligned on the wheel. | ||
Trevd |
I actually borrowed a dial measurement tool from my mechanic buddy, and will see if I can do it tonight or tomorrow morning. But I'll try your version first - seems easier than trying to find a solid place to hook the vice grips to. Guess I'll be putting the wheel on again! One good thing about this is that I'm getting really good with removing and installing that front wheel! Etennuly, do you use loctite when reusing your bolts? Red or Blue? EBR confirmed that the "bolts are one-time use due to the lock patch that is applied to them. The rest of the hardware can be reused." Tomorrow I'll probably remove the new rotor, and put the old one back on, using the new hardware. Then at least I'll be able to do my trip this weekend with only a comparatively slightly pulsing rotor... I've said it before, but one should NEVER do major mods to their bike right before heading out on a ride.... "What harm can come from installing a brand new rotor" I thought to myself...  Thanks. | ||
Motorbike |
Trevd, as you pull it apart again, pay very close attention to all of the mounting parts and how they are installed. The new style rotor mounts hold the rotor more solidly to the wheel but still allow just a very slight amount of flexing. I believe the new style mounts also help to control heat from the disk by allowing better heat transfer to the rim, but that is just a guess on my part. It doesn't take much to cause the rotor to not be perfectly aligned with the wheel. Take a close look as you pull it apart to see if all six of the 'Drive Inserts' are oriented properly as stated in my previous post. Make sure the smaller radii are to the outside of the rotor slot. If they are wrong, they could bind and not allow the rotor to position itself properly. I know how you feel about taking a trip with the bike not exactly as you want it but don't let it ruin your trip. Try not to think about it and keep a positive mind that you will get this fixed when you get back so the next trip will be even better. Good luck and have fun. | ||
Uly_man |
Sorry to hear that and does not sound good Trev. The things I would suggest doing are. Check the wheel is true by a holding a ruler on the fork near the rim and rotating the wheel to see if it is out. You can do the same with the disc as a guide but of course that is not a 100% thing on it. If all of that looks good remove the disc to ensure nothing is under the mounts to throw disc out of alignment IE Dirt, swarf, etc and that all the mounts are ok. Do the same with the brake caliper and ensure the pistons are not binding. They should retract very slightly once you disengage the brake lever. Good luck. | ||
Etennuly |
This is my personal ruling on loctite type products. They work by gumming up the threads so that vibration cannot loosen the stretch that torquing the bolt does. In some instances the product glues the threads so that they cannot come loose even if run over by a two hundred car freight train. I usually "re-use" loctite one time. I know engineers will tell you that it will interfere with the torque spec by gumming the threads going in. Like I said this is my personal use method and I do not do it on customer stuff. I have never had a bolt loosen or fail re-using loctite. But then I also inspect my bike more frequently than most riders would. When I get off my bike I look at bolts, when I wash my bike I touch the bolts, wheels, panels, everything I can to constantly check. I learned this "pay attention" program when I owned and drove race cars. I do this method because I like to be able to remove a bolt while on the road on a trip or whenever I am not at my shop with air tools and such. If I go in to remove a loctited bolt a second time I wire brush it off and use a drop or two of the red stuff. Some times I even clean out the nut side with a brush or a thread chaser. With what you are doing I would make sure the problem is fixed, a straight rotor is running, the brakes are working properly, then remove the bolts one at a time to lock them. It is to me, stepping on your own toes to loctite the bolts before the problem is fixed. Before loctite was a readily available product I used to mix up a little body filler or fiberglass filler for problem bolts that wanted to work loose. It worked great, first time I used it was on a vibrating two stroke lawn mower deck that could shake bolts loose that had even had the threads spiked. Just because a product is used on rockets does not mean it is rocket science. | ||
Trevd |
SO.... Using the dial measure tool from my mechanic friend, I tested the wheel to ensure that it was indeed true. Never having done it before, it was a good learning experience, (as this whole thing has been actually!), and I sent the results I found and video of me doing the tests (to confirm that I was doing them correctly) to EBR. For those with nothing better to do and interested, the videos are here: http://youtu.be/1wk1rmfvNuQ There are a couple of others in my profile of similar tests. Adam at EBR called me the next day, and confirmed that the wheel is in fact well within spec. 0.030 inches apparently is acceptable, and mine was off by about 0.015, so the wheel was good. He offered to send me a new rotor, but while talking to him he said that sometimes it's the mounting pads on the wheel that are our of whack. He said that a difference of as little as 0.005 of an inch can cause problems like I've been having. He told me how to measure for it using the dial measurement tool that I still had, so I told him to hold off sending the rotor until I measured that. Here's some video of that, again, not overly exciting: http://youtu.be/5wj4ThtUK-U I took several measurements on different parts of the bolt holes areas, and sent Adam the results. In the meantime, I took the new rotor, laid it flat on our glass top stove, and it seemed flat as a board. I tried the same with my old rotor, and it is definitely off by a bit. I was able to rock it a bit on the stove, while the new rotor was solid. I suspected that the rotor was not the issue. Adam called me back the next day telling me that he's pretty certain that it is my wheel that is the issue. He said that mounting holes being off a bit like that can have a major impact with the new rotor and hardware, because it is a much more solid setup than the previous system, and the disc doesn't float as much. It hasn't been an issue with my old rotor and hardware because of the extra movement in that old setup. They've seen issues like this twice before. He said that their recommendation is a new wheel, but that at least one of the previous people that experienced this got a machine shop to shave up to 0.005 of an inch off the high bolt pads, to make them all even, which then fixed his problem. So last night I put my old rotor, my old hardware and my old pads back on. I sanded the old rotor a bit before putting it back on, so the pulsing issue I was having may be gone now for a while, but it's definitely not a permanent fix. But at least I'll now be able to go for my Vermont bike ride this weekend! LESSONS LEARNED: - NEVER do any major modifications to my bike the weekend before going on a 3 day ride. It only leads to a stressful week. - When replacing old parts, make sure I keep the old pieces together to prevent myself from having to comb around the garage floor to find the little washers from the old hardware. - It's good to be friends with a mechanic that can lend you his $600 dial measurement tool - Removing and installing the front wheel on the Uly can be done in about 3 minutes flat once I've done it a half-dozen times in a week. A new wheel is not in the budget right now, so I guess I'll look into getting a machine shop to fix this up for me... not sure how much that would cost. That will probably wait until the winter anyway. (Message edited by trevd on May 16, 2014) |