| Author | Message | ||
Desert_bird |
Changed the fork seals and am going for fork reassembly, and am stumped. I fill oil to recommended amount, drop the spring in the fork body with the fork collapsed. I pull up on the damper rod and then drop in the fork spring joint (spacer) over the damper rod, while trying to get a hold of the top damper after the spacer falls down into place. But the damper rod is just way to low to get ahold of. Seems like the spacer is too long or the spring is too high in the shock body? The damper rod slowly sinks, spitting fluid and I have to start over. How in the heck do you get a hold of that damper rod jam nut? No way that I can compress the spring that amount. I'm not using the manual's suggested damper rod retrieval tool, but seems like plenty have done the job without it. What am I doing wrong? | ||
Electraglider_1997 |
I used a heavy duty upholstery thread to pull that damper rod back up out of the oil. Of course you have to tie it around the nut near the top of the damper rod and tie a washer to the other end of the thread to feed it through the spring before dropping the spring down into the tube. Then just pull the damping rod back up with the thread. Easy as that. | ||
Desert_bird |
Great. So I got how to pull the damper rod up. In order to compress the spring down, did you use the compression straps as well? Seems like one hell of a lot of compression to get the damper rod nut above the spacer so you can screw on the shock cap. Did you bend the hole in the spacer with the hook of the compression strap? | ||
Mark_weiss |
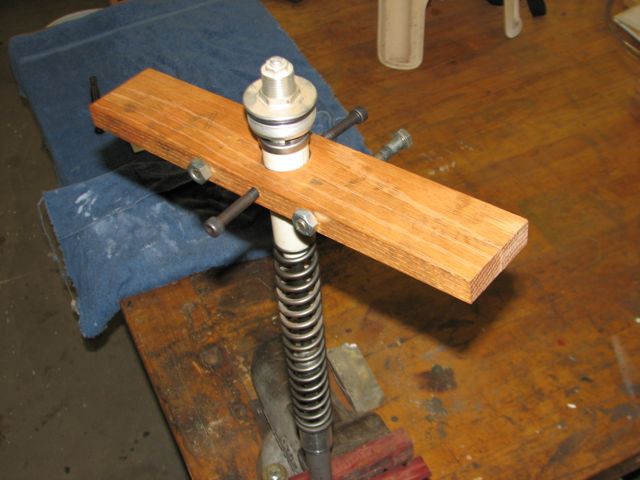
I slid a piece of tubing over the threaded top of the damper rod. The tubing is long enough to extend through the top of the spring. If you pull the tubing up too quickly, it will slip off of the damper rod and you'll need to do it over again. The spring does require quite a bit of force to compress. I made my own compression tool from a piece of wood and some bolts. Bore a hole in the wood, a bit larger than the spring. Drill holes laterally through the board, one on either side of the bored hole, large enough to slip two of the bolts through. Drill a third lateral hole that crosses the bored hole's diameter. Split the board lengthwise so that half of the bored hole is on each half. The "compressor" halves are lightly bolted together and slip over the preload spacer. Your two remaining bolts go through the diameter holes and engage the holes in the spacer. Press down to compress the spring and screw on the fork cap. Remove the compressor by removing the two long bolts and splitting the halves of the compressor. Save for next time. | ||
Mark_weiss |
 | ||
Electraglider_1997 |
Desert Bird, Just checked the phone and heard your message. Read through this thread and yes, it does take a bit of compression with a ratchet strap and s-hook to pull that spring down. The whole process is a bit of a pain but really not so bad. There are many ways to accomplish this task as I'm sure you've noticed but whichever way you choose, clear your mind and stick at it until the job is finished. Keep everything as clean as possible. Once you are finished you'll wonder why it took you so long. Like any fairly complicated job you are doing for the first time, it takes way longer than if you had to do it again a second time a day later. I'll attempt to get you on the phone to see if you have anymore questions. | ||
Hughlysses |
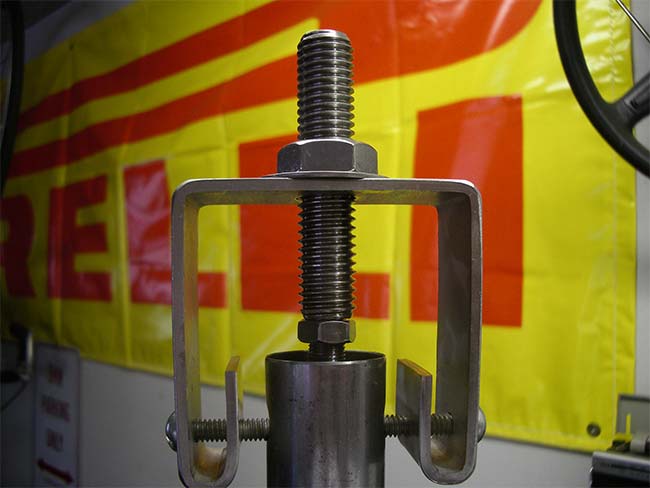
There's a lot to be said for biting the bullet and spending ~$120 on the tool made for this purpose. It makes the job a LOT easier when you're doing it by yourself. This is Race Tec's version:  If you plan on keeping this bike (or any bike) and doing your own maintenance, it's a good investment that will save you a lot of aggravation. | ||
Desert_bird |
Thanks for all the tips. I saw your home made tool a while back, Mark. Nice piece. The race tech tool looks great as well. But I needed the job done now, so I went ahead and used some nylon string to pull the damper rod up, and used two ratchet straps to compress the spring. Easy as pie. No problems there. It all went together pretty easily, in fact. Now to the other leg, where I need to hand-sand out a few sharp edges on the fork slider, the original cause of the bleeding seals. I also have to wait for more fork oil to arrive by mail. NO one out here in Santa Fe has Motul and I already used that in one side so figure I should get the same for the other. That one fork (plus my spillage  ) took much more oil than I though it would. I thought one quart would cover them both. ) took much more oil than I though it would. I thought one quart would cover them both. EG'97 is right; the job is quite a bit easier than you think it will be, once you get the order of operations, and have the basic approach down. Now on to brake pads, tranny breather tube, air filter, tires, leaking starter gasket . . . . . DB | ||
Electraglider_1997 |
 | ||
Hughlysses |
Now to the other leg, where I need to hand-sand out a few sharp edges on the fork slider, the original cause of the bleeding seals. I had good luck removing the sharp edges from some tiny rust pits by using a smooth file lightly on the fork leg. The file wouldn't touch the smooth chrome surface, but it would instantly knock down any raised edges. | ||
Tootal |
 |