| Author | Message | ||
Tstone |
The other day I was reading a post where (I think) somebody was advising not to completely remove the front ECM nut/bolt during Comfort Kit installation. Does anybody remember which thread that was? | ||
Ourdee |
I remember reading it. Just loosen the front enough to turn the ecm out of the way. I think thats what it said. | ||
Mnrider |
That's what I heard on here and it worked out fine when I installed my CK. | ||
Tstone |
Thanks guys. That's what I thought it said, but there's been so much conversation about the kit that I couldn't find it again. | ||
Motorbike |
Tstone, When you install the kit you will find that the new shroud over the rear shock makes re-installing the nut on the front ECM bolt very difficult. Many on this site have found this out the hard way and were kind enough to pass on their advice to us. When I installed my kit, it went very smoothly because I just loosened the front screw and rotated the ECM out of the way. The kit comes with a new screw but I can see absolutely no reason to use it. I think it is in the kit just because it has threadlocker on it and Buell wanted to make sure the nut does not vibrate loose. I just snugged mine up after the installation and would bet at least 50 cents it will never come loose.  | ||
Tootal |
Even if you use the new screw like I did you just tighten it just enough so the ecm will still rotate yet is really tight enough. I mean it's all just plastic anyway, no need to ham fist it.  | ||
Tstone |
Tootal, I just noticed you're right up the road from me. We need to get together this summer for a spin. | ||
Tootal |
Are we going to ride the 11 curves in 318 miles? | ||
Tstone |
Ha! I know what you mean. I just moved back to Illinois after spending 7 years living between Farmington and Ste Genevieve, so I have have some Uly specific loops layed out. That is - routes with some gravel and a couple creek crossings. Not anything technically challenging, but beautiful and fun. Of course lots of twisted, paved, two-lane as well. Let me know if you're interested - otherwise if there's anybody else interested, I'll post it on the Storm-Fronts page when I get ready to head down there. | ||
Mideon |
We need to start getting the area Buellers together again! | ||
Tootal |
I'm up for that. Let me know when and where and if I'm around I'll be there. My friends just opened up a winery in St. James and there are some great back roads to get there if you're interested in wineries that is. I'd love to find some gravel since none of my friends would even consider following me off the pavement. That's why I own a Harley too. Riding the Buell with them would be really boring! | ||
Jim_sb |
I thought the installation was pretty simple. Lots to do, but nothing difficult. Take your time, think each step through and it's not a problem. | ||
Pontlee77 |
any one has pics of the installation? it would be good help as there is no guide of it when i got it. Thanks. | ||
Boogeyman |
Yeah I wouldn't use the new bolt. I just got done installing my kit. I used the new bolt and I think it broke the nut that was cast into the plastic loose. I think it was due to the threadlocker making it hard to turn. Or it was not cast in well to begin with. I only used the short end of the allen wrench for leverage, wasn't even using the long end! The bolt didn't even snug up the spacer block, it's kinda loose now and I can't tighten or remove it. The bolt just spins. The rest of the install was a breeze though. Just sucked to have all that stuff under the seat out, and the last thing I go to do screws up, and now I have to take everything back out. | ||
Bishopjb1124 |
The same thing happened to me last night when installing my CK. Now I get to tear it all back down to tighten up the stupid ECM bolt. | ||
Bobbuell1961 |
When installing a CK take the supplied bolt and put it in your stash, your going to be installing it in to a nylock nut anyway, The lockpatch Harley uses is way too stiff, In many applications i will remove the lockpatch and use liquid theadlocker. I have found that a hot glue gun can be a good friend when installing the offending nut. Bob | ||
Tootal |
The nut is not formed in the plastic, there is just a ridge that it pulls up into and it's not much of one either. Like I said above, put that screw in while the pan is out and just don't over tighten it. That will allow you to swing the ecm out of the way during reassembly. Some have not touched the screw and were able to swing the ecm over during disassembly and that is probably the best way. I couldn't figure out why the screw needed changing anyway, I just did it just in case I was missing something. I don't think I was. | ||
Boogeyman |
Thanks Tootal, I was wondering about that after I posted. I didn't look at the nut while it was out, and once I had it back together I just figured it was cast in since it didn't fall out when I removed the bolt! This is what I get for following instructions! I knew better when I did it but I followed the instructions anyway. | ||
Travisrd |
I recently installed the Comfort Kit The scoop and the pipe shield (which is metal, clamps on with hose clamps) are a 15 minute install. I added some stick-on weatherstrip to top edge of the scoop to prevent rubbing. The fan shroud extension was sort of a pain in the neck - took a couple of hours. You need to remove and then replace the battery and the rear fender (under seat) and move all of the wiring harnesses out of the way The pictures that come with the instruction don't show clearly how the part fits. In the end, the bottom edge of the shroud extension just sits edge to edge with the existing fan shroud. Not a very good design - Buell should have added some type of lip or tangs to allow both parts to actually interlock with each other. I put duct tape over the joint, since it didn't line up exactly (1/8" gap). I also replaced the weatherstrip they provided with wider, thicker material to allow it to seal better. Another thing with the shroud extension is that you really need to squeeze / distort it to install. Not that difficult, but never stated in instructions Cutting the overflow/vent tube is simple, but again the instruction picture is not very clear. Originally it's zip tied in place. You need to cut the tie when installing the shroud extension, and the tube just gets shoved into the hole in shroud extension The hardest part of the whole project was reattaching the engine control module to the inner fender (the subject of this thread). The forward allen bolt, which installs into a plastic spacer on top, screws into a hex nut. That hex nut, at least on my Uly, did not properly snap into the recess on bottom of inner fender. Do yourself a favor, and tape the nut into that recess, prior to reinstalling the inner fender. I had to use a piece of threaded rod and fish the nut up through the rear spring, and then use a big screwdriver to reach up and hold the nut against the recess. I might even consider epoxying the nut in place first I live in Tucson, and so far, the kit does seem to be making a big difference - haven't gotten into the real heat yet though. The fan definitely doesn't run as long or as ofter as before. I have a 2006, so the ECU reprogram didn't apply (from what I've read online) | ||
Balloyd66 |
THAT DAMN NUT!!!!!!!!!!!!!!!!!!!!! (Message edited by balloyd66 on March 26, 2010) | ||
Buhler1 |
I installed the kit today and am very thankful for this thread. It went pretty smoothly based on the tips and tricks listed here. Thanks for a great site!! | ||
Boogeyman |
I fixed the ecm bolt and nut problem last night. I went to the local farm store and headed for the hardware isle thinking how am I going to fix this? I was preparing myself for a long brainstorming session in the hardware isle. As usual they have a semi-retired guy working there, I show him the tail pan, the nut, and how they go together, he says "You need a square nut." Why didn't I think of that? Score one more for the semi-retired guy in the hardware isle. The square nut fit in the slot just perfectly and won't rotate like the hex nut. 1/4"-20 is the size. So my next issue was to hold the square nut in place while the bolt is out. Yes I could bolt the ECM to the pan and install, but the nut would fall out if a tech or someone else (me, when I forget to not take that bolt out) goes to work on things again someday. I decided to make a little retainer bracket to hold the nut in there. See the pick for before and after bracket. The bracket is a 3/4" x 1/2" corner brace, from the hardware isle again. I had to trim the one side off, redrill a hole to bolt the bracket to the pan, and enlarge the hole that the ecm bolt goes through. The ecm bolt hole needed to be enlarged so it wouldn't interfere with the bolt when it goes through. It's a little off center compared to the bracket hole too. I used a 11/32" hole, but 3/8" would probably be okay too. I had to bend and rebend the bracket a couple times in my vise to get it to fit right, and I bent the corners down a bit on the open side to try and contain the nut a little better, probably won't help, but can't hurt. To bolt the bracket to the pan I used a #10 machine screw and nylock nut. I used a 3/16" drill bit to drill a hole for the attachment bolt. I don't remember the length of the screw, just add up the bracket thickness, pan thickness and nylock thickness. I put the square nut in the slot, held the bracket where it needed to be, and drilled the hole through the bracket into the pan. I then put a bunch of black RTV around the square nut, and bolted the bracket to the pan. I figure the RTV will act as a kind of loctite, since the square nut isn't a nylock, and I didn't want to put loctite on it as that is what caused this whole problem in the first place. I put everything back together without any issues. Here's the pics of stuff, and everything installed. Stuff:  Installed, bottomside: 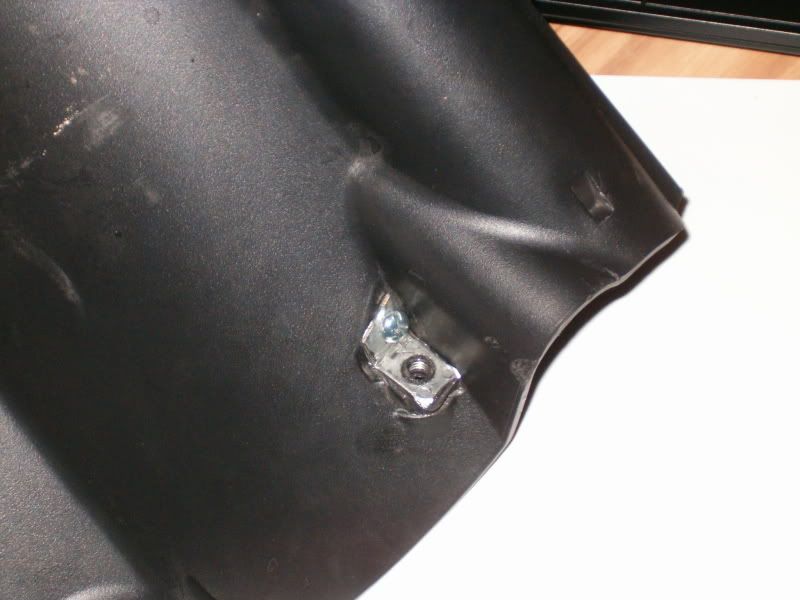 Installed, topside: 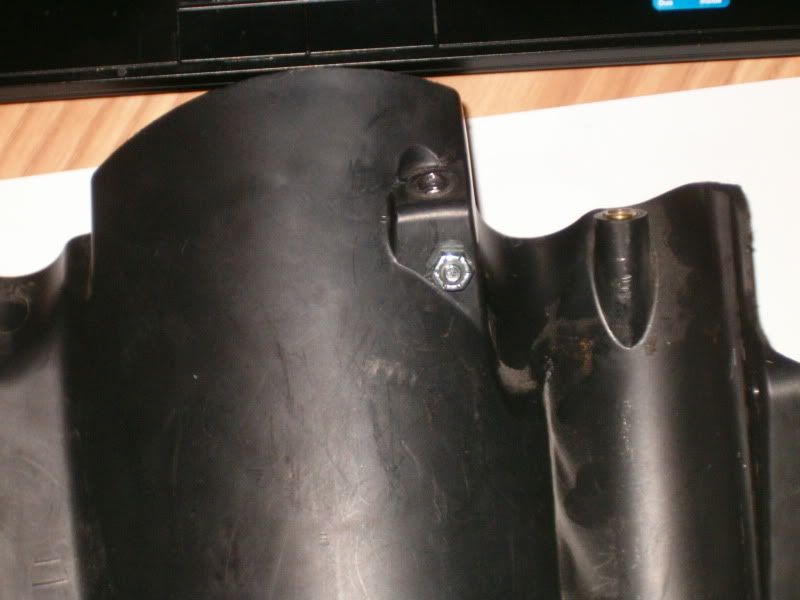 | ||
99savage |
I had the problem - Nut just spun when I went to install the bolt - Could not get a finger under there to keep nut from spinning Went to hardware store & got a gizmo w/ a wood screw thread on the outside & a UNC thread on the ID. - Screwed it in & epoxied the hell out of it. So far so good. | ||
Eternalbiker |
Just installed my comfort kit today, 09-XT Took longer than I thought! Just hot glued my ECM nut to the bottom while I had everything apart worked like a charm. Can't wait to try it out tomorrow it'll be 95 degrees. |