| Author | Message | ||
Froggy |
This is my quick pictorial guide to changing the oil on a Buell XB motorcycle. Mods, feel free to duplicate/move/delete/ban me. My bike is a 2006 XB12, so this will only be a rough guide for other model years. Please consult your manuals to confirm things including the proper oil level. Before we begin, confirm that you have all the materials and tools on hand to perform the oil change. You will need the following
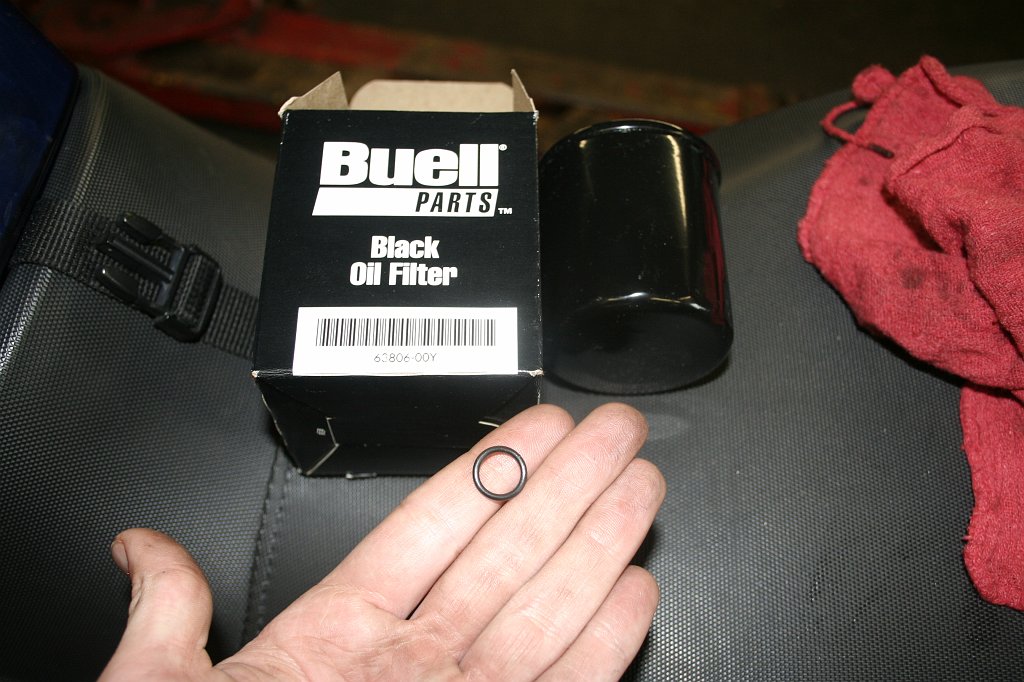 To begin, first you need to locate your dipstick and remove it. It is located on the left side of the rear swing arm, not far behind the rear foot peg. (Note: I got a custom dipstick with thermometer. The location of the factory stick is the same place.)  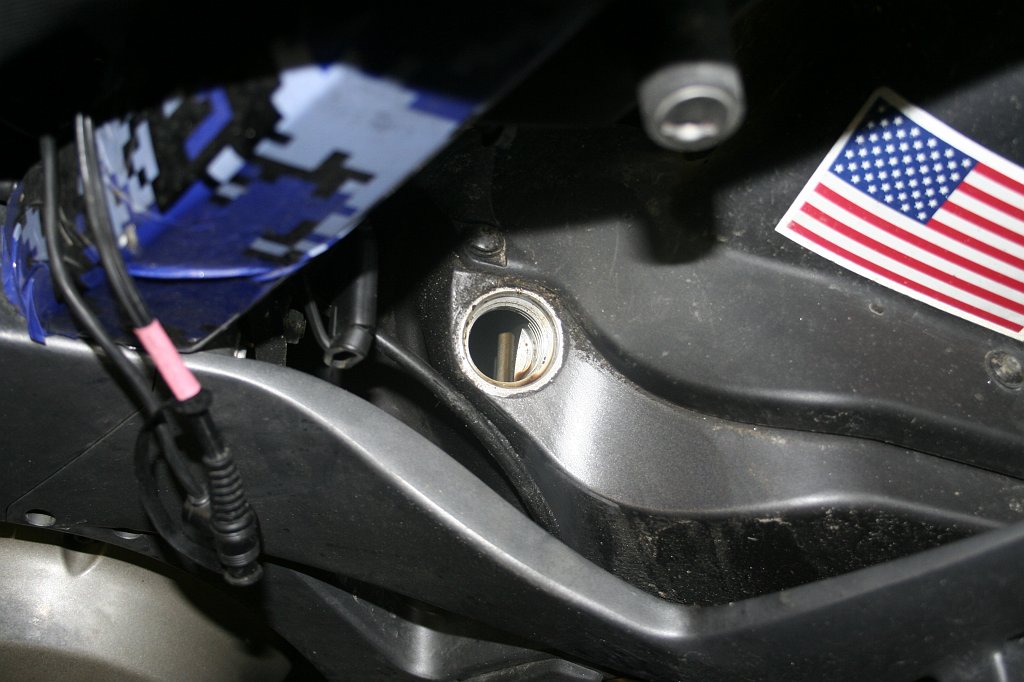 Take your drain pan and place it under the bike as close to the rear wheel as possible. 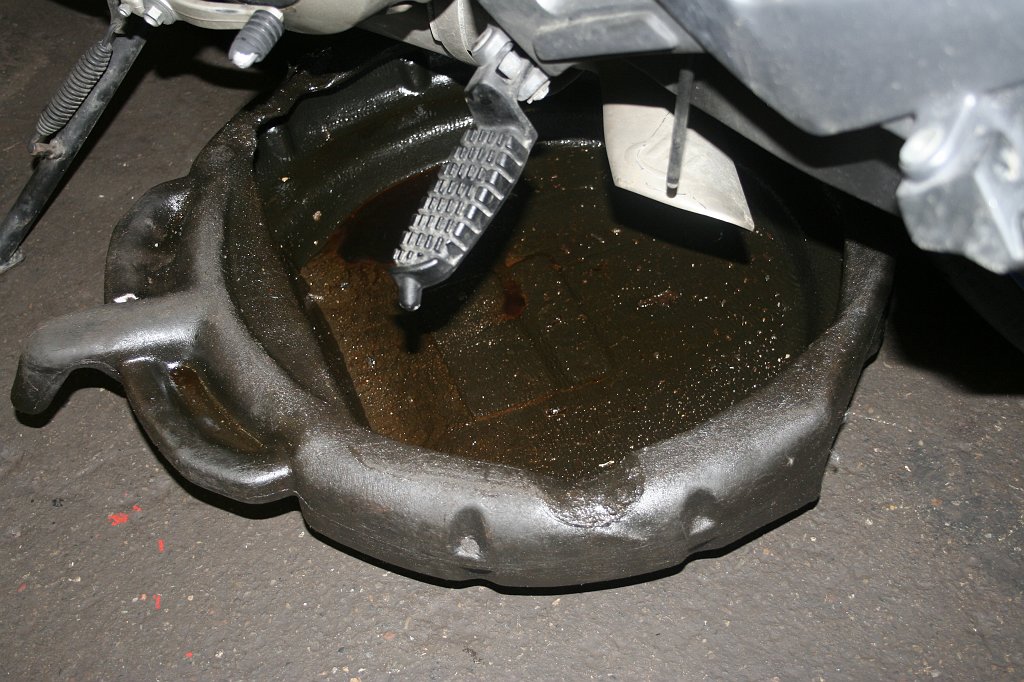 Using your 5/8� wrench, locate and remove the drain plug from the underside of the swing arm. 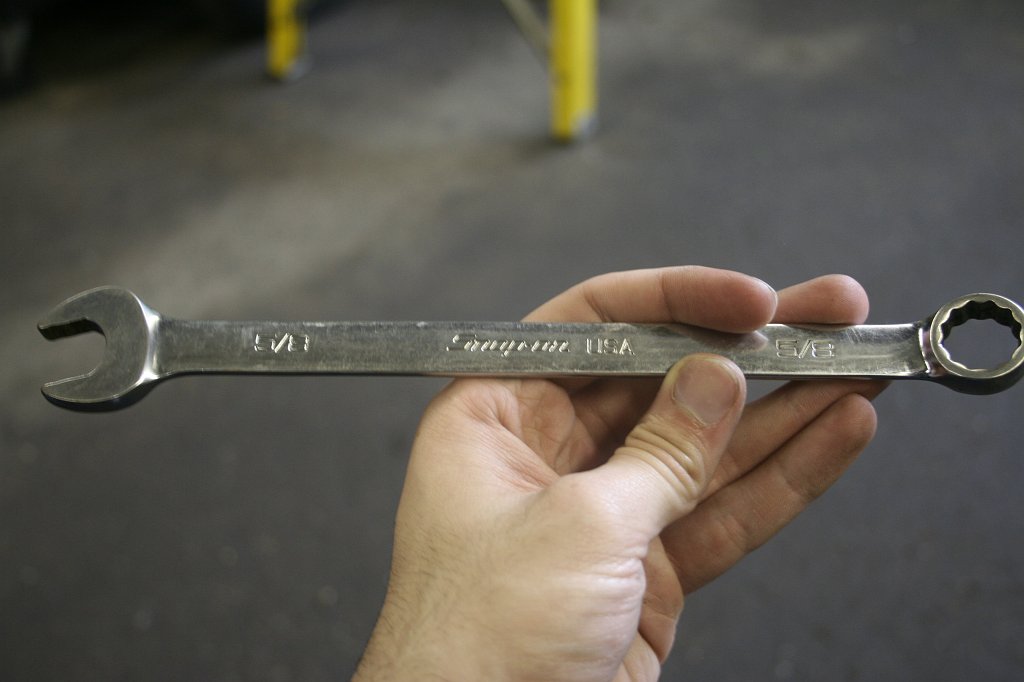 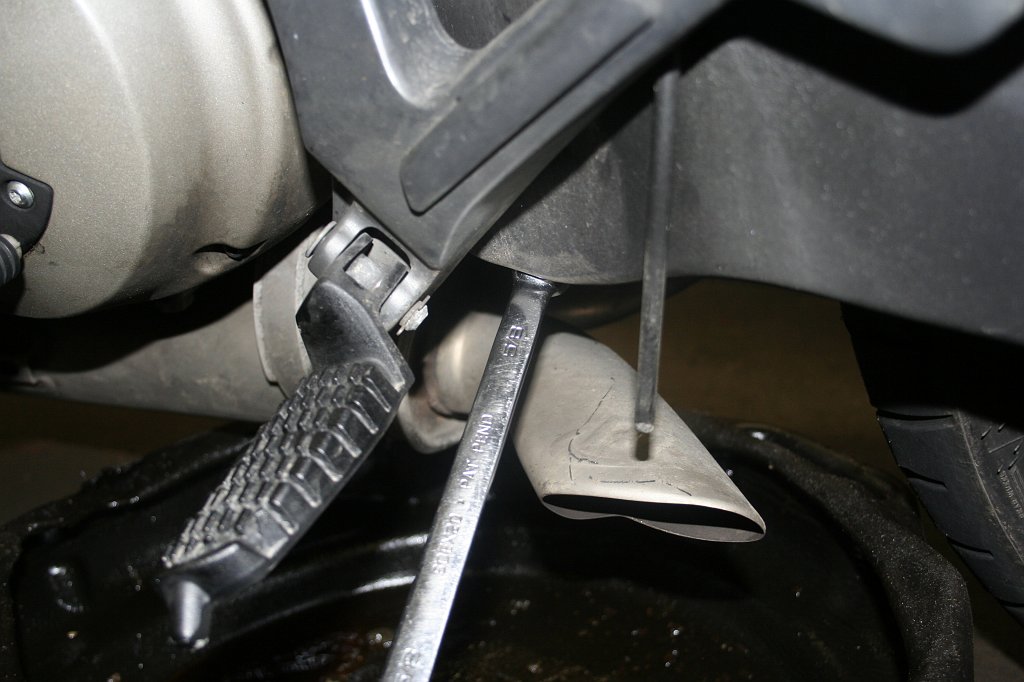 When you remove the drain plug, oil will come pouring out and depending on what muffler your bike is equipped with, oil may spill onto it. Use caution, oil may be hot. Clean up any spilled oil and any oil that got onto the muffler or other parts of the bike. 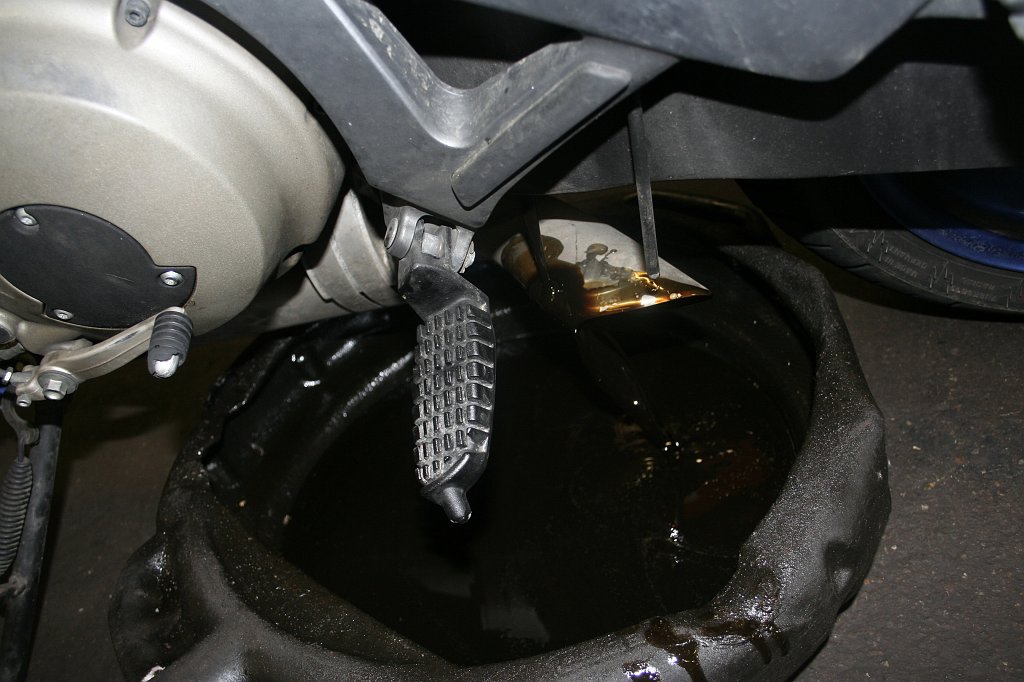 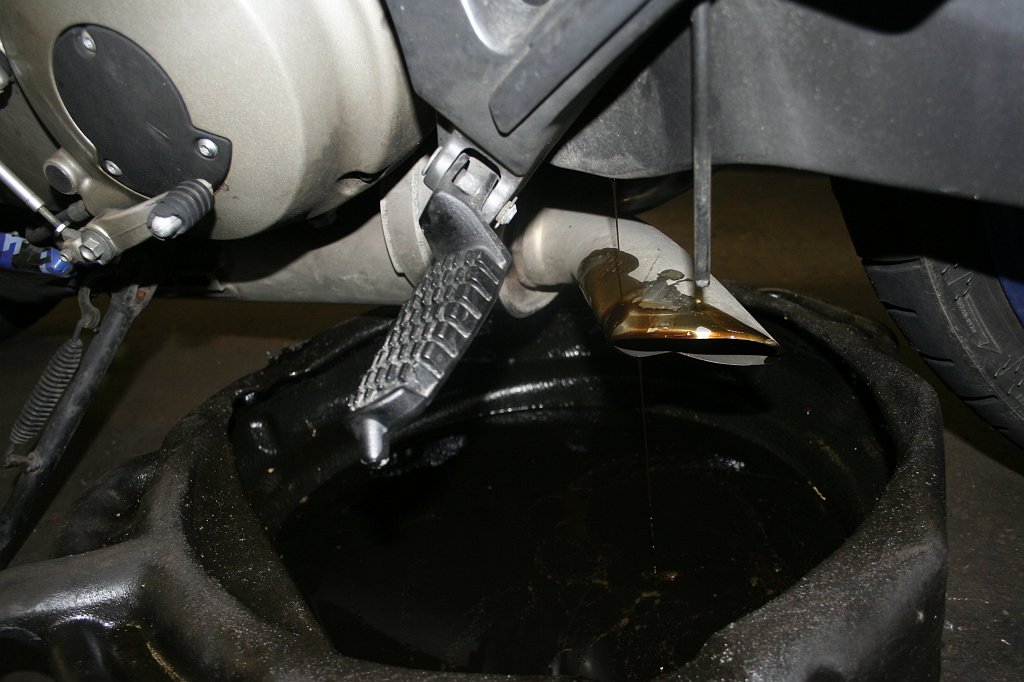 Next we need to remove the chin spoiler so we can have easy access to the oil filter. On a stock bike, there are seven Torx 27 screws holding the chin spoiler to the muffler. There are 3 screws in the right piece, two on the left piece, and two on the front piece. (Note, my bike does not have the stock exhaust system, and uses different bolts) 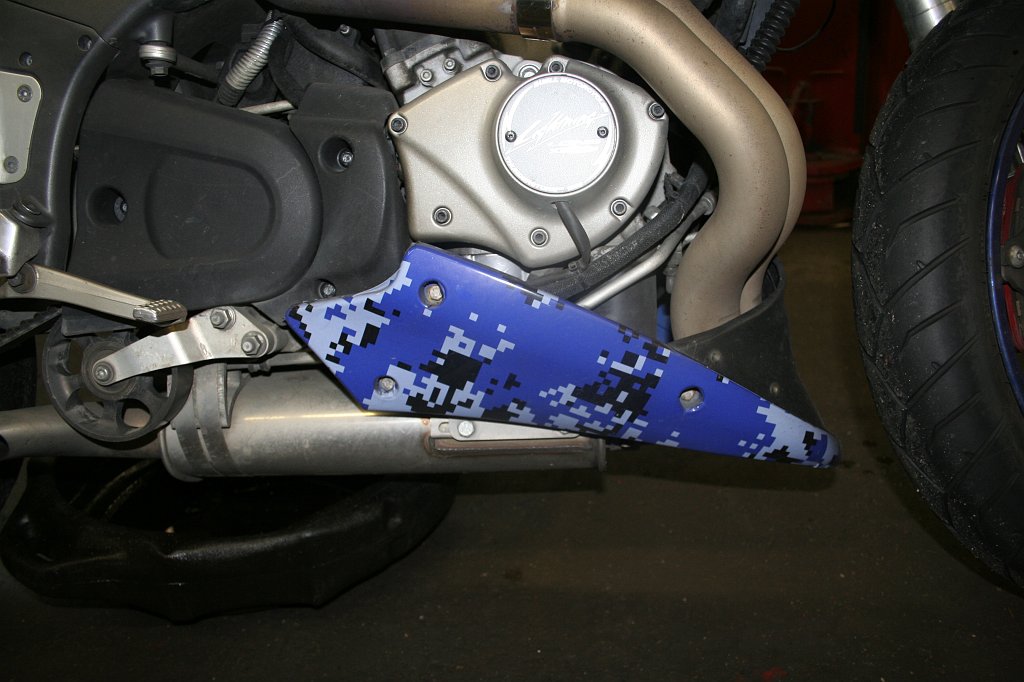 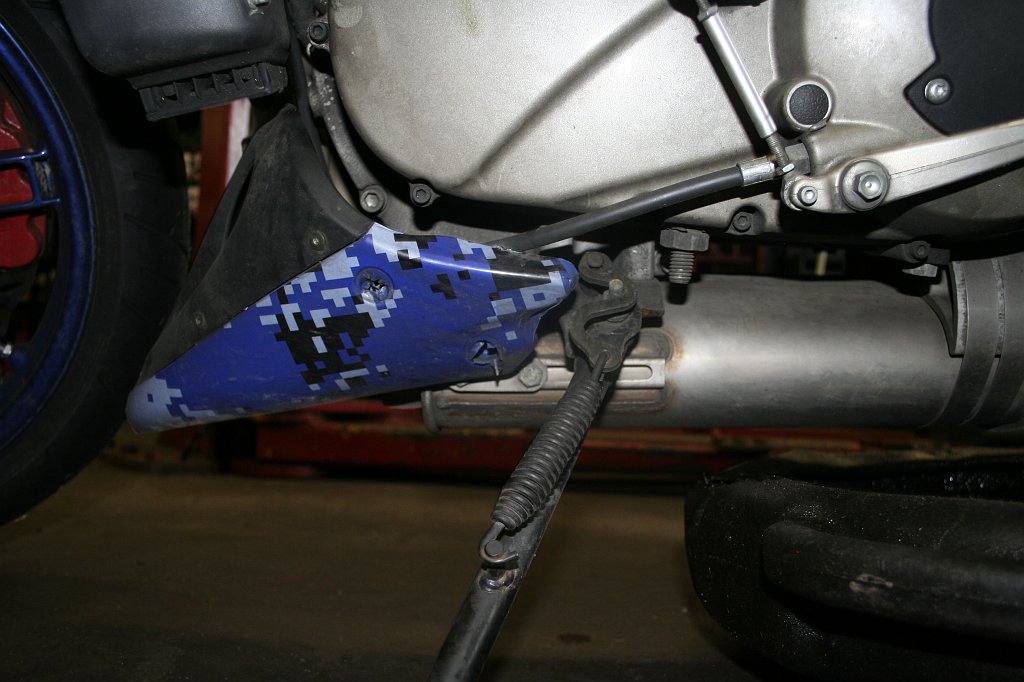 After you have removed the chin spoiler you should have easy access to the oil filter, which is the black cylinder at the front of the engine near the exhaust header. (Note, my exhaust requires an extra step of removing a bolt for the chin spoiler bracket so that I can get sufficient clearance to remove the oil filter) 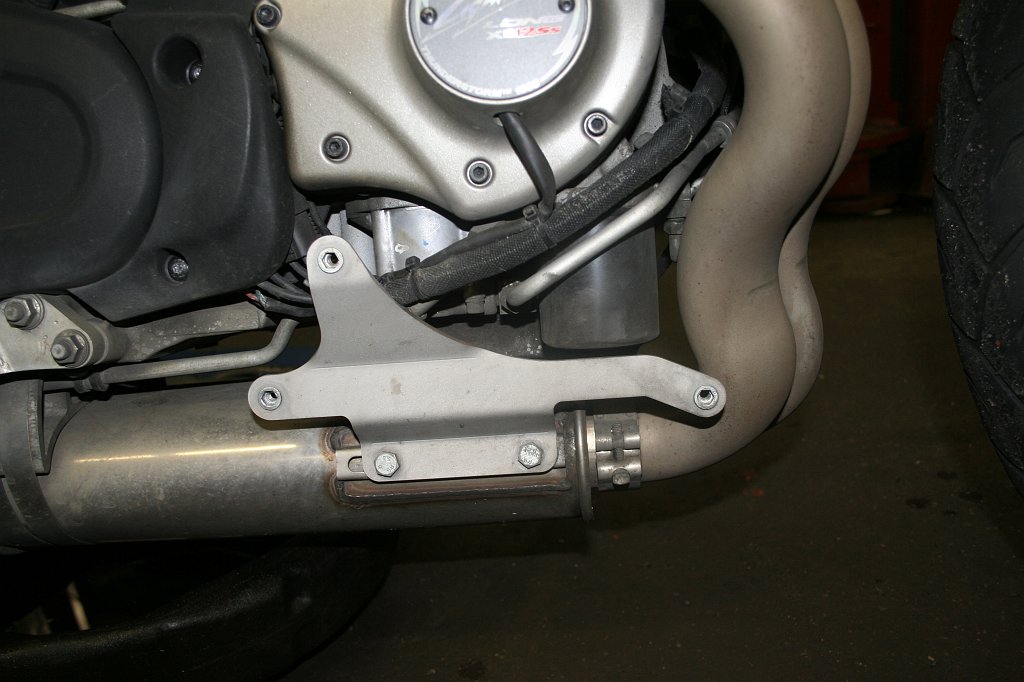 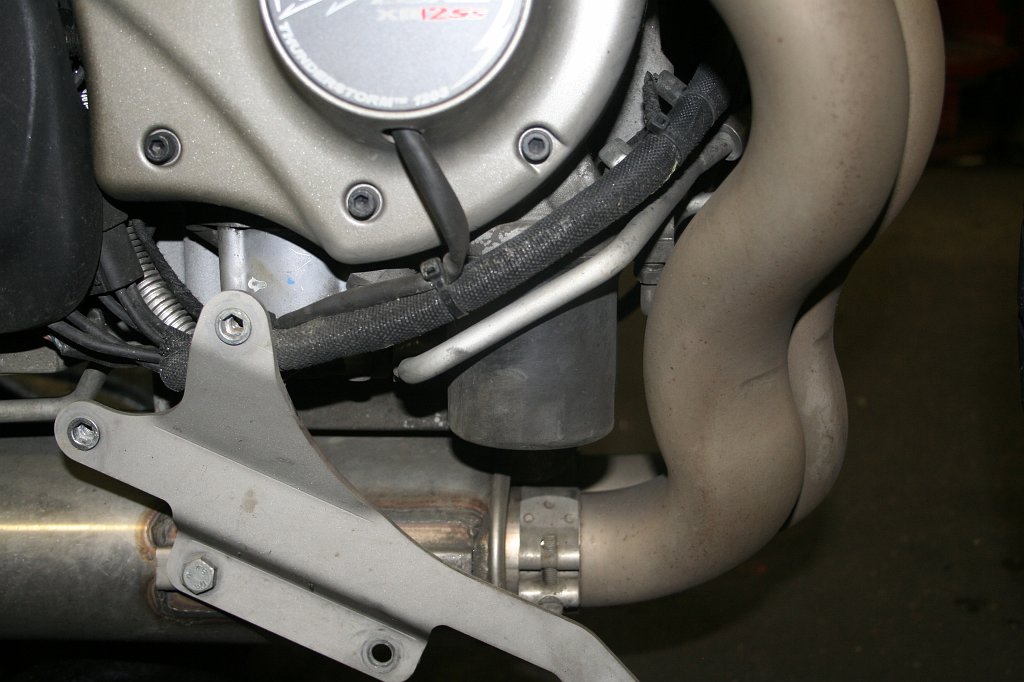 Take the oil pan and move it to the front of the engine under the oil filter. I recommend you put a small rag under the drain plug hole where the oil pan was, as sometimes a few drops of oil will come out after moving the pan.  Remove the oil filter. I use an oil filter wrench. 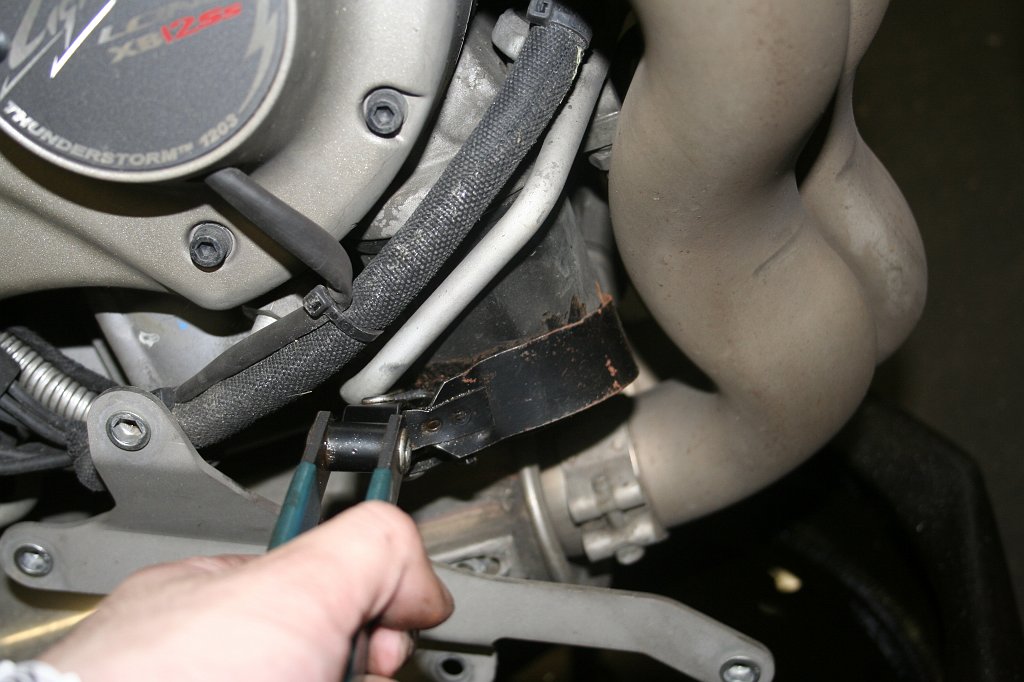 As you remove the oil filter, oil will spill out. Please use caution again as oil may be hot.  Wipe up any spilled oil. 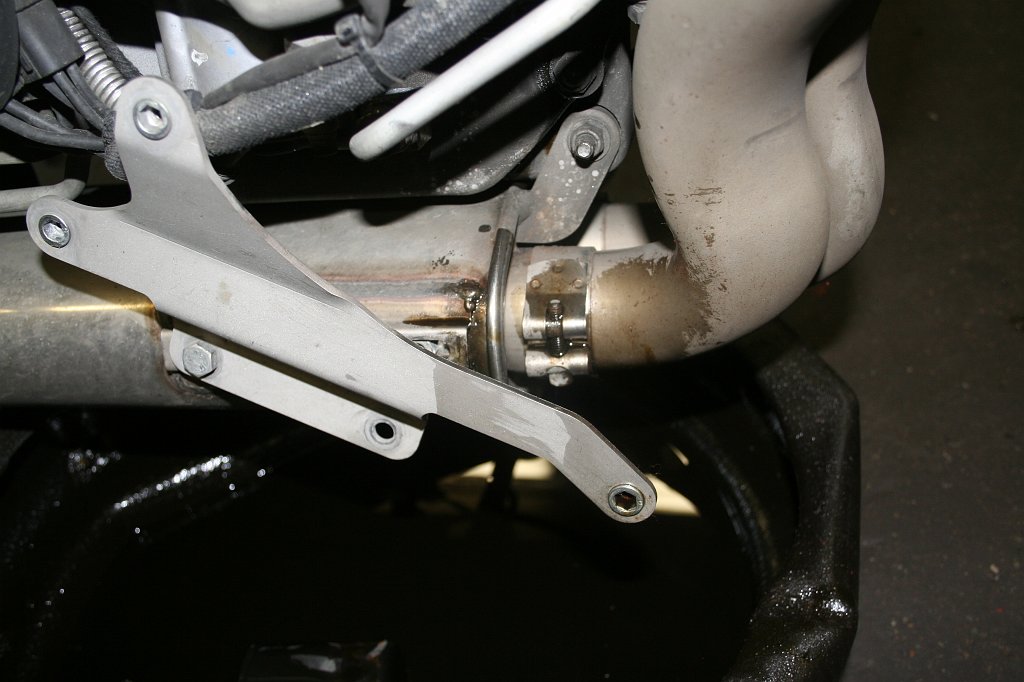 Now we need to prep the oil filter for installation. Take the filter out of the box, and pour some new oil into the filter till it gets about 3/4 of the way full. 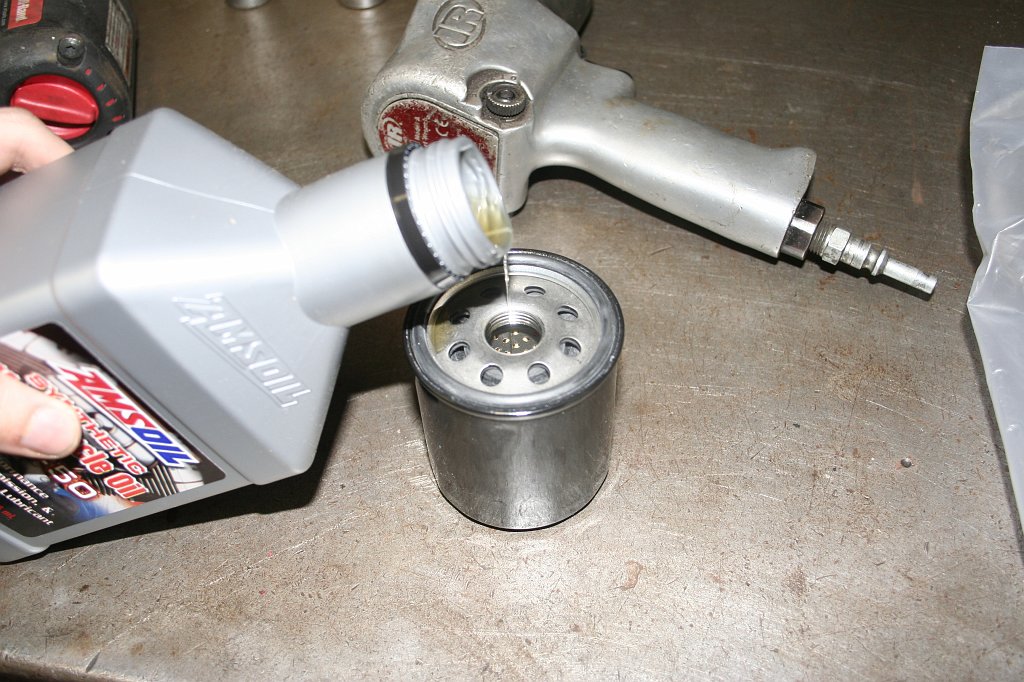 Smear some oil onto the rubber gasket on the filter. This is to make the filter easy to remove next time you go to do a service. 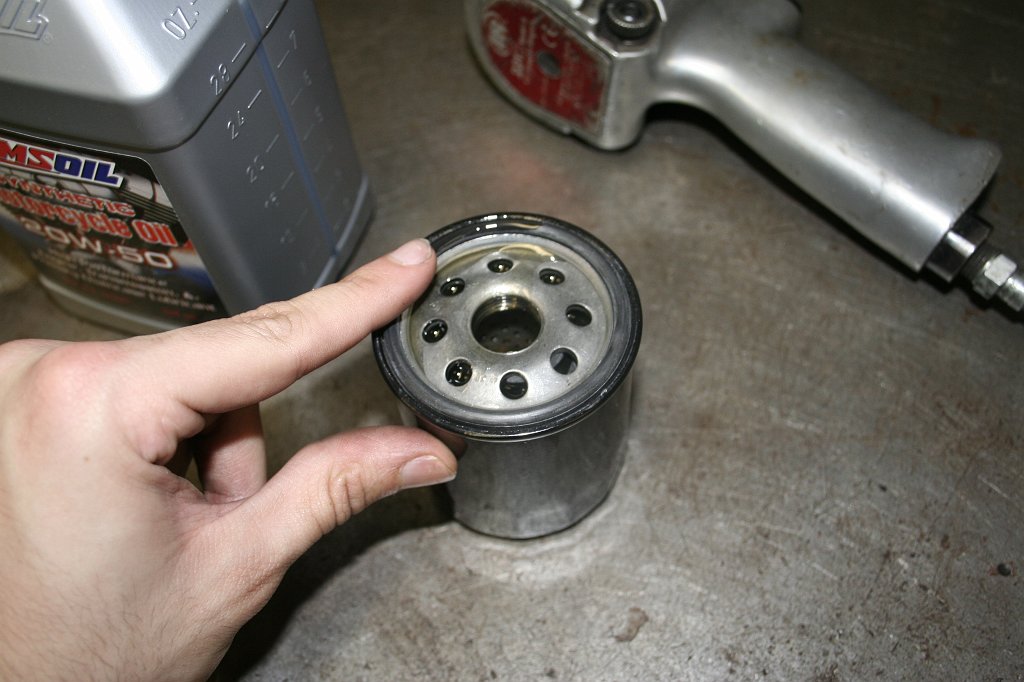 Installing the oil filter is the same as removing it, but in reverse. I screw it on by hand and tighten it as much as I can, then I use the oil wrench to tighten it a little more. 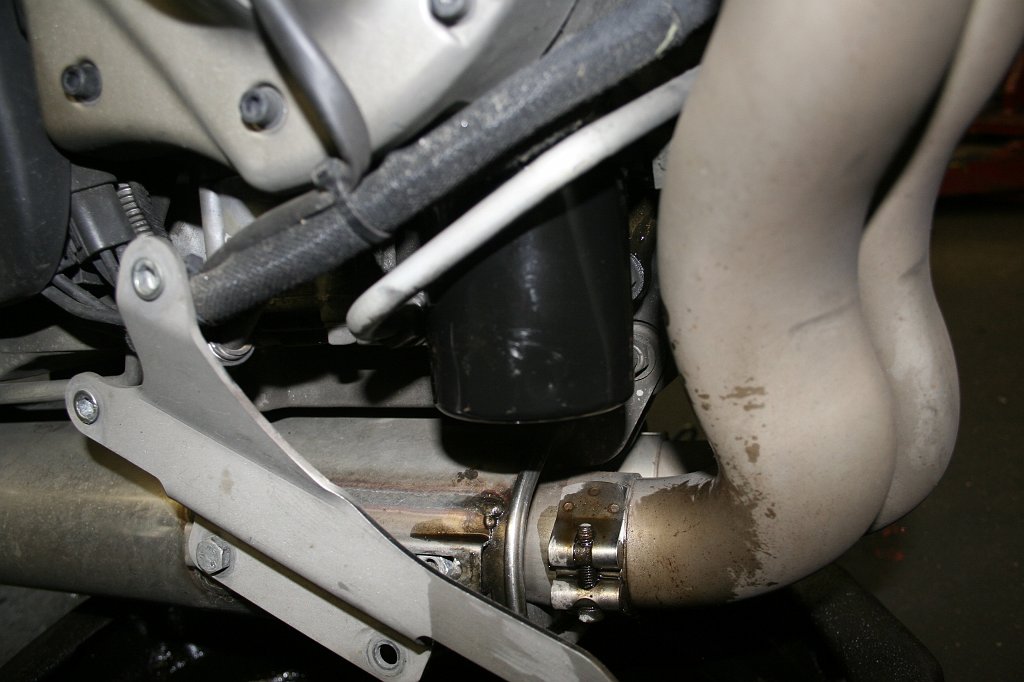 Time to put the drain plug back in. I did not listen to my own advice, and had a small accident as some more oil drained out from swing arm. 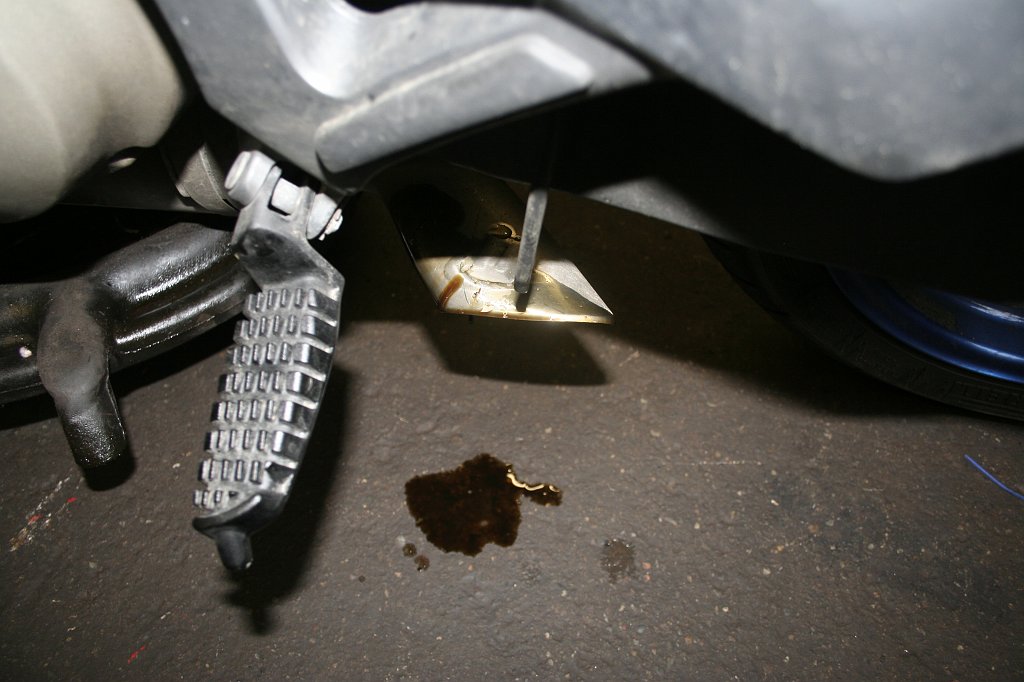 Take the drain plug and clean it off. Remove any metal shavings that might be on the magnetic tip. Remove the O-Ring and replace with the new one. 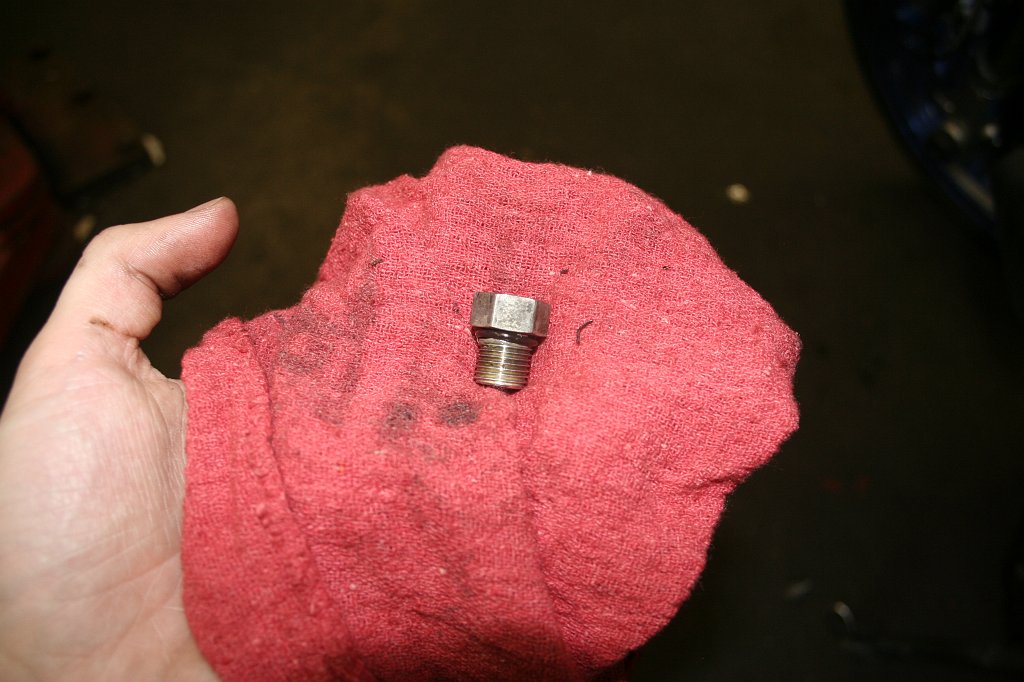 Reinstall the drain plug. I recommend you screw it in by hand, and then using the 5/8� wrench, tighten it till it is good and snug. Do not over tighten the drain plug, as it can easily strip the threads requiring repair. 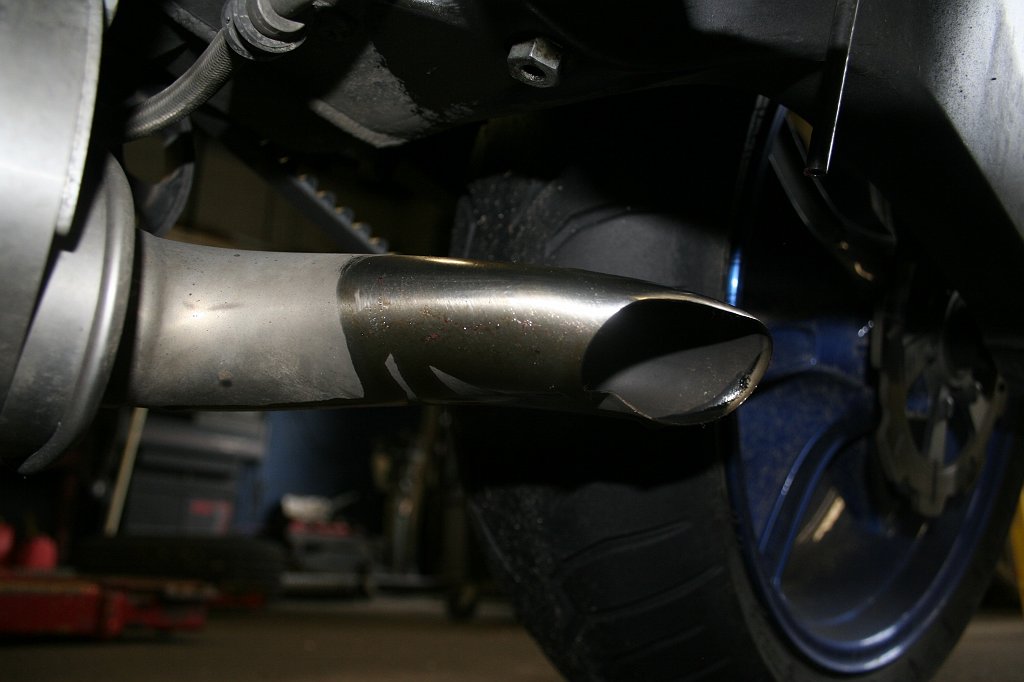 Pour your new oil into the filler hole, where the dipstick used to be. On my bike, the proper amount of oil is 2.5 quarts including the small amount we poured directly into the filter. 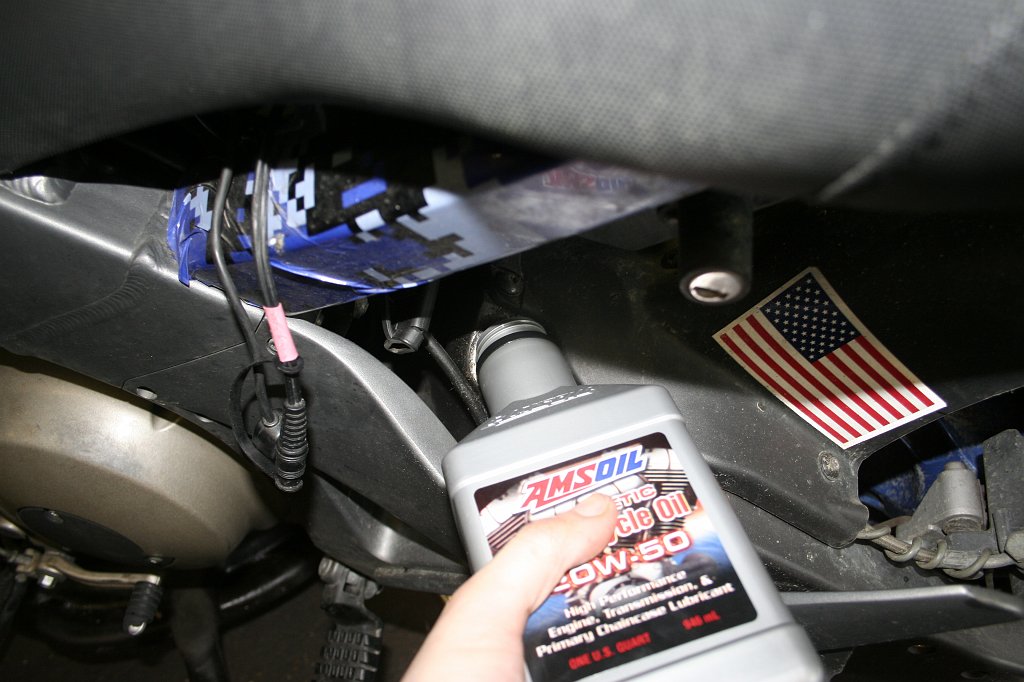 Reinsert the dipstick, and then start the bike. You may get the oil light for a few seconds, this time I didn�t. Take it out for a quick spin and come back and park in a different spot. Check oil level, and check for any leaks. Depending on the mess you made during draining, you might have some residual droplets falling off the bike. Do not be alarmed, if droplets keep forming under the bike double check the tightness of the filter, dipstick, and drain plug. 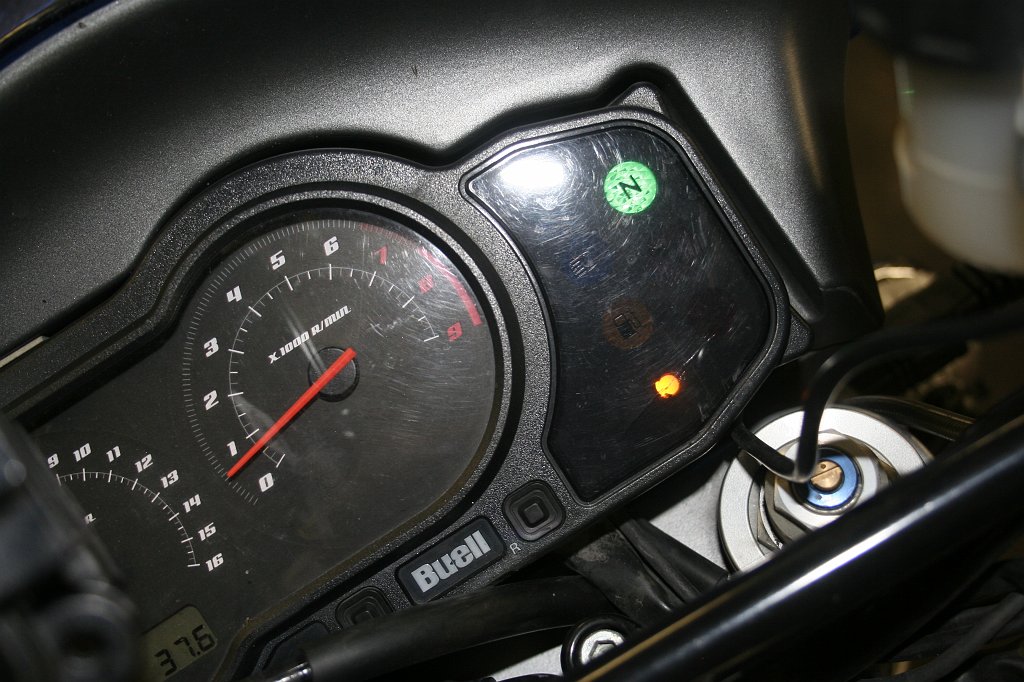 Go ahead and reinstall the chin fairing, it goes on in reverse of how it came off. I do not have pictures of this, as I left mine off because I am doing more work tomorrow!  I hope my guide was beneficial to you. I am not an expert mechanic, and if you see a flaw with my methods please post. My bike has survived about 25k miles with me doing oil changes like this, so I think I�m doing it right! | ||
Newbuellertoo |
Very nice job! I sure it will be helpful to many.  | ||
Signal4 |
Thanks for the step by step, definitely the next one I'll be doing myself. I've changed oil before, and occasionally tinkered with an old 80s dirt bike when I was a kid, but that's about it. I also picked up the White Horse Press book about motorcycle maintenance, man that is an awesome book. Strange enough I saw it at Borders after I had been debating ordering it on the web... I like it when luck goes my way. -Josh | ||
Froggy |
Oh yes, I forgot to mention, it takes no time at all. I did the whole thing in about 30 minutes, including stopping to take photos. It is very easy to do, very straight forward, even for someone that isn't the most mechanically inclined like me. | ||
Itileman |
I did my first oil change on my XT last week. You left out a couple of things:  The oil drain plug is only a few inches away from the primary drain plug. Do not be alarmed when only 1 qt comes out very clean instead of a bunch of dirty oil. It was a good day to change the primary fluid too. The rubber o-rings need to be purchased separately. Be sure that one of the 3 oil filter wrenches that you own will actually fit the Uly filter. If not, stab a large screwdriver through the filter and loosen. Remove by hand. Go clean hands. Clean floor, muffler and hands again. Checking your shoes is not a bad idea either. | ||
Xbimmer |
Nice Froggy, should ease the concerns of those who are inclined to paying big bucks to the dealer for a simple job. My additional suggestions: 1. Take a piece of aluminum foil and form it over the tail pipe to funnel the drainage into the pan, you can use it on the other side for the filter too. Less messy. 2. Everybody take note of Froggy's advice on the drain plug torque. Snug with a box end wrench with a new o-ring and Loctite or Permatex sealant on the threads is just fine and preferable. 3. My last filter change the filter adapter unscrewed with the filter, maybe a good idea to check that it's snug before screwing on the new filter. 4. Change your oil in the same spot on your slab always, put in the required amount and COLD make a note on the dipstick level. After the requisite warmup make another mental note on the HOT level. This will be your CORRECT oil quantity, I'm not alone in thinking that "It's gotta need more oil" and over filling the swingarm and having it puke into my airbox... | ||
Court |
The only thing I'd add. . . . call me anal . . is that I'd clean the area around the oil filler prior to starting to prevent getting dirt, crud and foreign material in. Nice write up. | ||
Xbimmer |
I don't think that's anal, IIRC the oil is pumped from the swingarm, through the pump, to the cooler, then through the filter. Dirt and crap always collects around the dipstick and I always wipe it off before removing the stick. If any gets into the tank then it may find its way through the pump. | ||
Froggy |
Court, I thought the same thing. I should of wiped it off better before removing the stick. | ||
Ulynut |
Nice job! | ||
Hanginout |
Yep, very nice job! I was going to comment on the risk of oil contamination until i read a bit lower in the thread. Maybe a steam wash around filter and plug areas before starting. Also, i was of the opinion the oiled o-ring on the oil filter was more for installment purposes, i may be wrong though. Are the drain plugs magnetic on these bikes? | ||
Ulynut |
Yes, magnetic drain plugs. | ||
Pso |
I thank you, good w/pics. Someone had posted earlier that all that needs to be removed on the chin fairing are the two upper screws on the left side, then just pull it away from filter. | ||
Froggy |
Not 100% sure why I do the o-ring oiling thing, I didn't even look in the manual to see if it says to do it or not. I just have been doing it for years on my cars as my dad showed me. | ||
Court |
I've always put a thin coat of oil on the filter prior to installation to help seal it. I like the idea of changing the o-ring as well. I'm going to pick up a couple. | ||
Palladin |
Nice one Froggy, thanks for that, as soon as I am off warranty, will be changing oil on my own, used to do it all the time on the Road King..piece of cake... Oh, yeah, I owe ya ten bucks.. | ||
Tootal |
I was shocked to see your running a side ways fishtail exhaust tip, I thought anybody running something like that would have opted for the chrome oil filter!!  | ||
Greenman44 |
I was taught in my army helicopter mechanic school that you lube up the o-rings so it does not get pinched as you tighten them down causing a leak issue. A dry o-ring can possibly stick to the metal and cause it to stretch or not seat correctly. Just thought I would let ya know the army's reasoning behind doing this. Shawn | ||
Dynasport |
You're supposed to change the oil? I don't like change. Can't I just keep the oil I have? I have grown close to it. | ||
Electraglider_1997 |
Froggy, Did I make that Temp Dipstick?? | ||
Methed |
Nice work Froggy. Hey, ever considered hand-modeling?  | ||
Thetable |
I too, would like to add a couple notes. I always do mine with the bike good and hot, I actually leave the bike running right up until I have the drain pan in place and the drain bolt a good 4 turns out. Then kill the engine while removing the drain plug as quickly as possible. I have seen how fast the bike will allow oil to drain from the swing arm during normal oil checks, and I want to get as much out of the tank as possible before much can drain back. While you are doing the oil change, the maintenance schedule also calls for the primary chain adjustment. Oh yeah, great write-up! (Message edited by thetable on June 15, 2009) | ||
Froggy |
Service manual calls for it, plus the old one usually looks pretty crushed. They are 51 cents each from the dealer, I don't know what size they are to get a bag for the same price elsewhere.
They make a chrome filter for our bikes? I saw one for a sportster, but wasn't sure if it would work.
Yes you did
I did, but having to take out an insurance policy on my hands just seemed creepy.
Yep, that is part of the primary fluid change, which I will be posting as soon as I can find my camera. I took a ton of photos of it. | ||
Someday |
I have to agree with what Thetable said. On my '08 Uly when the oil is hot it drains back into the engine so fast by the time I get the drain plug out the swingarm is practically empty. To get a reading on the dipstick I MUST have the engine running. I know this is going to freak some people out but when I did the 500 mile oil change I started the engine with the drain plug out of the swingarm and watched for the flow to slow noticeably, then stopped the engine. I'm hoping there will be enough oil film on parts and in the lifters to prevent damage in the short time this takes. If anyone has a better procedure I'd like to hear it. | ||
Xb12xmike |
Someday, thats crazy imho. The first time I changed my oil,.. I removed the drain plug,..let it drain and thought "wow...thats NOT alot of oil". I figured it was normal or was very low. I replaced the filter and then start filling it up and immediately it starts overflowing...I am like WTF!!! (oops wrong drainplug!) LOL!! | ||
Court |
>>>I'm hoping there will be enough oil film on parts and in the lifters to prevent damage You could (I wouldn't) run it an hour with likely no discernible wear. | ||
Cyclonedon |
when I changed my oil, I never replaced the "o" ring and didn't put oil in the filter before replacing it on the motorcycle. Does that mean my beloved Uly is going to die a slow death?  | ||
Electraglider_1997 |
Court, One time I decided to run all the oil out of the oil lines during an oil change so I unplugged the fuel pump wire and cranked the starter until the oil quit flowing out the hole. What scared me was after I filled the swingarm up with the requisite oil and started the motor it took what seemed like forever for the oil light to go off. Probably less than a minute. I really worried about that but that was more than a year ago and my ULY doesn't seem to burn a drop and has been problem free. The amount that came out of the oil lines isn't worth the effort or worry. Don't know if I believe our motor could run an hour without oil though. Seems like the rings would fuze to the cylinder walls well before an hour. Maybe I misunderstood. | ||
Court |
The current crop of oils is amazing. Somewhere. . . . and someone with some time on their hands can find it. . . there are some amazing test results and videos of motors run after the oil has been drained. | ||
Ratbuell |
Don - don't worry about the o-ring this time (if it isn't leaking, you're fine)..but I'd replace next time. Use/re-use likes to make them bunch up and get nicked, and then they leak. Filling the filter just keeps the engine from sucking/pumping air on the first startup after the change, and helps 'prime' the system. Again...if you're doing ok now, don't sweat it...just remember for next time Great writeup, great pics. |