| Author | Message | ||
Tootal |
Since I'm waiting on some parts I thought I'd go ahead and write down the disassembly part while it's still semi fresh in my beer soaked brain! I'm also going to swap out my 06 springs for the 07's. First off if you�re going to do this tree swap do not expect to read this and be able to do it. Go buy a manual! They are good and I don't feel like trying to do a better job than they did. I'm here to do this without HD Part Number XXX. The Service Manual is Mozart and I'm a Garage Band! Let's get started: Obviously you need to remove the front wheel, guard/fenders, brake caliper etc. Remember the front axle is a left hand thread! Remove the fly screen/windshield and behold mama Leoni's Pasta Kitchen: 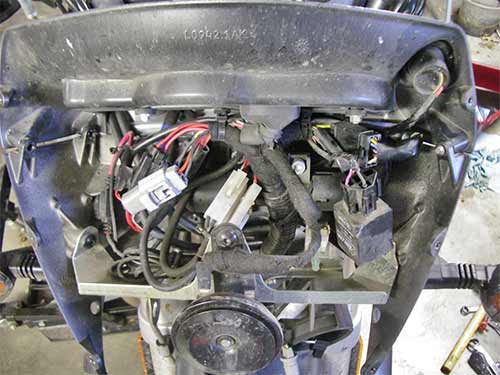 The housing around the ball of wiring is in three pieces. The instrument wiring will disconnect from the harness and after you pull the wire tie keepers from the instrument panel you can lift it off. Once that's off you can see the two security screws that hold the lock cylinder. These take a special torx tool to remove but vice grips will work real well. These screws did not have any locktite on them so as soon as I broke them loose they unscrewed by hand. Here is the bottom screw: (circled) 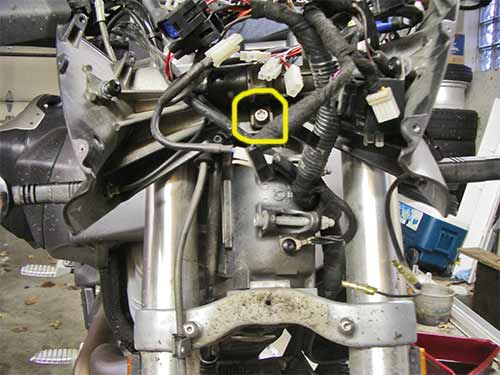 And the upper screw:  Once these two screws plus the other screws in the trees are removed everything just falls apart and you�re left with naked forks. If you're not changing your springs you can simply remove the forks at this point. I am changing mine so I will go ahead and show this part also: 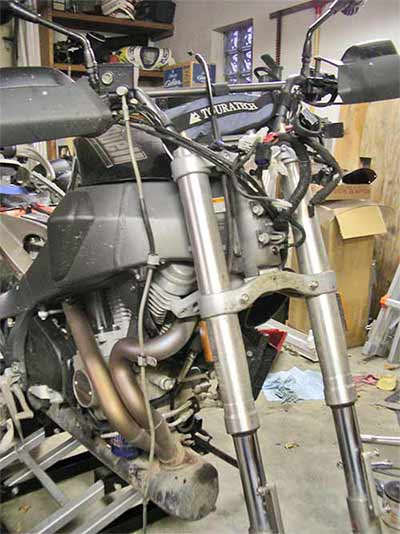 If you haven't cleaned the bottom of your forks I would recommend it. I used WD-40 since it takes off suicidal insects, tar and dirt real well and lubricates at the same time! Such a deal! Now removing the handlebars will leave you with concern over all that wiring, well I just let it hang over the fork. I don't want to disconnect anything I don't have to. I'm lazy. You can easily work around it. The next step is removing the fork legs and putting them in Harleys fork clamp. Well I'm looking at this and am thinking they already are in a clamp so why remove them! I decided to disassemble them in place. First take the c-clip off the top of the adjuster as seen here on the right, and unscrew the adjuster and pull it off as on the left: 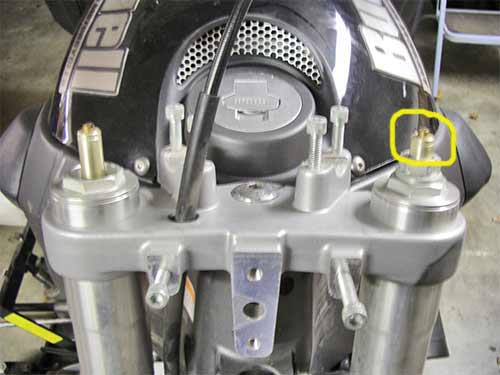 The next step is to unscrew the big nut that's on top of the fork. Before you do put the front axle back in and thread in a few threads. Take a ratchet strap or equivalent, and put it over the bottom tree and under the axle. Ratchet it up to get rid of the slack and stop. Now get a proper socket, deep well works best, and break the top nut loose and unscrew it. There is no spring pressure on it so there are no surprises! Now you will need to ratchet your strap and lift the guts out of the fork tube. This is why I wanted you to clean the fork tube. Just crank it on up so you can easily work on things. Before you go any further you will need to make some minor tools. At this point the manual says to put the fork in HD Part #XXX spring compressor. Well I made up a couple of items that anyone should be able to do at home. To pull the spring spacer,(tube), down I used a piece of pipe roughly 1" long and drilled and tapped two 3/8-16 holes in it 180 degrees apart. I cut a piece out just to make it easy to attach and put some long 3/8" bolts in the holes to pull down on the tube. Once the tube is pulled away I slipped a slotted spacer under the jam nut to hold the tube. Here is a pic: 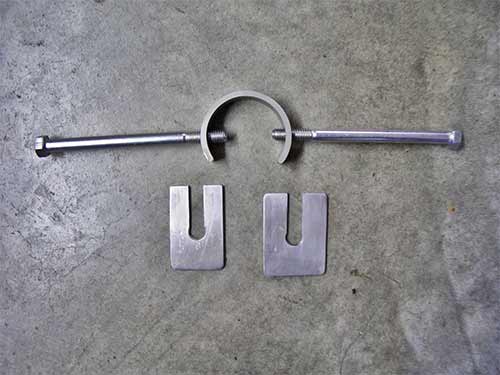 The slots are 7/16" wide. Here's a shot of the tools at work: 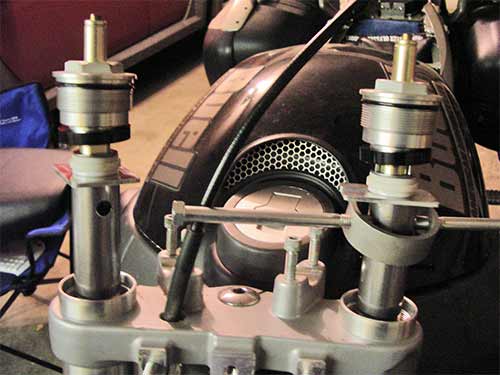 Once you have the tools in place you can unscrew the brass away from the jam nut. This requires some thin wrenches. I used some tappet wrenches that came with the Craftsmen tool set I bought many moons ago. I rarely use them but when I need them they are nice to have.  Once you break them loose they will unscrew and then gently pull the long dampening adjusters out. Once they are removed you can reemploy the spring compressor and slide the plates out and relieve the pressure. You can pull the tubes out now. Have a rag handy as they will be dripping. The ratchet strap can be loosened but have a block of wood or equivalent on the floor to stop the travel so the forks don't pull out completely. I don't know if they would but they came out further than normal to I didn't risk it. You can remove the forks now as described in the manual. Poor the oil out and stroke the inner tube 10 or so times until there is no more resistance. They say to let them hang in the fork clamp and drip but I just set them upside down on some paper towels. Well we're down to the naked trees now. Just loosen the allen nut in the middle, unclamp the top tree and finish unscrewing the nut. You can twist the trees back and forth till the top pops off and the bottom pulls out of the bearings.  Notice the rust on the shaft.  The bearings were shot. I was getting a clicking sound under heavy braking so I was pretty sure they were toast. I really don't like this type of set up. Timken bearings are so much stronger than these I really think a bike like the Uly deserved the better timken design. IMHO. Here's what the bearings looked like: 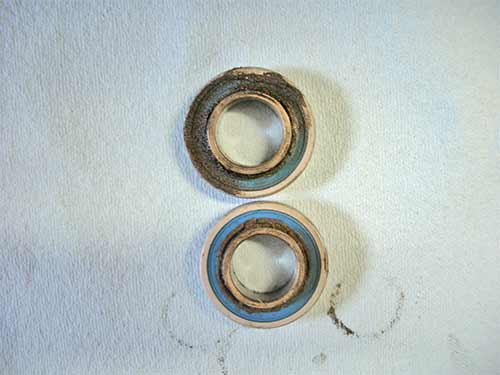 You can see the upper bearing's seal was leaking and they both had a lot of side play. They really are wimpy bearings. Well as soon as I get some new ones along with some other items I will start the Assembly thread. If anybody sees an easier way then by all means let us know. Beer break!  (Message edited by tootal on January 24, 2009) (Message edited by tootal on January 24, 2009) | ||
Buellhusker |
This may be a stupid question but why did you disassemble the fork legs could you not just slip them out the bottom after loostening the tripple tree pinch bolts? | ||
Buellhusker |
Another stupid question what are the pinch bolts used for on the neck of the frame? | ||
Ratbuell |
The bolts on the neck of the frame aren't pinch bolts, they're used (even though there isn't a long wheelbase fairing XB) to hold the XB-R fairing stay to the frame. They're what lets folks build XBXR Ulybolts. | ||
Dio |
The bolts on the neck of the frame are mounting points for the wire loom guide for the main harness, and a grounding point for some of the electrical. | ||
Tootal |
Buellhusker, part of my endeavor is to install the 07 progressive springs. I apologize, I totally forgot to mention that. I had in a previous thread but not here. I'll have to fix that, thanks. | ||
Alchemy |
Tootal, Thanks soooo much for putting these pictures together. Did you happen to get a picture of the compression strap in use? I have the 07 springs and have been thinking about such an upgrade. Not so impressed with the bearing situation and the corrosion. Keep up the excellent posting. | ||
Xbimmer |
Thanks for the pix.  The ratchet strap can be loosened but have a block of wood or equivalent on the floor to stop the travel so the forks don't pull out completely. I don't know if they would but they came out further than normal to I didn't risk it. Yes, they will drop out! Only thing holding them in is the top cap. Had it happen to me with a freshly topped-off serviced fork in my hands when I let go of the bottom to answer the phone...  I see in your second pic you still have the '06 wire harness guide. You can see how it is crimping your harness where it exits at the top. That's where it broke my tach wire in there. You might want to replace it with updated part #Y1000.2AK or do like I did and leave it off completely. Couple of zip ties through the bolt holes to manage the harness, frees up the steering too. | ||
Tootal |
Xbimmer, thanks for pointing that out. I still have the original clutch cable wire form too. While I'm here I'm going to change the throttle cables too. It's a good time to tidy up a few things while it's all apart. Alchemy, I didn't get a picture of the strap but you could use a rope if you wanted. There is no pressure involved, it just raised the internals up so you can work on them. It also keep the forks from falling apart once you remove everything. | ||
Mnrider |
Oh good deal I can go out to the garage and drink beer and remove my wire harness guide and fab something for that. More great tips for my 06 X | ||
Longdog_cymru |
Just a quick question: I have an '06 Uly and I am pretty happy with it now I have dialed in the suspension. If I fit progressive springs, how does the suspension set-up chart in the handbook/workshop manual relate? Is the '07 settings different? If so then how? Can someone cut 'n paste and post the '07 settings? | ||
Gamdh |
Longdog.. try this, '07 Manual http://www.buell.com/om/99477-07Y_en/index.asp | ||
Tootal |
http://www.buell.com/om/99477-07Y_en/file-5.asp#hd topic000616 | ||
Longdog_cymru |
Gamdh and Tootal, thanks!!! | ||
Tootal |
Well my bearings came in and now I have to make an insertion tool. I'm afraid that even though you can theoretically beat them in with a hammer, I would never do that to a bearing. The factory tool is what I will make. I don't take shortcuts with bearings, they are just too easy to damage. | ||
Tootal |
Ok boys and girls, if you know what these are and you honestly need one please PM me and I'll ship you one. 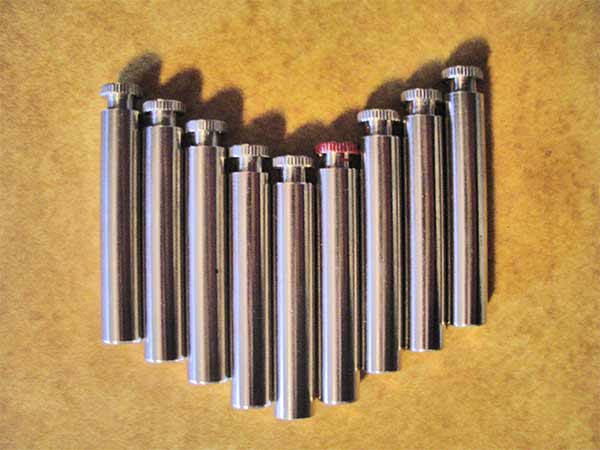 They are stainless and I will include a bushing, as soon as I make some, that will steady it so it doesn't rattle. I was reading elsewhere that the 08's have a rattle in them that's related to these. | ||
Tootal |
Well the first bushing failed so I changed course. I knurled a spot on the pins and press fit, along with some green loctite, a bushing onto the pin. It will slide in the tree now. I put mine in and it worked great. Here's the pin: 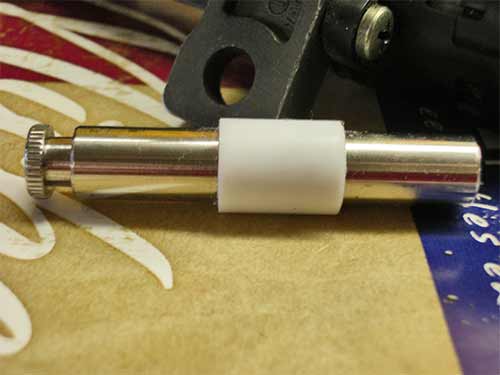 Here it is in the lock mechanism: 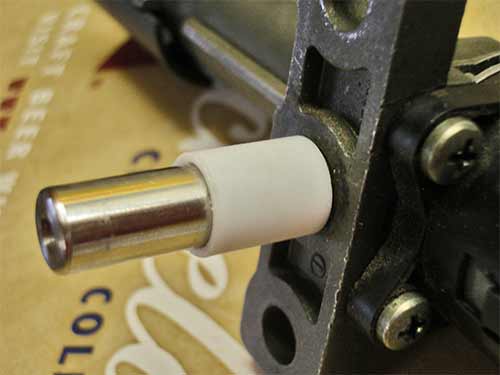 Here it is in the off position: 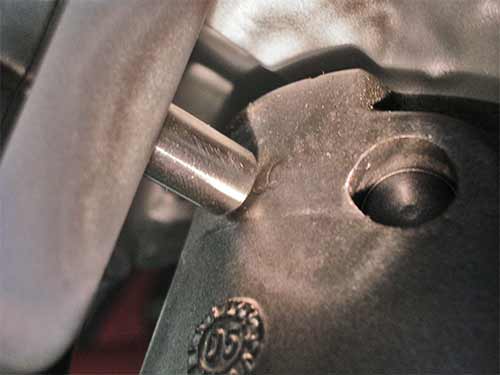 And in the lock position:  The bushing feeds out the back and steadies the pin. I'm happy with it now so I will be shipping hopefully tomorrow to those who PM'd me. | ||
Tq_freak |
Where did you find the bushing at if you don't mind me asking | ||
Tootal |
I made them out of Teflon on a lathe. | ||
Tootal |
I finished the bearing tool and it is similar to the factory one: 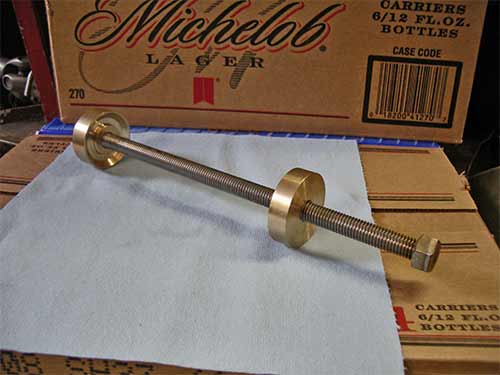 I cleaned the bearing holes and then put some anti-sieze on the mating surfaces. When you put the bearings in, do one at a time to help keep things square. Here's the top bearing being pressed in: 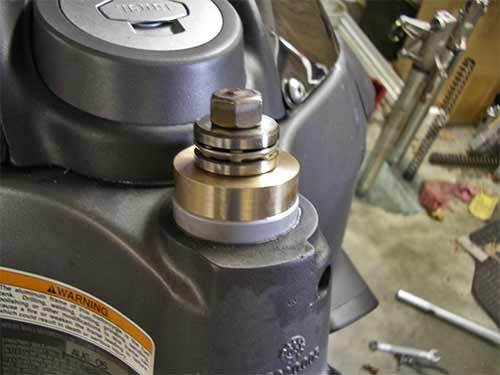 And the bottom one: 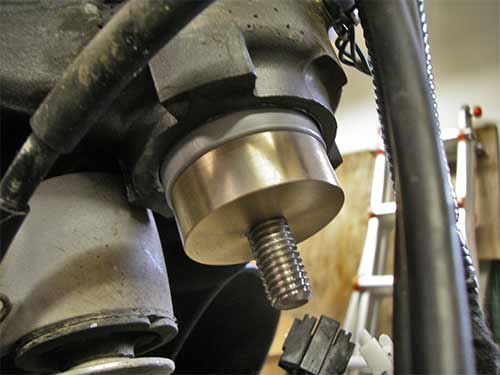 Mission accomplished:  After getting the new ones I now realize what type of bearings they are. I call them a high shoulder bearing. One side has a tall shoulder so it makes it handle thrust in one direction. By using two of these bearings back to back it locks them up to get rid of endplay. Still not as strong as a Timken but better than I originally gave them credit for. I put anti-sieze on the shaft of the lower tree and inserted it up into the bearings and connected it with the top tree. Now I'm ready for fork oil. Maybe this weekend I'll continue. Now where did it set my beer? | ||
Tginnh |
Tootal - thanks for the excellent post and the time you invested in thoroughly explaining the process. Very impressive job! Seeing the condition of those bearings and the shaft is a bit disconcerting. Couple of questions: 1) How many miles on your 06? 2) Is there anything atypical to the conditions you ride in that would lead to this type of failure? Ok, I know there is not much that is typical about Uly riders, but you catch my drift, right. 3) Was the rust on the shaft superficial or did it leave pitting? | ||
Etennuly |
Thanks for your continued posting on this project. As you know Orangulius and I, with the help of Gotj, plan to do this project over a weekend when the weather warms up a bit. You have laid out instructions that are much better than any tech manuals I have seen. That pin looks like the ticket! Good job.....and your beer.....on the bench to the left at the back behind the parts box. You set it there so it wouldn't spill in the work zone.  | ||
Tootal |
I think I have 13,XXX miles on the Uly. I have the dash off and I don't remember exactly. I have ridden in a lot of rain. I like to ride in Colorado in August and it seems to rain there every afternoon! The rust was starting to pit. Etennuly, thanks for finding my beer. It was warm by the time I found it but that's OK, it was a stout!! The lock pins have all been spoken for. Sorry if you missed out. I'll be happy to give anybody the dimensions that can use them. | ||
Tginnh |
Yikes. 13k miles, rain or shine - that sure seems like a premature failure. Is this a common problem/issue? Etennuly - could you please update this thread with the condition of your bearings when you have them removed? Thanks. | ||
Etennuly |
Etennuly - could you please update this thread with the condition of your bearings when you have them removed? Thanks. Sure can, but they likely will be that of Orangulius'. We will be doing the triple tree update on his '06. For now mine will likely get a fork oil change and a retorque, I might even wash it. | ||
Smiley1eye |
I thought Uly's started to fall apart when you washed them? Taking a hell of a chance there Etennuly! | ||
Etennuly |
Well, I have washed it a few times.....and I have had a few problems......Hmmmm? | ||
Tootal |
Well as a few of you already know the lock pin I made was a little short. Someone on this board claimed that .450" longer than stock was what you needed so that's what I did. When you put the pin in and mounted the switch assembly to the tree it was a perfect dimension. HOWEVER, and there's always a however in life, when you put the side housings on they go under the lock mechanism and puts that mechanism .220" further out making the pin too short! Doooh!  Therefore we will fabricate once more. Before I discovered my DUMBA$$ attack I had put the forks back together so I'll concentrate on that for now. Since the 07 forks require less oil than the 06's I searched this site and found a wonderful explanation from anonymous, and we all know who that is right? It gave the different specs between the 06 and 07. You can read it yourself at: http://www.badweatherbikers.com/cgibin/discus/show.cgi?tpc=142838&post=741654#POST741654 Get yourself some HD Type E fork oil and pour 9 oz. into your measuring cup: 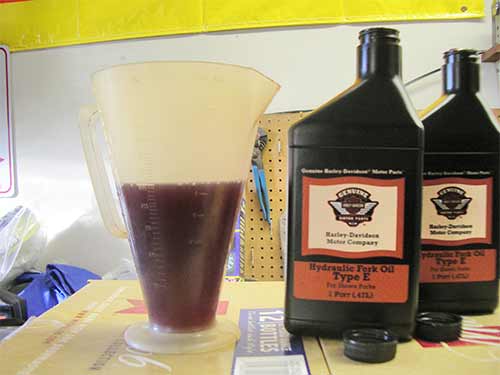 Pour into your fork. Your springs should not be in there yet: 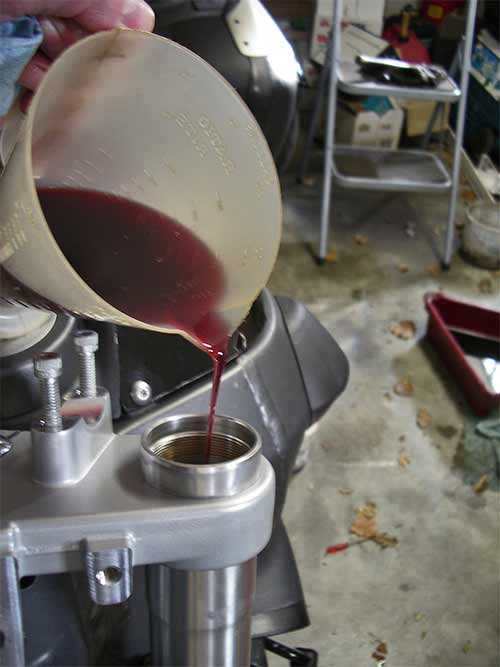 You will need to collapse the fork completely. I did both forks at the same time by installing the axle and using a ratchet strap to collapse them. Go slowly so you don't shoot any oil out! Once you're collapsed you should be able to reach into the fork and grab the dampening rod. Ok you bunch of sophomoric punks, this is where you get to stroke your rod!! It should only take 12 to 14 strokes before fluid squirts out of the top. The strokes should be long and slow. Short fast stroking will not accomplish your mission! Once you feel resistance stroke it a couple more time to be sure you've got all the air out. Pour 4oz. more in and check your measurement. You want 172mm or 6.772". That's just slightly over 6 3/4" and since you have a +/- of 8mm or .315" or 5/16", that's close enough. I took a wire tie and measured down from the edge of the head the 6-3/4� dimension and took a pair of dykes and cut a nick in the side. Now I can simply run the wire tie down against the head and take a measurement: 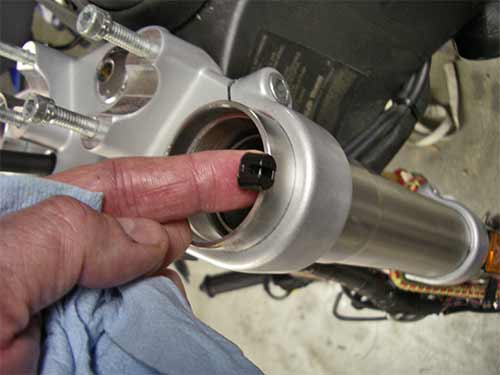 You should still be under your mark so add a little oil and check again:  You can see I'm overfilled by less than 1/8" so I'm well within tolerance. Repeat on the other fork. Now I know somebody is going to tell me that you can't measure accurately since the forks are in the trees and they are not straight up and down. Well if you take your measurement from the side you will get an angled reading. If you use the middle of the angle as your reading then you will still be accurate. Look at the above picture and you can see the oil line is angled across the wire tie. Now you can insert the springs:  . Now you have to get out your spring compression tools and install the tube. Now here's the real trick. You must pull the dampening rod up, slip the tube over it quickly because it slowly falls back in. Now with the tube over the rod insert the compression tool and quickly pull down and insert the slotted shim under the jam nut. Be sure the jam nut is all the way down. Now you can install the dampening adjusting rod and screw the brass piece onto the rod and lock down the jam nut. Don't go crazy on the jam nut, that brass is not as tough as steel. Now you can lower the forks and screw the large nut assembly into the forks. Put some oil or grease or 111 onto the o-ring to lubricate it. This is not tightened very much even though it might have been hard to remove. I think it's around 140 INCH LBS. Install the adjuster nut and set to your specs. Install the snap ring retainer on top. As soon as I have the proper pin for the fork lock I'll continue. Until then,  | ||
Thesmaz |
I have been following this thread since you started it an I just want to say THANKS! I am planning on doing the 07 spring upgrade/fork oil change soon and your pics/step fill in some of the blanks from the shop manual. You ideas on how to do this job without all of the special tools is great as well. I'm going to send you a PM as well, got another question | ||
Tootal |
Well the new pins are finished and this time it actually works. Here's the pin in the lock:  Now it's time to install the sides, lock and connect all that wiring: 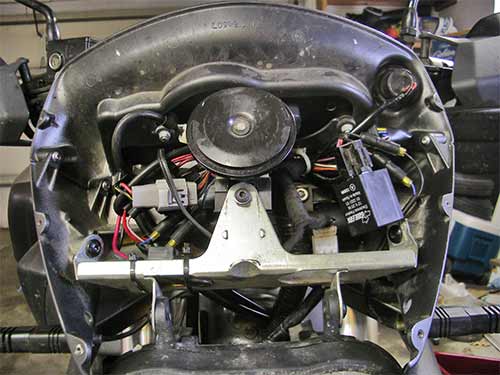 Now that everything is back lets' check the new pin: 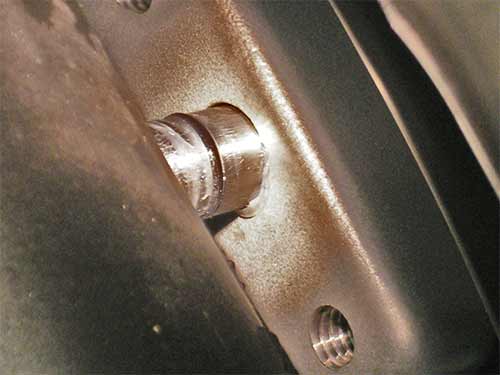 Here it is in the locked position. You can see the o-ring sticking out. When it's in the off or run position it retracts to the edge of the hole to seal out dirt: 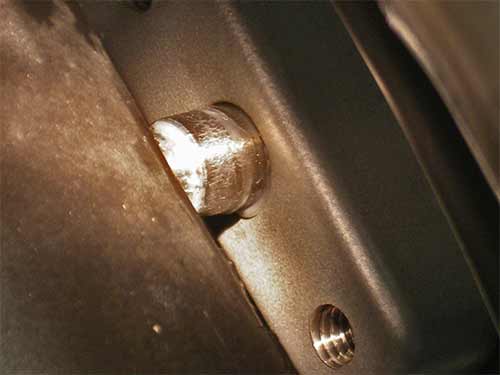 I finished reassembly of everything I had tore apart and took it for a shakedown cruise. Wow, I feel like I just got a new bike. I could turn it around in my garage and pulling out of the driveway I didn't hit the fork stops. What a huge improvement. I went out on some farm roads and what use to feel like I was riding a jackhammer was now smooth. The new springs made a big difference. I think maybe mine might of had too much oil in the forks. The difference is so big I can't believe that just the springs made that big of a difference. By the way, I had configured the forks in many different ways trying to make it ride smooth and nothing seemed to help. Now it's great! So my Winter project is finally done. I changed the primary to the XB9. New clutch cable and throttle cables. The 08 trees and 07 springs. New magnecor spark plug wires. New clutch cable holder. With all these mods it has transformed the Uly to what it should have been to begin with. Well except for that 6 speed!! All in all Buell did a great job at their first attempt and has done well listening and changing things for the better. I was so pleased that I actually gave her a bath!!  I think nice beer and a stogie are in order to celebrate the completion. Thanks for all the kind words and if anyone needs any info feel free to PM me and I'll try to help. Cheers!  |