| Author | Message | ||
Tootal |
Well I did a search on this in the Knowledge Vault and didn't see any step by step so I thought I'd throw some pictures in for those that are planning this mod. Thanks go to all those who have done it and passed on your experience. 1. Follow the manual on removing the primary cover. I didn't remove the shifter assembly, no need. I left the clutch cable in too. When removing the case I lubricated the splines on the shifter shaft to protect the seal:  2. To remove the crank nut use a piece of metal 4" long and put it between the two sprockets to lock up your primary. I had to use a 3/4" breaker bar and a 1.5 foot pipe. Here's a shot loosening the clutch using the same technique except the clutch has a LEFT HAND THREAD! 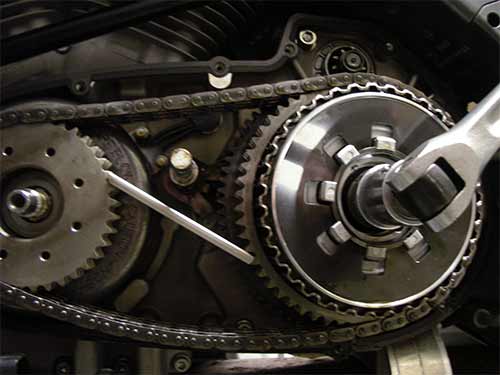 3. To get to the clutch nut you must remove the retaining ring and remove the clutch adjuster: 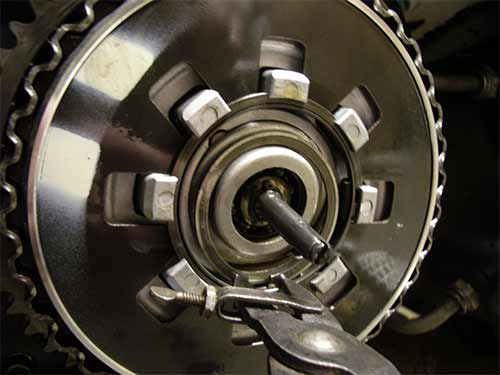 4. Remove the whole assembly as a unit. The front stator magnets will make it a little tough but it will come off: 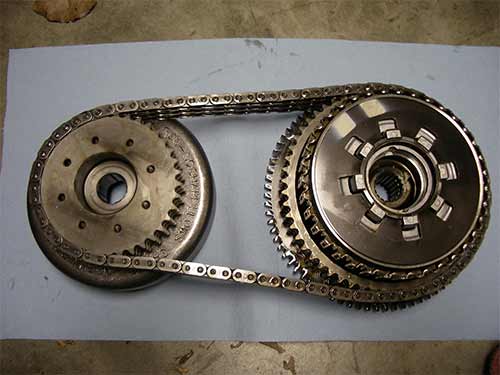 Put the sprocket in a vise with soft jaws and remove the 1/4" bolts holding the magnet housing on. If you don't have a vise at home get a friend with a good grip! 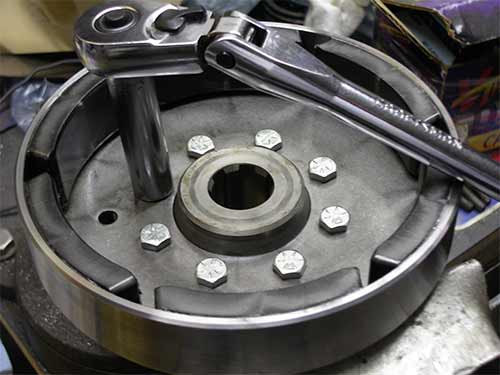 Once the bolts are out it may take a press to get the sprocket off. I don't have one at home so tomorrow I'll take it to a shop and press it off. Once it's off I will continue with assembly is the reverse of disassembly. Time for a homebrew!  | ||
Rotorhead |
Thanks for the thread!!! Starting this mod tomorrow afternoon!!! | ||
Maximum |
Thanks for the pictures tootal. I am thinking that this might be one of my next upgrades...as I have been close to pulling the trigger several times (including last night). I read somewhere on BadWeb that if you order part # 32493-02B (ROTOR & SPROCKET ASSY), then you can bypass the pressing stage. Too late for you, but that might be something for others to consider. Has anyone ever done this conversion and not liked the resulting performance? This might be a winter project for me...so keep the pictures coming. | ||
Tootal |
I read about the assembly after I had ordered the kit from American Sportbike. That's ok, I have an arbor press at work that will work perfect. I will continue the pics on assembly. Anything in particular anybody needs to see, let me know. | ||
Tipsymcstagger |
I read somewhere on BadWeb that if you order part # 32493-02B (ROTOR & SPROCKET ASSY), then you can bypass the pressing stage. Too late for you, but that might be something for others to consider. Is that part number for all years or pre-2008? I'd like to do this over the winter as well on my '08. I need to reserach the applicable part numbers and get this stuff ordered. Tipsy | ||
Cityxslicker |
That is how any home mechanix fixins should be measured. The number of brews needed, the number of people 'helping' multiplied by time spent and factoring in the ratio of pizza slices consumed.... Most of the stuff is about a 2 beer operation  | ||
Jlnance |
I measure by: 1 - How many trips to Advance Auto. 2 - How long before I have to call for help. | ||
Ratbuell |
Projects in my garage are usually measured by "goddammits" and "mother******s* - not only quantity, but frequency and volume. Great writeup, I'm anxious to hear your impressions once it's done. It's on my "if I don't have anything else to do" list for my '06.... | ||
Hmartin |
Rat - so true!    | ||
Conchop |
I inquired about a swap with my dealer. My bike still has a warranty so I'll have them do it. They are supposed to be checking on "parts". Do any of you know if the motor company has the parts for this swap - OR - is American Sport bike the only game in town? Typical - if it ain't chromed, it ain't in the HD brain. | ||
Maximum |
Tipsy: My understanding is that the part number I listed above was for only the Pre '08 XB12 engines. But maybe one of the guys with access to all the parts manuals can verify this...and get the '08 and newer equivalent part numbers for everyone. Conchop: American Sport Bike sells a kit that contains Buell factory parts...so they are the same parts that could be purchased from any Buell dealer. But Al normally keeps a pretty good stock of stuff, so it might be quicker to order the items from him. | ||
Tootal |
What Maximum said. Here's the links to the 04-07 bikes: ($193.10) http://www.americansportbike.com/shoponline/ccp0-p rodshow/A17150.html Here it is for the 08+: ($220.00) http://www.americansportbike.com/shoponline/ccp0-p rodshow/A17192.html The crank is bigger on the 08+ bikes. You can order the front sprocket, chain and gasket from the dealer, it's all factory parts. AS has them in stock and ready to ship most of the time, unlike most dealers. (Message edited by tootal on December 29, 2008) | ||
Thunderbox |
What I want to know is what kind of homebrew do you use and how much do you make in a batch? | ||
Tootal |
Well that would depend on the job. I pulled the primary off while watching a football game so that doesn't count! We make 10 gallons at a time. Full grain recipes. Sabco brew magic RIMS system and Pro Mash software. My brewing partner is a geek and I'm the hammer jockey. He's the idea man and I'm quality control!  | ||
Tootal |
Ok, I'm back from the shop. Pressing the old sprocket out made my keester pucker. The book shows two blocks, one on each side, holding the stator. When set up like that it wants to fold the stator in half and as you add pressure you can hear little cracking sounds.  I kept turning it and pressing till I heard noises but it wasn't going well. My friend looked around and found a couple of large crank bearing caps laying around. (He builds pro-stock motors), and I was able to use them to wrap around the sprocket giving me four points of contact instead of two. This worked much better as it popped real good when it let go. I inspected the magnets and didn't see any cracking so I installed the XB9 sprocket by pulling it in with the bolts. They show a press in the book but I didn't want to take any chances with the magnets. Using a cross pattern I pulled it in real easy. Now here is a shot of the two sprockets. The XB9 is mounted and you can notice they machined out the center to make it lighter, less of a flywheel: I kept turning it and pressing till I heard noises but it wasn't going well. My friend looked around and found a couple of large crank bearing caps laying around. (He builds pro-stock motors), and I was able to use them to wrap around the sprocket giving me four points of contact instead of two. This worked much better as it popped real good when it let go. I inspected the magnets and didn't see any cracking so I installed the XB9 sprocket by pulling it in with the bolts. They show a press in the book but I didn't want to take any chances with the magnets. Using a cross pattern I pulled it in real easy. Now here is a shot of the two sprockets. The XB9 is mounted and you can notice they machined out the center to make it lighter, less of a flywheel: 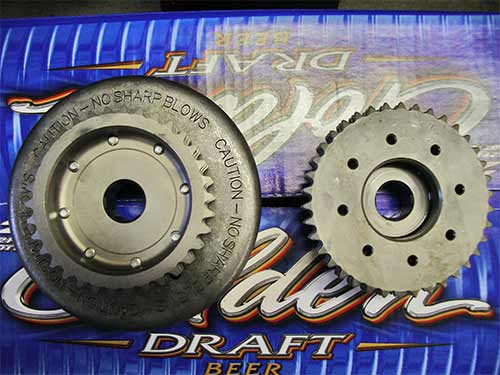 Now get your new chain out and put your stator/clutch assembly together and install on their appropriate shafts. Hopefully you already cleaned the threads on both shafts. Now add some red loctite to both: 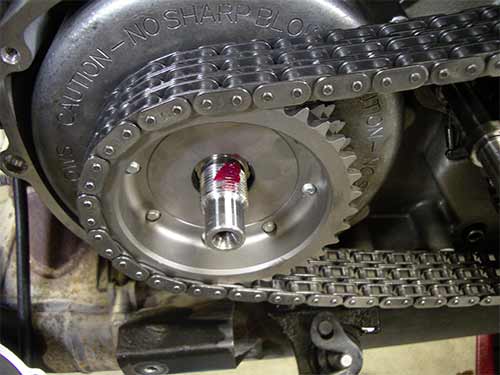 Remember the clutch is a LEFT HAND THREAD! Torque it to specs: (70 - 80 ft.lbs.) The crank nut is 190-210 ft.lbs. If you don't have a big enough torque wrench then use this method. It's easy for me because I'm 200 lbs. Place center of foot one foot down the breaker bar and stand up: 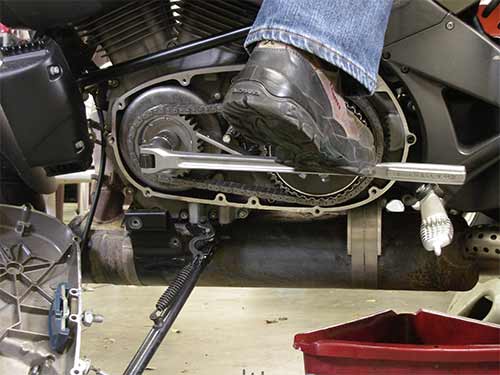 Now there's two ways of looking at this, if your not drinking then you might survive this maneuver. However if you slip you might do some physical harm. On the other hand, if you are drinking then you probably will slip but it won't hurt so bad. Do this at your own risk. Don't tell me I didn't warn you! Ok, both nuts are torqued to specs and everything looks good. I've also installed the clutch adjusting screw and it's retaining ring: 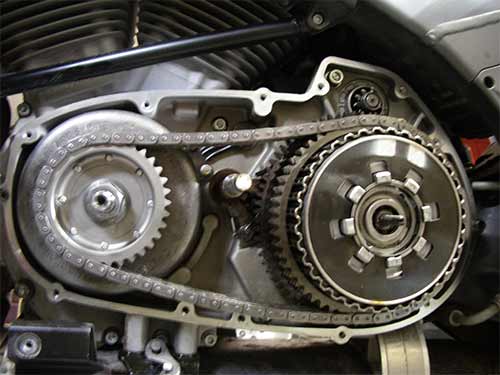 Now it's time to install the new gasket. I like to use a product made by Dow Corning. It's 111. It's a non hardening silicone. It helps with installation by controlling the gasket because it's sticky. It helps seal and it makes removing it ten years from now real easy!! This is not required nor promoted by the factory, it's just me, do what you like. Before installing the side cover wipe your shift shaft off and relube the splines. Put a little grease inside the double lip shaft seal that's in the cover. Line up the shift shaft and slide cover on. Just as it gets to the seal you will need to reach up under the cover and push up the primary chain till it lays on top of the adjuster. At this point it will slide right on. Line up your dowels on both sides and you have it: 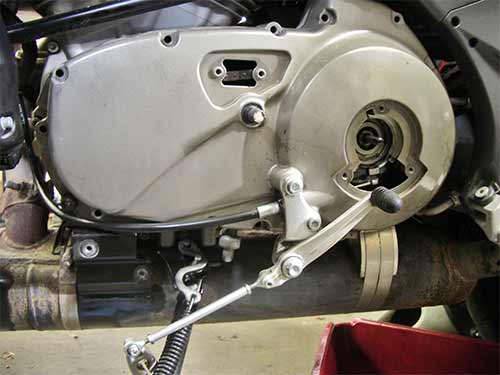 Clean the side cover screws with brake cleaner or equivalent. I use a wire wheel on a grinder to remove the old loctite: 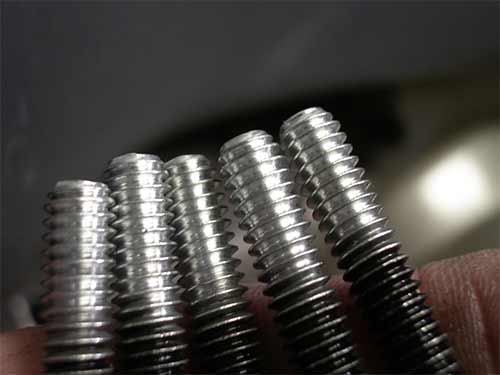 The factory recommends red loctite on these screws but that seems overkill so I use blue loctite instead. It's made for 1/4" screws and I've never had one loosen up, plus they will be easier to remove in the future. These screws should be torqued to 120 inch pounds in a strange sequence outlined in the manual. Once they are done then install your shifter clamp. Be sure and install the rubber washer behind it: 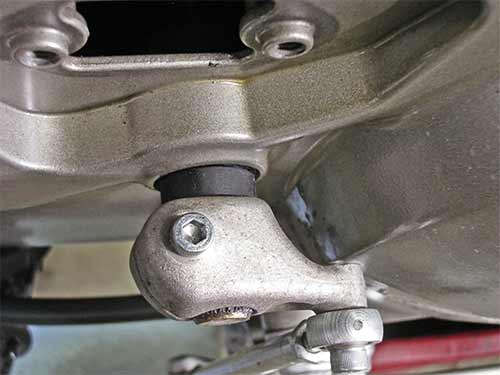 At this point you can install the clutch cam assembly. When you set the clutch they say to turn the screw in until you feel resistance. I found that once you feel resistance I could still wiggle the hook, where it attaches to the cable. I held just a slight pressure on the screw while I wiggled it and the screw went in a little more. When I couldn't wiggle it anymore I figured I was bottomed out. I made my 1/4-1/2 turn out from this position. Set your chain tension as you normally do, add oil and reassemble the rest. I unfortunately don't have any oil here but my brewing/racing partner, the amsoil dealer, has a case waiting for me but I won't be there for a couple of days so I won't be able to give a ride report for a little while. It will give the loctite time to harden anyway! Speaking of liquids, it's time for homebrew!   I hope this helps those wanting to do this mod. If you have any questions either post them here or send me a PM. Prost!  (Message edited by tootal on December 29, 2008) (Message edited by tootal on December 29, 2008) | ||
Tipsymcstagger |
Tipsy: My understanding is that the part number I listed above was for only the Pre '08 XB12 engines. Looks like on the '08+ the sprocket comes with/on the rotor. This is a quote from the AS page: "The 08+ sprocket comes WITH the rotor as well, the sprocket isn't available separately." Thanks for the info guys. Tipsy | ||
Maximum |
Excellent!!! Thanks for taking time to post the pictures...I think I might be ready now (minus the money and time).  | ||
Gamdh |
Great write up!! Just thought I'd point out one thing... When I replaced my stator.. I found this.. http://www.badweatherbikers.com/buell/messages/3842/148030.html?1145912069 The previous torque spec on the crank nut was 190-210 Ft-lbs. The new Torque spec is 240-260 Ft-lbs. (Message edited by gamdh on December 29, 2008) (Message edited by gamdh on December 29, 2008) | ||
Werewulf |
if you buy the sprocket from the factory, i think they all are coming with the rotor attached now.. i bought one for my 06 and 08 and both had the rotor as a unit... | ||
Thrux181 |
I have a 08. I ordered the parts from Blue Ridge HD. They came in cheaper and charged me 2 hours labor. Which was good because I don't have a garage and with my beer timing it would have taken me much longer. For those not sure about the change; If you want more control off road, do it. If you want more engine braking, do it. If you want it to hum and not work at it,do it. Feels more like my Thruxton than my Electra Glide now. Tootal, that must be the Afterstock you were telling us about in Georgia. Looks TASTY. | ||
Tootal |
Indeed it is. Will be brewing chocolate stout and Rye Ale over new years. As far as the torque spec. I got that out of my Uly service manual so maybe they use a different thread on the XB's than on the tubers. A finer thread would require less torque. My manual is newer than the service bulletin. | ||
Hughlysses |
Tootal- I hate to tell you this, but you missed an update on the crankshaft sprocket nut. The factory upped the torque recommendation to 240-260 ft-lbs for all pre-08 XB's after the nuts started working loose on some bikes. See bulletin here: http://www.badweatherbikers.com/buell/messages/327 77/155801.jpg The 08/09 bikes use a bolt vice a nut on the crankshaft and less torque is required. | ||
Tootal |
Thanks Hugh. I don't think I'll go back in since red loctite on clean surfaces works pretty good. If it loosens up I'll know it, I've heard that sound before! 250 foot pounds can be attained by putting your foot 15" down the breaker bar. That is if your 200 pounds. Here's how to figure it: 12"/your weight * 250= inches down the bar. | ||
Thrux181 |
Thanks Tipsy, I should have done this earlier. These are the numbers from the work order for the conversion of a 08. Rotor & Sprocket Assy- 30018-08 Chain,Primary,XLBuell- 40005-57B Spacer,Sprocket Shaft- 40254-02 Screw,Hex Flange 505- 4589 Tootal, hope you're going to make it to March Madness | ||
Maximum |
"12"/your weight * 250= inches down the bar" Thanks for the formula Tootal...I thought that I was going to need to gain another 50 pounds before I do my install! | ||
Maximum |
So based on my research, these are the items needed (when ordering the sprocket/rotor kit) for a 2006-2007 Uly: 32493-02B - ROTOR & SPROCKET ASSY 40005-57B - CHAIN, PRIMARY, XL/BUELL 25378-02B - GASKET, PRIMARY COVER 25377-03A - GASKET, CLUTCH COVER 34819-03A - GASKET, INSPECTION COVER Am I missing anything? | ||
Tootal |
Maximum, Just stand in the same spot while holding a bag of cement. Wait, that's 90 lbs. extra. Never mind. Thrux, I need to check the dates and see if my vacation lines up. I have to pick all my 2009 vacation back in September. If it works out I'll try and be there. Just hope the weather is better than in the past. tootal (Message edited by tootal on December 29, 2008) | ||
Hmartin |
If you don't have a big enough torque wrench then use this method...Do this at your own risk. Don't tell me I didn't warn you! If you're pushing straight down and not bouncing your weight on the bar, you can only push about 85% to 90% of your body weight (the rest is needed for balance). So, perhaps you could modify the equation to [12"/(your weight * 0.88) * 250 = inches down the bar] as a safer and less painful option for those who save their homebrew for last (or those who work while staring at your garage posters). | ||
Rotorhead |
Tootal, Thanks for the post. I did my swap today and it was a bear trying to get the freaking sprocket off mine. I gave up all my home garage tricks to "make a press" around 6pm to find everyone in town was closed, except for the Pepboys. The guys were about to shut the doors as I stepped in. They pressed it out for nothing. Pretty keen if you ask me. Then I had to stay and explain what I was doing because they were all harley riders. Got it all back together by 7:30 and test drove it around. Also had to check out the lighting. I mounted a CR front on the ULY!!! Another post later when I get it cleaned up. Your going to really dig the low end on it. I was able to idle smoothly up a slight grade at 1000 RPM and 7.6 MPH on the GPS. I got a hell of a deal off Ebay from Wolfridgerider on a used chain and sprocket. I can say it was the best bang for the buck mod I've done to my ULY to compliment my chain final drive. I think I was really due for a primary chain (1,300 miles shy of the big 50,000). I noticed it shifted without the clunk and found N easy. I have adjusted my old chain and would be by the book but for some reason the new set up is like new tight and smooth. Get some oil and enjoy. For me it's back to the ECMSPY and tune for the new gearing! It will be back in the 70's tomorrow. Got to love AZ. | ||
Hangetsu |
Do any of you who have done this mod have anything to say about it's effect on highway cruising ability? I only have 2K or so on my 09 at this point, but I have had it in a fairly large variety of environments. I can honestly see how this mod wold greatly improve the off road drivability and great mid-range enhancement in the twisties, but I do log some pretty serious highway time and long road trips are definitely on the horizon. On the highway I like to maintain a pretty constant 80mph and at that speed the Uly's humming at a very pleasant 4000RPM and I still sometimes find myself trying to grab a 6th gear. I'm just not sure if I want to cruise that engine for extended periods at any RPM higher than that. Of course the engine can handle it, but will I start losing fuel economy and riding comfort by doing this. From all that I am hearing, I like the sound of what this mod is doing for the low to mid-range scenarios, but I don't want to sacrifice that higher speed cruising ability. Any comments? |