| Author | Message | ||
Red_chili |
Just thought I would bring this up for those who have repeated intake leaks (and for posterity). I received my order of Genuine James Intake O-Rings last night (AFTER I did my wife's intake seals of course) and I expected the same design as H-D with different material. Not so at all. It still uses a compression design to seal around the intake tube, but unlike the H-D design it also has a flange of silicone material to seal against the cylinder head. This baby WILL seal, and the flange of silicone material means that it can tolerate some misalignment. I wish my camera was back from being repaired and I could include a picture. But I do look forward to using these on my next intake leak. I expect it will be my last leak. Source thanks to Tootal: Go to http://www.denniskirk.com and put in part number: H26-258. Include the dash and it will come up. Only $5.00 a pair. Plus shipping. Treadmarks endorsed too.  If anyone has another source, post up! Note to Anony... is it possible to consider this design for OEM, from the factory use? It would save a lot of warranty claims and most likely pay for itself many times over. | ||
Djm |
Thanks Red. As one of those having problems, please let us know how it goes. I am having my seals replaced under warranty, but if the trouble persists I will try the ones you are recommending. | ||
Treadmarks |
 | ||
Snowscum |
I guess I will be the first one to try them? | ||
Red_chili |
Nope, Treadmarks is a James frequent flier. He told Tootal, and Tootal told me. Or something like that. As straightforward to replace and inexpensive as these seals are, I wouldn't even put in a warranty claim, I'd just do it. Stealin' deal at twice the price. | ||
Red_chili |
"straightforward to replace" Let me clarify. You need to sacrifice a virgin 1/4" ball-end allen and cut it off so you can drive it with a 1/4" drive 1/4" socket + extensions + wobble joint, and buy a 1/4" drive 1/2" socket with built in universal from Sears. I'm serious about the 1/4" drive, there is very little room and not enough for a 3/8" drive. THEN it is "straightforward to replace". No fuel draining needed; just depressurize the fuel line via your favorite method. (Message edited by Red_Chili on September 03, 2008) | ||
Snowscum |
Yea I was in there trying to get standard tooling to work. Gota chop up some work tools. Lol Or bring down a 12 pack eh? | ||
Red_chili |
 Sure. Preparation for hunting might compete though. Sooner rather than later, I'd say. The only problem with coming down to my place is, we have to wait around so Mr. Bill doesn't singe his digits. That could harsh my mellow. | ||
Snowscum |
Hahahaha! Well I could give it a go. Had trouble with it even staying started this afternoon. After it warmed up it ran pretty good. Heading down to Bandimere. I said what the hell and am taking her. No I am not going to race. Just observing a friend. Gaskets show up Monday! Oh hunting we will go  | ||
Tootal |
THEN it is "straightforward to replace". No fuel draining needed; just depressurize the fuel line via your favorite method. I didn't mess with the fuel rail. I pulled the injectors out, and all the other connections, and just layed them to the side. I also just cut off an allen wrench real short and cut the long end to 2.5". I had to take a little off the manifold itself to make room for the James 0-rings. Since they wrap around the end they may not fit if your gap isn't big enough. If you have to cut them down try taking 1/32" off on a side and keep it even, measuring to the edge of the machined area. Basically, you shouldn't have to force it in there to line up the screws. tootal | ||
Snowscum |
Take a little off? Like with a dremel tool? | ||
Red_chili |
Eww. I'm not liking removing material. Especially since it is a sealing surface. Kind of a one-way trail. But if I were to remove material it would NOT be with a Dremel. Hand file and ultra flat surface to check. Maybe the hobbyist belt sander/disk sander I have, that would be quicker and maybe flatter. At least the silicone will be tolerant of some misalignment. I wonder what Treadmarks did? (WWTD) I didn't pull the injectors, I just released the fuel line connection. Slick connector they use. there was very little pressure as the XB9 had been sitting for a bit. Well, as luck would have it, my idle went all to heck on my XB12X with around 9K miles last night. This was especially noticeable since hitherto it has idled VERY sweetly. I started it up, and it chugged along at 500RPM and slowly died. WHAT the... ? Sounded more like a single than a twin. Of course this was in front of my buddies at the 4x4 club meeting.  Lucky my friend wasn't there, who warned me Buells were unreliable. Lucky my friend wasn't there, who warned me Buells were unreliable.  He rides a Ducati; his fixes are somewhat north of $5.00. LOL He rides a Ducati; his fixes are somewhat north of $5.00. LOL When I got home after turning up the idle, I hooked up ECMSpy and expected to see some hellacious EGO correction numbers. Nope, AFR at 90 (kinda wondered about that, expected ~100), and EGO corr. at nuttin'. Huh. Since I am out of carb cleaner (been using a lot of that lately  ) I tried brake cleaner. Sure enough, the idle changed when I squirted near the front intake. That explains why the EGO was normal and why it sounded like a single - the rear intake is probably fine and the ECM didn't know any better with the O2 on the rear. Learned something about diagnosis. ) I tried brake cleaner. Sure enough, the idle changed when I squirted near the front intake. That explains why the EGO was normal and why it sounded like a single - the rear intake is probably fine and the ECM didn't know any better with the O2 on the rear. Learned something about diagnosis. So it looks like I WILL get to try out those James O-rings sooner than I thought. My wife refers to me as a MacGyver, I have spares for everything on my truck and I am working on the Buells. Worked out great this time! (Message edited by Red_Chili on September 04, 2008) | ||
Froggy |
 | ||
Red_chili |
 The procedure is in the SM. My camera is in Timbuktu... getting fixed, I am told... | ||
New12r |
Snap on makes a long ball end socket that will take the allen bolts out in a matter of moments. | ||
Red_chili |
Mmmmm... that would be ideal. Well, I dove in last night and got her done, I guess it took me three hours interrupted by cooking dinner and cleaning the kitchen and watching McCain. I didn't really have much problem getting it back together, as I learned long ago that holding your tongue just right makes all the difference. There seems to be a LOT less room to work with on the 12 vs. the 9. I did use a trick to line the last bolt up: I used a dental mirror to see which way it was misaligned, and I had a brass rod I used to gently tap it into place from the top. Worked great. The hardest part was getting my *&%&*^* Craftsman 1/4" allen in the thing; I swear that allen is .253, not .250, and for most of it I used a 6mm which is a sloppy fit but good enough until you start torquing. For that I used the 1/4" allen from which I removed .003", more or less . Bet I wouldn't have to do that with a Snap-On. I really like how the James seals affect how things tighten up. With the H-D seals, you tighten until it bottoms; with the James seals it gradually gets tighter, so you know you are compressing the seal quite a bit. I don't see how them babies CAN leak. The service guy at Rocky Mountain H-D likes them, but they don't stock them, but he said if I asked them to it would go a lot further than him asking. Good guys over there. | ||
Tootal |
Your right about taking the material off, it needs to be done evenly and a dremel would be a real pain. I used a belt sander but I scribed a line where I wanted to be and sanded up to the line then finished with a smooth file, filing in two different directions to keep it flat. Patients is the key here, it's not so easy to put material back on!! | ||
Snowscum |
So your talking about taking material off the gaskets them selfs? | ||
Tootal |
No, off the intake/throttle body. Here's some pics of a Harley intake, it's the same o-ring used on the Buell. Here is the James 0-ring: 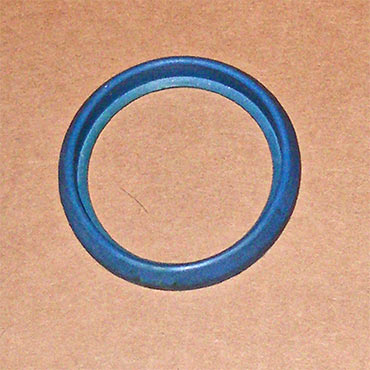 Here is the manifold. I've put black arrows pointing at the area you might need to sand/file off. The green arrows are where you want to measure to in order to keep it even all the way around. 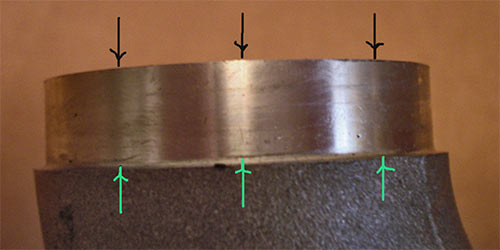 Here is the o-ring on the intake: 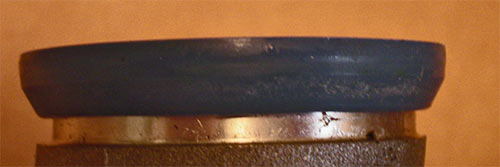 The best way is to put the new o-rings on the manifold and slide it into place. Install the bolts into the flanges and see if they start easily. If they won't start then they are not aligned, therefore you'll will need to take a litte off at the black arrows. Measure your stock dimension and take .020" to .030" off each side and try it again. You should not have to force the intake into place in order to line up the bolt holes. Both sides should also be kept equal. If you don't have the tools or time to do it right please get a hold of someone who does. I don't want anybody trying this unless you have some talent in this direction. If you take too much off by using a chainsaw then you'll need a new throttle body, so proceed with caution. YOU HAVE BEEN WARNED!! | ||
Snowscum |
So the orings are thicker than the stock ones if your obviously have to take stock off the intake. Is this the right? | ||
Bosh |
So Red Chili, Did you have to shave off any metal to get things to fit?? | ||
Tootal |
So the o-rings are thicker than the stock ones if your obviously have to take stock off the intake. Is this the right? The stock ones don't have the lip that goes between the manifold and the head therefore if your gap is too small they won't fit. That's one of the advantages, they keep your manifold centered and from touching the head. | ||
Red_chili |
I didn't have to remove any material from the intake manifold/ TB. I put it in place (kinda tight space in which to work on an XB12, not as easy as the XB9, but just keep persistent and hold your tongue just right) and I used the hex bolts to make sure where I was (you leave them partially threaded in, per the SM. They locate the assembly when you are putting it back together). The rear allen bolt threaded right in (I did the rear first due to less accessibility). Then the front allen bolt hole was not aligned and pushing down on the manifold would not do it, so I used a dental mirror to see in which direction it needed to move. I used a long brass rod from the top, with a gentle bit of hammer tapping, to move it down into place (not much force needed). Then the front allen bolt threaded right in. Tightening them down, you can really tell the difference between the H-D and James parts. The H-D seal just starts to compress when the bolts bottom. The James seal starts compressing much earlier, and you sandwich the blue 'wrap-around', and by the time you bottom the fasteners that baby is SEALED. | ||
Bosh |
"I didn't have to remove any material from the intake manifold/ TB" Sweet! I was hoping you were going to say that. Thanks. | ||
Snowscum |
Mine are in. Not sure yet if their doing their job but will report back later. Did not have to remove material. Just had to JIMMY the intake to get that back cap screw to start.Used a flat head screw driver and did the pry down in that one spot in the picture.  A shot of the front seal that I think that was leaking. 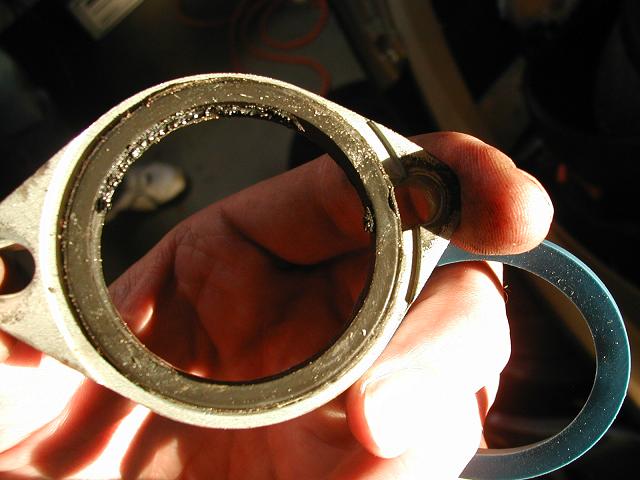 | ||
Snowscum |
A picture of the rear.  | ||
Red_chili |
Those are ugly looking H-D seals. What is all that crap on them? That does NOT look right. I'm thinking the shop that replaced them the first time... did something awry. You can sure see why the James seals seal better. | ||
Snowscum |
Did yours look that bad? Either they were pinched or lots of heat melted them. | ||
Red_chili |
Mine looked much better than that! They were kinda stiff though. I don't think heat melted yours. Looks like they got pinched somehow between the TB manifold and cylinder head? Can't tell. Or is that grease or something? | ||
Snowscum |
Its part of the gasket. Nice huh...... |